
Are you looking for a fun and creative way to decorate Easter eggs this year? Look no further than your kitchen pantry! In this blog post, we’ll show you how to use coffee filters and watercolors to create beautiful and unique watercolor Easter eggs designs. Whether you’re a seasoned artist or just looking for a fun activity to do with the kids, this tutorial is perfect for all skill levels. So grab your aprons and let’s get crafting!
Here is a watercolor project that kids of any age will enjoy making and they will end up with some beautiful Easter decorations. One of the best things about this project is you don’t have to spend a lot of money on expensive watercolor paper… heck, if you drink coffee, you might already have a bunch of the main material on hand.

Coffee Filter Watercolor Easter Eggs
Here are the materials you will need:
- Watercolor paints
- Paint Brush(s)
- Container for Water (brush washing)
- White Coffee Filters
- Paper Plates
- Napkins or Paper Towels
- Scissors
- Tagboard or Cardstock for Egg tracing template
- Ribbon
Begin by flattening out (1) coffee filter. Place it on a paper plate. Start painting the coffee filter by either blocking out colors or painting designs. One tip is to use a fair amount of water with your paint so that the colors bleed/blend together. You’ll get softer more pastel looking colors and softer edges between colors. Another tip is to not use too many colors on 1 filter or the colors will end up bleeding together and turning brown. Finally, if your paper plate gets too much water pooling up in the middle, lift up the coffee filter and blot the paper plate as dry as you can. Then put the filter back down on the plate and resume painting.
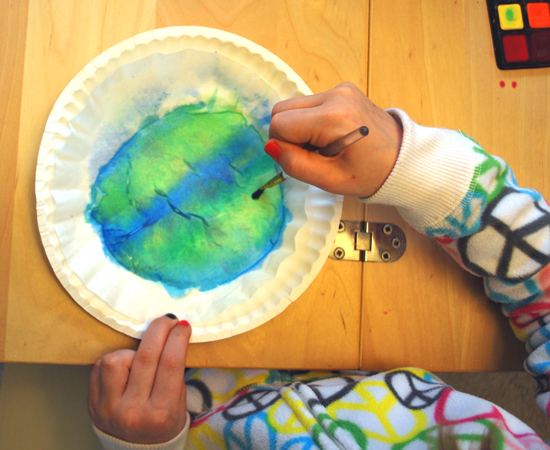
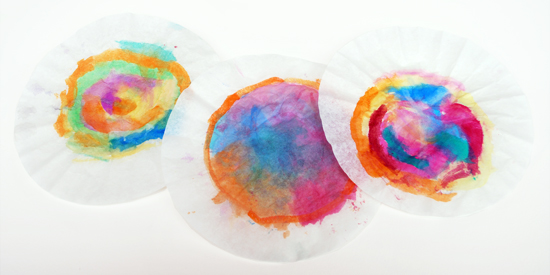
Don’t over work them though. If your kids are like most, recognizing when they should be done with one will probably be the hardest part. Go ahead and make a lot of these! They are fun, pretty quick to make and if you see one get to a point where you think your child should be done with it, just replace it with a new filter. They won’t complain so much or feel like they are missing out on painting time. As the filters are finished, lay them down flat to dry. I sped the drying time up by drying them with a hair dryer. As the filters dry, the colors will set & become more vibrant.
While the painted coffee filters are drying, cut an egg shape out of cardboard, tagboard or cardstock. This will become your tracing template. Take your finished template and have your child place it in the colored area where they want their final egg to be. Have them trace around it…
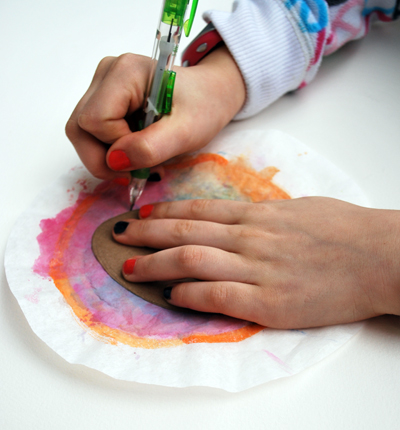
and cut the egg out. You can either have your child cut on the inside of the traced line, or they can trace the cut out onto the back side of the coffee filter so the pencil line doesn’t show on the front. Here is one of our finished “dyed” eggs.

The finishing touch is to take your ribbon and make some little bows. I hot glued these to the tops of the eggs, and a piece of ribbon to the back for hanging.
I also took some of our finished eggs and hot glued them to one long piece of ribbon to make an Easter bunting decoration.

My girls absolutely loved making this project, and now that we have so many of these beautiful water colored Easter egg decorations all over our house, it feels like Spring has really Sprung!
Creating watercolor Easter eggs using coffee filters is a fun and creative way to decorate for the holiday. The unique texture of the coffee filters allows the colors to blend together beautifully, resulting in stunning and vibrant designs. Whether you choose to use traditional Easter colors or experiment with a bold and modern palette, these watercolor Easter eggs are sure to impress. So gather your supplies, get creative, and don’t forget to let us know in the comments how your watercolor Easter eggs turned out! We would love to see your beautiful creations. Happy Easter!
FAQs
Q: Can you use watercolors on Easter eggs?
A: However, painting hard-boiled eggs with watercolors can result in genuine pieces of art! You can now make amazing drawings, patterns, and settings quickly and easily using watercolor paints and watercolor pencils.
Q: What is the point of coloring eggs for Easter?
A: Eggs were painted and decorated to signify the conclusion of the period of penance and fasting because it is believed in Christianity that they were once a banned meal during the Lenten season. Eggs were colored crimson by early Christians in Mesopotamia to resemble the blood that Christ spilt at his crucifixion.
Q: What is Easter egg painting called?
A: These Ukrainian Easter eggs, referred to as pysanky, are adorned using the wax-resist (batik) technique. These beautifully decorated eggs can also be found throughout much of eastern Europe. The designs used to decorate them are frequently derived from Slavic folk art.


