
Introducing Straw Weaving Bracelets! These unique accessories are a stylish way to show your support for sustainable agriculture. Made from straws, these bracelets are easy to make and perfect for eco-conscious collectors. They can be personalized with your favorite sustainable agriculture message, or worn as a simple fashion statement. Whether you’re a student interested in learning more about sustainable agriculture, or just want to make a statement, Straw Weaving Bracelets are the perfect accessory for you!
Growing up during the summers, I would make tons of bracelets. There could never be enough string or yarn around the house. It was one of the best summer boredom busters for me. My daughter is now showing the love for making bracelets too, so, I introduced her to these Straw Weaving Bracelets . Straw weaving is a great way to make bright chunky bracelets that are perfect for the kids. The best part is that they are inexpensive to make.

Straw Weaving Bracelets
Here’s What You Need For Straw Weaving:
- Straws
- Scissors
- Yarn in Different Colors
- Tape
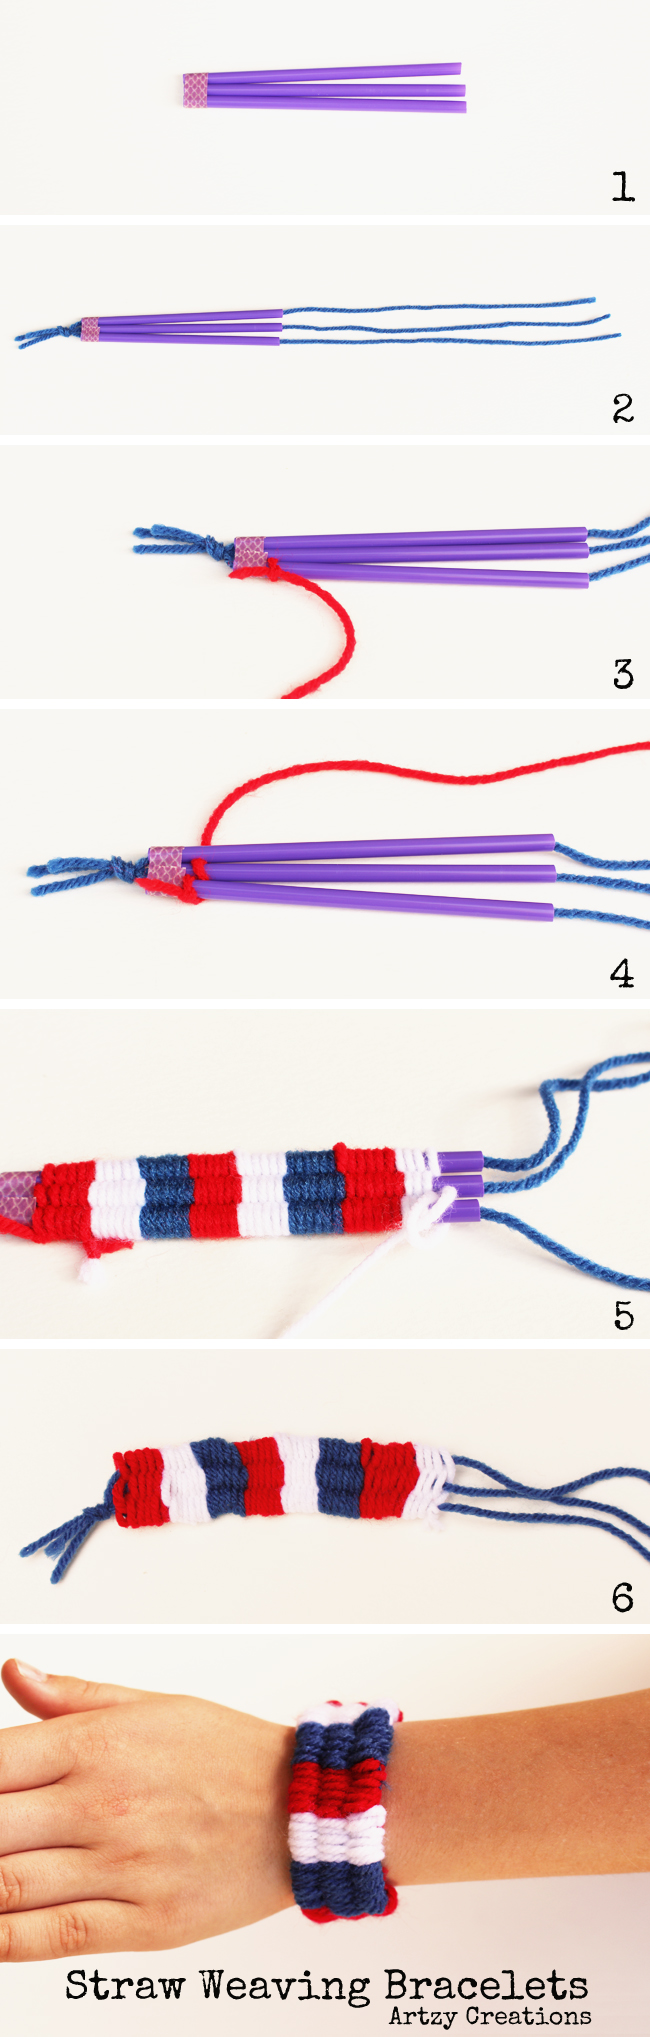
Step 1: Decide how wide to make your bracelet 3, 4, or 5 straws wide. Cut the straws 5″ in length. This length of straw works well for my daughter who is 9. If you have a child making this that might have a larger wrist, increase to 6″ or 6.5″. Tape the ends of the straws together to hold them in place. Step 2: Cut three pieces of string that are roughly double the length of the straws and thread each string through a straw. At one end, tie all three strands together in a knot like seen above. Step 3: Choose a color of yarn that you would like to begin weaving with. Tie it to the first straw. I always double knot mine to make sure it’s going to hold. Step 4: Begin weaving in an under & over pattern. Over the first straw, under the next, back over the next. You get the idea. When going in the opposite direction, make sure to do the opposite pattern of the one before it. After your band of color is the thickness desired, tie on your next colored piece of yarn and continue. Step 5: When you get to the end of the straws, wrap the yarn around the end of the straw and make a loop. Pull the end of the yarn through the loop to make a knot. Step 6: Pull this tight and double knot it to tie it off. Carefully, push your weaving up to expose the straws and begin to slide the straws out untill they have been removed. Push the weaving together and straighten it up as needed. Tie it onto your wrist and trim the excess yarn.

So easy and simple! Yet, it will literally keep your kiddos occupied for hours.
If you are not good at weaving yet, we have listed several designs in the article that are suitable for beginners. Not only do we provide instructions but also tips. You can also use them to gift handmade jewelry or get a simple bracelet on your own.
We love all kinds of crafts and this one seems easy enough to pull off! Click here to know more about straw weaving bracelets!
FAQs
Q: How do you weave a straw bracelet?
A: A straw bracelet is a simple but elegant way to show your support for conservation and sustainability. The weaving process begins by cutting long, thin strips of yarn using a sharp needle. You then tie these strips together in various patterns, making loops as you go. When you’re finished, the ends of the strands are tucked into the folds created by the loops and it is ready to be worn!This project can be completed in just a few hours with some basic sewing skills, so it’s an ideal project for beginners or anyone who wants to learn new techniques. Assembling a straw bracelet doesn’t require any special tools or materials and can be done almost anywhere – perfect for eco-conscious consumers!
Q: What is straw weaving called?
A: Straw plaiting is a method of manufacturing textiles by braiding straw and the industry that surrounds the craft of producing these straw manufactures. Straw is plaited to produce products including straw hats and ornaments, and the process is undertaken in a number of locations worldwide.
Q: What is straw weaving art called?
A: Braiding is the American term for plaiting, which is pronounced with a short a. Weaving wheat is the term used by contemporary straw workers. There are thousands of different plaits that come from the straw hat industry and other braiding-related sectors.


