

If you are looking for a stylish and natural way to add some personality to your home, this is the perfect project. Are you looking for an Easter craft that keeps your kids attention the whole time? With this bunny craft, simple craft, you and your kids will make super cute fuzzy pom pom chicks that sit in a colorfully painted egg carton nest. It is a fantastic easter craft idea for kids that cracks everyone up!
Supplies Needed for Your Easter Pom Pom Chicks
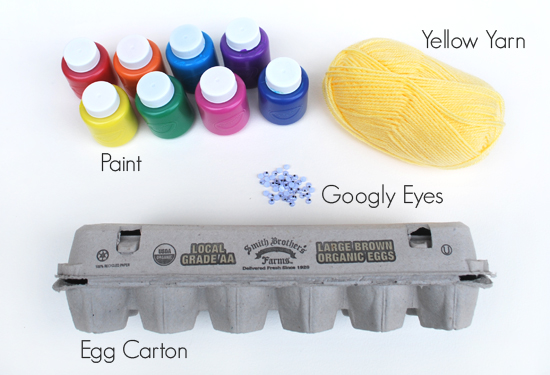
To make pom pom chicks, you won’t need expensive equipment. You can find most of these at a craft store or around your house.
- Yellow Yarn (or any colour you like for your chick)
- Cardboard egg carton
- Paint and brushes
- Orange paper or orange felt for the beak
- Googly eyes (small size works best for both chicks and bunnies)
- Glue (Tacky glue or a hot glue gun for adults)
- Scissor (sharp enough to cut yarn)
- Sturdy cardboard or a plastic card (like an old gift card) to wrap the yarn around
Step-by-Step Tutorial: The Nest
I recommend you start with the painting of the cardboard egg carton nests so that while they dry you can make pom poms. Begin by cutting the lid off of the egg carton. SAVE it! It makes the perfect paint palette that you can easily toss when you’re finished painting. I love easy clean up.
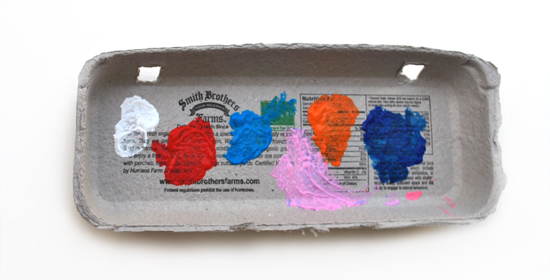
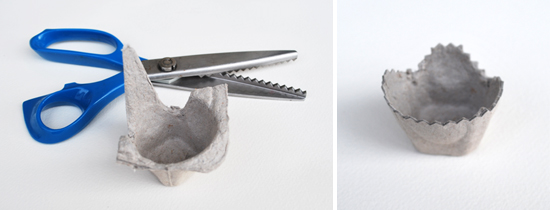
Next, separate the egg cups by cutting them apart. Once the cups are separated, go back with pinking shears to get a nice finished edge on the “nest” for the bunnies. Cut these so they look like a broken egg shell.
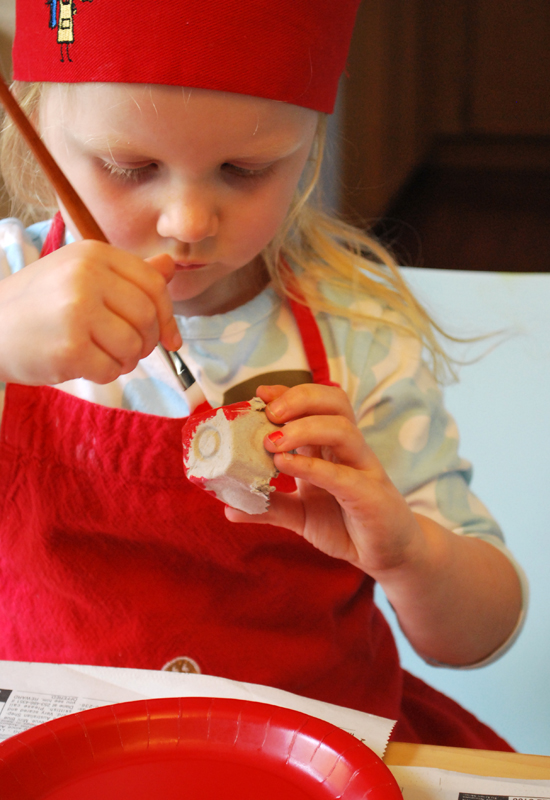
Now it’s time to paint! Let your child decorate these cups any way they like. My daughters painted everything from stripes to rainbows, including bunnies. This is a fun and easy craft for kids that allows for total creativity with your bunnies.
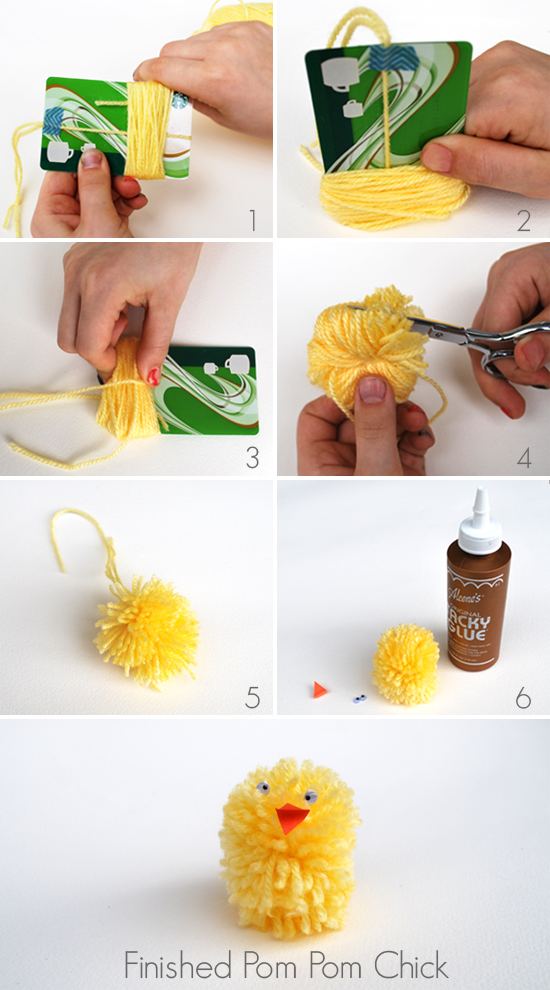
How to Make a Pom Pom Chick
While the nests dry, let’s make a pom pom chick. You don’t need a special pom pom maker; we used a plastic card! You can also wrap yarn around two fingers if you prefer the manual method.
Step 1: Wrap the Yarn
Cut a single piece of yarn about 6 inches in length. Tape this piece lengthwise onto your card. Then, take your bunny template. yellow yarn ball and begin wrapping it around the card widthwise. Wrap it about 100 times. The less you wrap it, the more sparse your final pom poms will be. This was great counting practice for my 4-year-old.
Step 2: Tie the Knot
Carefully slide the yarn bundle towards the end of the card. Use the piece of yarn you taped down earlier to tie a piece of yarn tightly around the middle of the bundle, which can include both chicks and bunnies. Tie a double knot to secure it. This holds your pom pom chick’s body together.
Step 3: Cut the Loops
SLOWERLY slide the entire bundle off the card. Once off, pull the knot as tight as possible. Take your scissor and carefully cut through the yarn loops on both sides. Be sure not to cut the center piece of yarn holding the whole thing together.
Step 4: Trim and Shape
Now you have a shaggy ball. Use scissors to cut and trim the ends of the yarn to give him a haircut and shape him into a round, fluffy chick.
Step 5: Add the Face
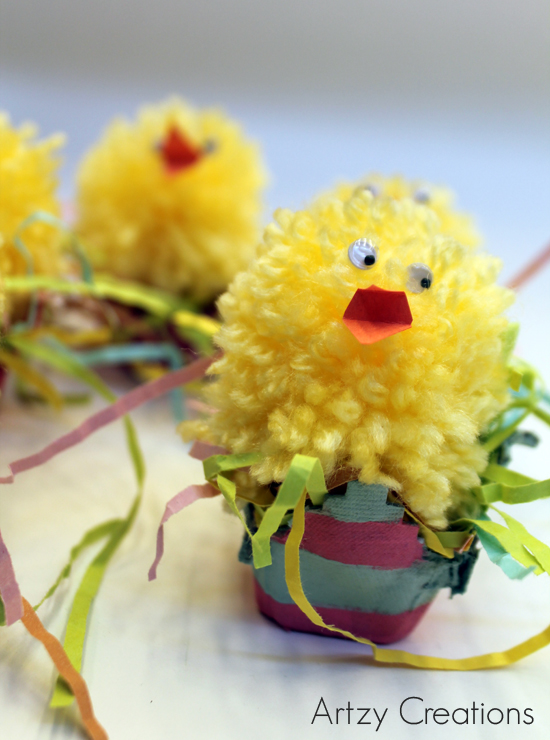
Cut a small triangle from orange paper for the bunny ears. beak. Leave enough surface on the back side so it is easier to glue in place. When the beak is attached, it helps you locate where to put the googly eyes. Put a dab of hot glue (or craft glue) on the back of the eyes and stick them onto the chick.
My girls cracked up because the eyes looked so funny on the fluffy yarn, but that made it all the more fun. You can even cut small felt pieces for little wings if you want to get fancy!
The Final Assembly
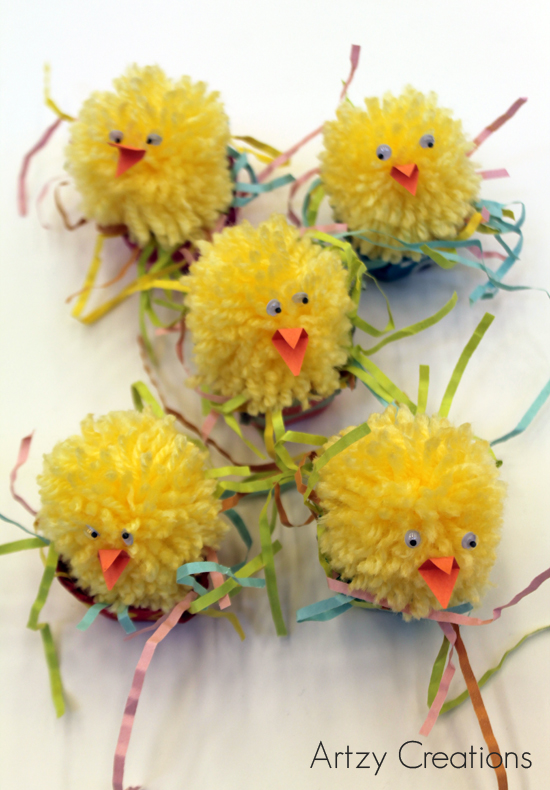
Once the paint on your egg nests is dried and your bunny decorations are ready, little pom pom chicks are finished, simply place the chicks in their egg shell nest. We added a little paper Easter grass to tie them all together. These make adorable decorations for Easter or spring.
I hope you enjoy making this cute easter craft and I hope you laugh as much as we did. It’s not only fun making them, but my girls still giggle every time they look at these cutest little chicks and bunnies. If you enjoyed this, check out other DIY projects for more inspiration.
Conclusion
Learning how to make pom pom chicks is a wonderful way to celebrate the season. Whether you use them as table decorations or hidden surprises, these pom pom chicks for easter are sure to delight. Gather your kids, grab some yarn, and start creating your own fuzzy flock today!
FAQs
Q: What are pom pom chicks and why are they a great kids craft?
A: Pom pom chicks are small, fluffy bird figures made by wrapping yarn into a pom pom and adding simple features. They make a fantastic kids craft because they’re an easy pom pom project that requires minimal special tools, encourages fine motor skills, and kids will love decorating them for spring craft or classroom activities.
Q: How do you make the pom pom for cute pom pom chicks around your fingers?
A: A simple method to make the pom pom is to wrap a piece of yarn around your fingers or a small cardboard ring many times, tie it in a knot in the middle with another short piece of yarn, then cut the loops to form the fluffy shape. For an easy pom pom chicks version, use yellow yarn and trim the bottom of the pom pom to flatten so the chick can sit upright.
Q: What materials do I need for an easy DIY pom pom chicks project?
A: You’ll need yarn (yellow for chicks), scissors, glue, small felt pieces for beaks and feet, and safety eyes or small beads. You don’t need special tools—just yarn around the center, a piece of yarn around to tie off, and basic craft supplies. This approach follows many red ted art style tutorials but is even simpler for young crafters.
Q: Can young children make pom pom chicks without help tying knots?
A: Yes—kids can make pom pom chicks with adult supervision for the steps that require firm knotting. After you wrap yarn around your fingers and slide it off, use a second piece of yarn to tie it in a knot or knot around the middle. Adults can tie the tight knot while kids hold the pom pom steady, then children can trim and decorate.
Q: What’s the best way to secure the bottom of the pom pom so the chick stands?
A: To make our pom sit flat, trim the bottom of the pom pom slightly to create a flat surface for the bunny. You can also flatten and glue a small felt circle to the bottom or add a tiny base. Tying the yarn around the center tightly and trimming evenly helps the chick and bunny balance better.


