
Succulent initial wreath is one of the most elegant and easy to make floral arrangements. This flower arrangement can be done in a few simple steps, and doesn’t require any advanced gardening skills. Plus, it’s a great way to show your love for someone special! If you’re looking for a romantic gift that’s sure to impress, check out this succulent initial wreath tutorial.

Image Source
Succulent Initial Wreath
This idea came about when I wanted to make something for my sister for her birthday. My mom, sister, and I all really like plants, especially succulents. So, I thought how great would it be to make her a succulent
wreath
that is her last name’s initial that she could have for her patio.
Here’s What You Need:
-
1 Large Bag of
Spanish Moss
- Floral Wire
- Floral Pins
- 1 Sheet of Peg Board
- Marker
- Jig Saw
- Scissors
I used pegboard for my letter shape because the succulents are a little heavy and the pegboard added neaded rigidity to the wreath. With the letter M, there were many straight edges and I just measured it out. Therefore, I didn’t need a template. However, If you want to do a letter like B or S or just don’t feel like measuring, here is what you need to do. Start by enlarging the letter of your choice by making an 11″ x 17″ copy at Staples, etc. you could piece together several smaller pieces of paper to get the size letter you want. Cut out the enlarged letter and tape it down to the peg board. Trace around the edges with a Sharpie marker. Then cut the letter out with a jig saw.

Image Source
The overall width and height of my letter M is roughly 16″ x 16″. and the letter is actually 3-1/2″ wide.
Next, take a piece of burlap and cut it to cover the back of the pegboard, and overlap the font of the letter. I did this because I didn’t want the peg board exposed on the back.
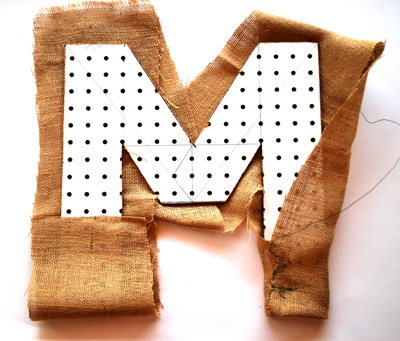
Image Source
I used a piece of floral wire to weave through the burlap to hold it in place. Take the floral wire and weave all the way around the letter. Pull it tight as you go. Make sure when interlacing the burlap that you go in about an inch or so. If you try to weave just the edges of the burlap, it will fray. I learned this the hard way!
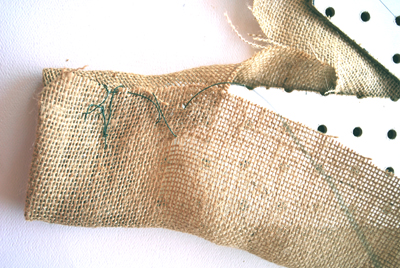
Image Source
Don’t worry about this looking pretty. It will be covered up by the Spanish moss.
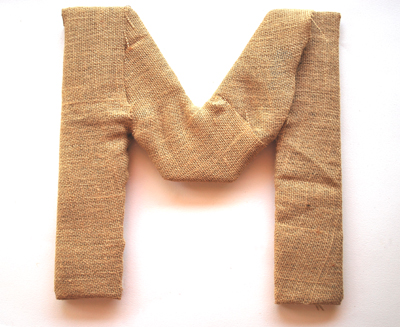
Image Source
Here’s what the back loos like after the burlap has been woven.
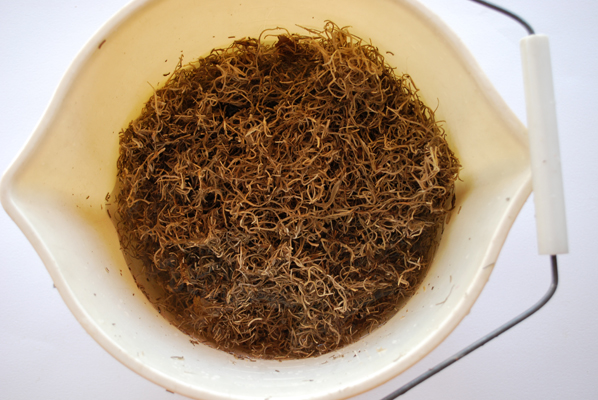
Image Source
Next, soak the Spanish moss for about 10 minutes.
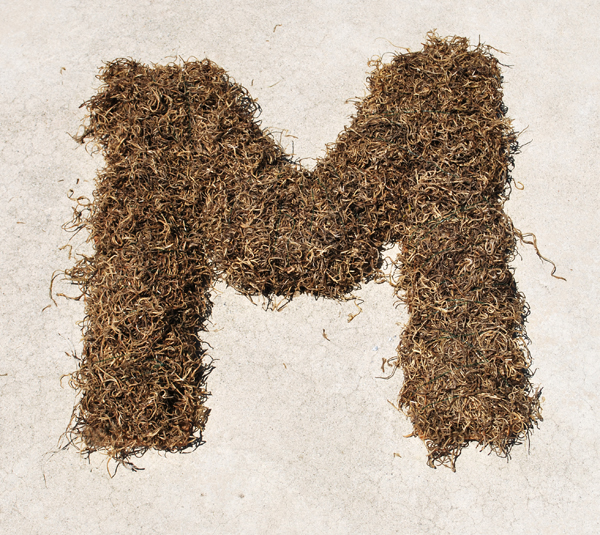
Image Source
Let the excess water drip off of the moss. Mound up the moss on top of the letter and wrap with the floral wire all away around the letter. This is how the moss stays attached to the pegboard letter shape. Here’s another tip… fish the wire under the burlap on the backside of your letter when you’re wrapping the moss in place. This way the wire will be hidden on the back side and the wreath will look a little more finished.
Collect a whole bunch of succulents. I have a lot growing in my yard so this was very easy. However, it did take more than I had expected! Also, cut the succulents a little longer than you think. It’s always easier to trim off the excess length when your placing them.
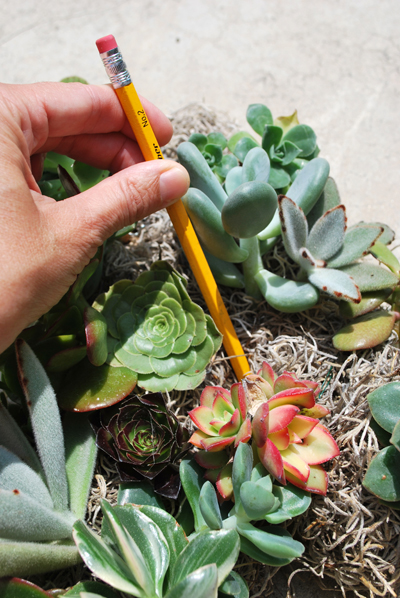
Image Source
Begin by taking a pencil and inserting this into the moss, and twisting it around to make a hole. I’ll be honest, this did not always work easily because the moss is pretty dense. Sometimes, I had to take my finger and tear at the moss a little bit to be able to insert the succulent.
Begin with your largest succulents first. Trim the succulent, and insert. Use a floral pin to keep the succulents in place. Sometimes I had to go through the succulent because otherwise it would not stay in place. Continue to add succulents until your initial wreath looks filled out.

Image Source
For the care of your succulent wreath. Morning light is always better for succulents. Let the wreath dry out completely… About 4 to 5 days. You be the judge. It will vary according to the climate, weather conditions, and location of your wreath. After the wreath has dried completely, give the entire wreath a good soaking. Rooting of your succulents will take place around 3 weeks or so. By 8 to 10 weeks, your succulents should be firmly rooted and your wreath will be ready to hang.
I Hope you enjoy this one of a kind succulent initial wreath. It will definitely be a conversation piece!
Enjoy!
While this initial wreath is as simple as it gets, it’s also a great way to explore succulent accents. Since the succulents are in different colors, they make for an enchanting centerpiece and can be kept forever with proper care.
Don’t forget to add more of them to your house if you like how they look together!
FAQs
Q: What was the original purpose of a wreath?
A: The word wreath is derived from the old English verb “writhen,” which meant to twist or writhe. The practise of hanging Christmas wreaths dates back to the Romans, who displayed wreaths on their doors as a symbol of their power and social standing.
Q: What is the most popular wreath size?
A: The normal wreath is 24 to 26 inches broad, which sits nicely on a door that is typically 36 inches wide.
Q: Where did the wreath come from?
A: Although it’s difficult to pinpoint exactly when wreaths came into being, it’s generally accepted that ancient Greece and Rome were where they were originally used. Depending on the materials used to make them and the recipients, wreath crowns and headdresses had various connotations in the middle times.


