Looking for a craft project that is fun, fast, and leaves you with something you can actually use? Duct tape is perfect for that, especially when you combine it with a classic, cheerful shape like a flower. These easy flower pockets are exactly the kind of project you can dive into on a rainy afternoon. They require just a few basic supplies, and the results are so satisfying. You get a colorful, useful little pouch that is perfect for holding small treasures, art supplies, or decorating a wall. This collection is full of bright ideas to get you started, from simple sunflowers to glittery petals, all using the magic of duct tape fabric.
Preparing Duct Tape Fabric Sheets For Construction
The fastest way to build a sturdy pouch is creating a double-sided non-stick fabric sheet. You start by overlapping strips sticky-side-up on your work surface until you have a solid rectangle. Flip it over and apply a second layer of tape, sticky side down, to sandwich the first layer completely. This technique gives you a clean, flexible material that will not stick to itself or your project.
Use a self-healing cutting mat as your work surface so you can press down firmly without damaging a table. Aim for your overlapping strips to cover about a quarter inch of the previous piece. Creating easy flower pockets becomes much simpler once you master this sheet-building step. This prevents frustrating gaps where small items can fall through your finished piece.
Selecting Contrasting Patterns And Texture Combinations
A bright neon petal against a metallic silver stem makes your design pop with no extra effort. Trust me, this high-contrast color combination is your secret weapon for a professional look. Patterned tapes add instant texture without needing you to draw a single line. Think polka dot petals on a solid green stem or striped leaves on a plain background.
The good news is you can layer different patterns as long as one color ties them together visually. When picking tape for your easy flower pockets, remember that high-contrast combinations give you instant visual appeal. Avoid using two busy patterns right next to each other, as the effect becomes messy. Your finished piece gains dimension when you pair a glossy tape with a matte finish for the leaves.
1. Geometric Sunflower Duct Tape Pocket – A Classic Design

Ever wondered how to make a cute, functional pouch that looks like a sunflower? This one surprised me because it uses basic shapes to achieve a complex look. You start by building a sheet of duct tape fabric for the pouch itself. Then, you cut geometric triangles for petals and a circle for the center to create that classic, cheerful flower design. It works so well because the geometric approach makes the sunflower motif achievable for any skill level.
You can absolutely personalize these easy flower pockets with your favorite duct tape colors, and they hold up great for storing small items. Trust me on this one, taking your time to lay the tape strips slowly ensures a smooth, professional-looking finish. A pro tip for crafting them is to use a metal ruler when cutting your petal shapes for perfectly straight lines. Isn’t it satisfying to end up with such a sturdy, pretty little pouch?
2. Miniature Daisy Patchwork Side Pouch – Perfect for Small Items

This one surprised me again because it looks complex but is built from simple shapes. You start by creating the daisy patchwork panel, which is the star of the show. Cut your fabric into small pieces for the petals and center, then use a consistent 1/4 inch seam allowance to sew them together onto a background square. Building easy flower pockets with patchwork panels takes a bit of patience, but watching the flower come together is incredibly satisfying. Isn’t it fun to see it take shape?
Once your patchwork is done, you assemble the pouch exterior, add a zipper, and attach a simple lining. It is a fantastic project for using up fabric scraps, and the result is so charming. The small size makes it perfect for holding your phone and keys, and the adjustable strap keeps your hands free. Before you tackle this, you will want to get comfortable with creative washi tape star crafts as they teach you the same precision with small pieces and patterns. Trust me on this one, pressing your seams after each step is the secret to a crisp, professional finish.
3. Layered Neon Rose Wall Pocket – Bold 3D Petals

Ever thought a rose could hold your stuff? This one does, and its bold 3D petals make it look like it is practically leaping off the wall. You will build it by layering neon duct tape petals onto a sturdy base, giving each one a little fold or curl before you attach it for serious sculptural impact. Trust me, that pop of dimension is what makes it feel like a real bloom, not just a flat cutout.
I love using a simple rectangular pocket shape here because it lets the rose be the star. Designing easy flower pockets for your walls becomes incredibly rewarding when you see those overlapping layers create real texture. You will want to press each layer down firmly as you work your way from the center outward. For a super smooth start, you can find a great tutorial on how to make a chapstick holder to get comfortable with basic construction first. Does that not feel wonderfully vibrant?
4. Polka Dot Tulip Storage Pouch – A Playful Spring Craft

Ever wondered how to make a little storage pouch that genuinely makes you smile? This one does it by combining a bright tulip appliqué with fun, scattered polka dots. You start by cutting your main fabric and fusing the tulip shapes in place with fusible web. Then, you either use a pre-printed polka dot fabric or add your own dots with paint. Storing your spring supplies in these easy flower pockets feels like a tiny celebration of the season. Sew up the sides, create a casing for the drawstring at the top, and you are done.
It works because you end up with a useful pouch that feels incredibly festive. I love how customizable it is. A key tip for beginners is to always pre-wash your cotton fabric before you start cutting. This prevents any surprise shrinking after your beautiful project is finished. When you are not using it for craft supplies, this pouch would be perfect for holding your materials for some fun tape art wall decorations. Does that not sound like a cheerful way to organize?
5. Holographic Lotus Flower Binder Pocket – Shiny and Functional

Who would have thought a simple binder pouch could be so dazzling? This holographic lotus version transforms a basic organizational tool into a personal art piece. The iridescent material catches the light from every angle, creating a beautiful, shifting rainbow effect right on your binder rings.
Slipping your easy flower pockets right into a standard three-ring binder takes only a second. You just match the pre-punched holes with your binder’s rings and slide it into place. I love how it instantly adds a layer of whimsy while keeping your loose notes, stickers, or small supplies neatly contained. It works because it makes staying organized feel like a creative act, not a chore. My top tip is to always verify your binder size and ring count before you start cutting. For a fun, complementary craft that shares this playful and colorful spirit, you could try making some simple pom pom paper flowers for your desk. Does that not look stunning?
6. Glitter Petal Heart Shaped Pouch – Sparkly and Sweet
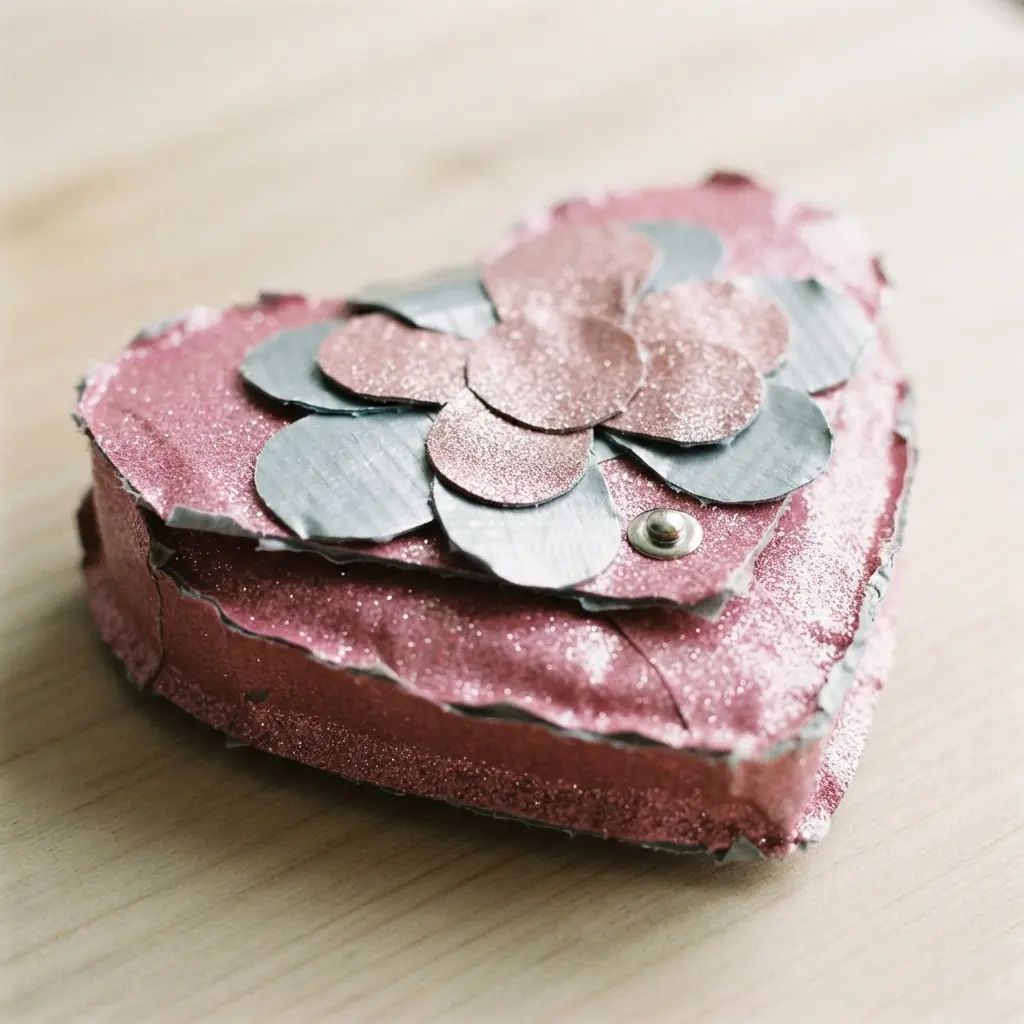
Ever wondered how to make a tiny treasure holder that looks almost too sweet to use? This one is a total charmer. You will start by cutting a sturdy heart shape from craft foam for a solid base. Cover it completely with your favorite glitter duct tape, smoothing it carefully to avoid any bubbles. Carrying your small treasures in easy flower pockets shaped like hearts feels wonderfully whimsical. The secret to a neat finish is taking your time when you attach the small zipper with more tape along the opening.
Then, cut small petal shapes from a contrasting color of tape and layer them around the edges for that lovely floral texture. I love how these details make the pouch feel special. This project works because it combines a universally loved shape with that irresistible sparkle. It is perfect for holding coins, lip balms, or even making a cute flower pot card craft extra special when given as a gift. Try it and feel the delight of creating something so sparkly and sweet.
7. Marbled Petal Spring Bloom Pocket – Unique Color Blends

This one is a personal favorite because it looks so intricate but is all about playful randomness. You create the marbled effect by layering small, torn pieces of different colored duct tape onto a non-stick surface. Let the pieces overlap and swirl organically, then press them down to form a unique sheet of fabric. Crafting easy flower pockets with this marbled technique guarantees a unique piece every single time.
Cut petal shapes from your marbled sheet and layer them onto a simple base. The magic is that no two blooms will ever be the same. It works because the marbling technique turns basic supplies into something that feels like custom art. Pro tip: keep your craft knife blade clean to make crisp cuts. If you love this floral style, you might enjoy our ideas for a creative rolled flower necklace as your next project. Feel that burst of springtime creativity.
8. Minimalist Lavender Stem Flat Pocket – Simple and Elegant

Ever wish your small essentials had a more elegant home? This flat pouch is a joy because its beauty comes from restraint. You start with a crisp, high-quality fabric like linen or organic cotton, then add a single, subtle lavender stem through embroidery or a clean print. Sew the simple shape, add a smooth zipper or snap, and you have a chic, functional pouch. Keeping your daily essentials organized in easy flower pockets with a minimalist design just feels more elegant.
It works because the design is purely about utility and a calm, natural vibe. For a neat finish, press every seam as you go. You can even use your leftover fabric to create simple origami bow designs for gift wrapping. The result feels so sophisticated and complete.
9. Zebra Print Hibiscus Accessory Pouch – A Funky Tropical Vibe
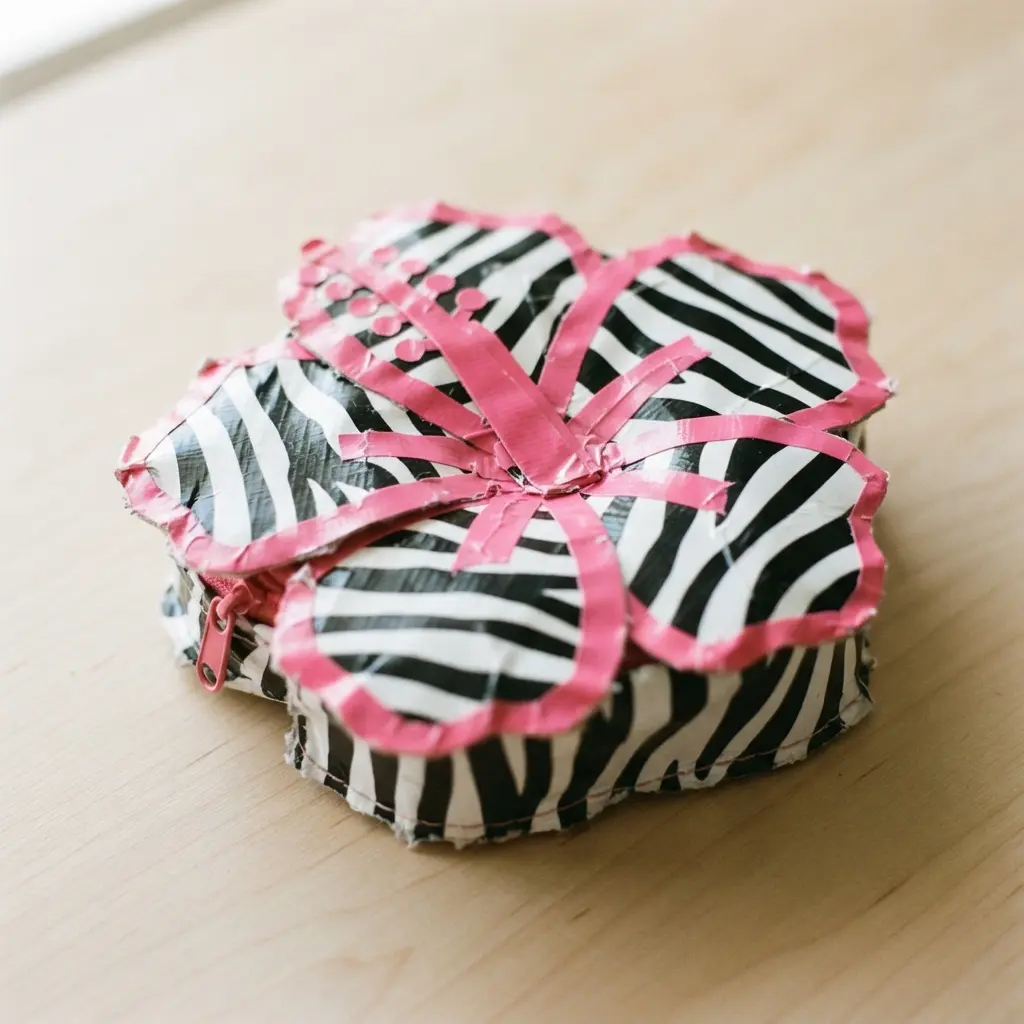
Who says a pouch has to be boring? I love how this one throws the rulebook out the window. You start with a bold zebra print fabric and then fuse it with oversized, colorful hibiscus flowers. The contrast is what makes it so lively. You cut your patterned exterior and a bright lining, then sew in a smooth zipper for a clean closure.
It is a simple flat shape, but the wild pattern does all the talking. Tossing your summer gear into easy flower pockets featuring wild prints instantly brightens your mood. This works because it acts as a genuine mood booster, turning a basic organizer into a cheerful statement piece. Pro tip: choose a decorative zipper pull in a hibiscus color for that final, funky touch. It feels like carrying a little piece of summer sunshine with you everywhere.
10. Metallic Gold Poppy Wall Organizer – A Gilded Statement Piece
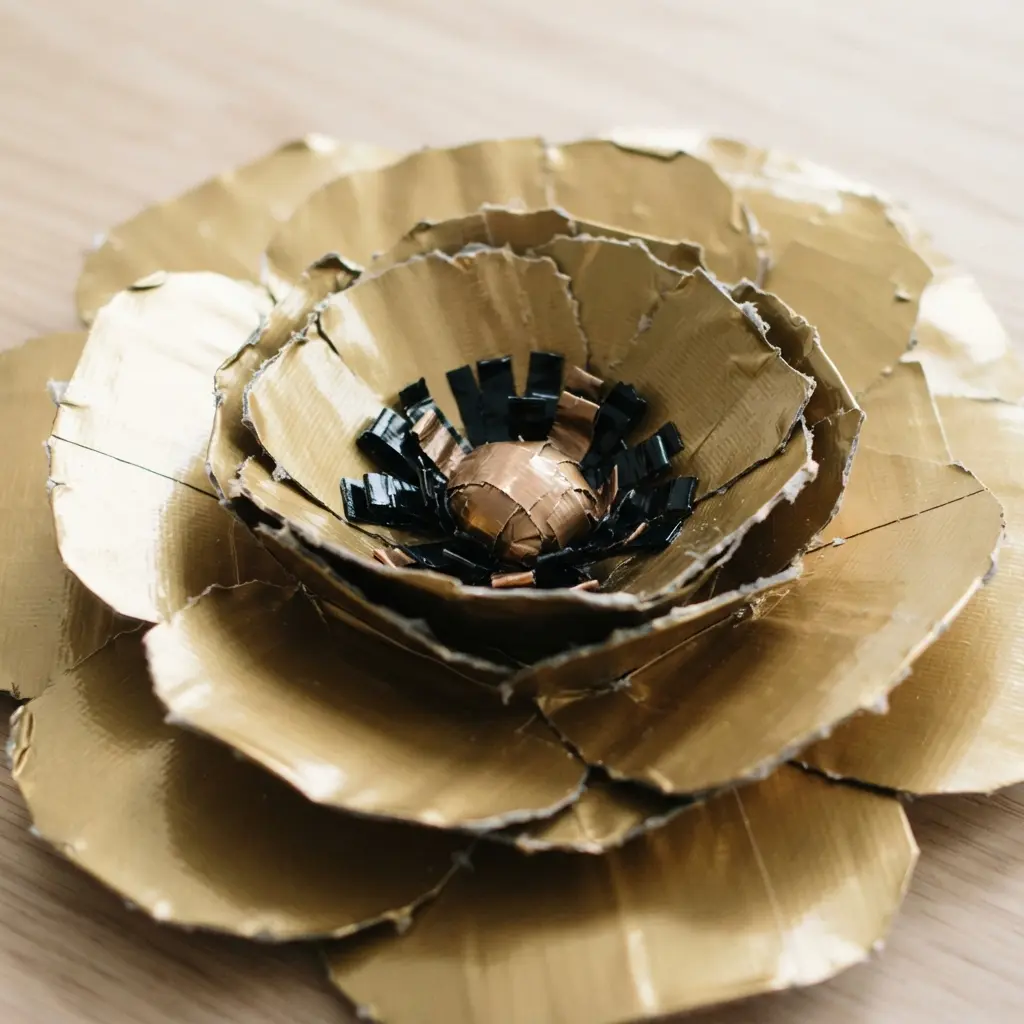
Who says functional storage cannot be stunning? This metallic gold poppy organizer proves it can be both. You will create a large, sculptural pocket from gold duct tape, forming deep, curved petals that hold mail, keys, or small tools. I love how the metallic finish catches the light, turning a simple wall piece into a true art piece. Displaying your keys and mail in these easy flower pockets gives your entryway a truly glamorous touch. The payoff is huge for such a straightforward project. Once mounted, it instantly elevates your craft room, making organization feel fun and stylish. Does that not look stunning?
This is a fantastic project to do with kids, as the shaping is simple and the result is so rewarding. For more family-friendly crafting ideas, especially as the seasons change, you can find a great collection of adorable spring crafts for preschoolers to try together.
Creative Ways To Display And Gift Pockets
Turn your favorite pouch into a unique gift card holder by slipping the card inside the petal flap. You will notice how the secure fold keeps the card safe while showing off your design. These holders also make perfect little desk organizers for paper clips or hair ties. Attach a loop of tape to the back and hang your creation on a pushpin above your homework station. Turning your completed easy flower pockets into personalized gift sets opens up endless creative possibilities.
For a friend’s birthday, fill the pouch with a few pieces of candy and a handwritten note. A quick swipe of double-sided mounting tape lets you stick the piece to a locker door or notebook cover. This final step transforms your craft from a simple project into a useful, customized accessory.
Conclusion
The best part about making these easy flower pockets is seeing a simple roll of tape turn into something so personal and useful. Each one has its own character, depending on the patterns and colors you choose. My advice is to start with the design that makes you smile the most because having fun with the process is what makes the final piece special. Once you get the hang of making duct tape fabric, you can mix and match these ideas to create your own unique versions. I hope this list gives you a great starting point for your next crafting session and shows just how versatile a simple material can be.
FAQs
Q: What kind of duct tape works best for these pockets?
A: Patterned or colored duct tape designed for crafts is ideal. It cuts cleanly and often has a more consistent adhesive. Avoid the heavy-duty silver tape, as it can be too stiff and difficult to manipulate for detailed floral shapes.
Q: Do I need any special tools?
A: You only need a few basic items. A good pair of scissors that tape won’t stick to is essential. A ruler and a cutting mat help make straight lines, but you can also use the edge of a book or a sturdy table.
Q: How do I make the pocket part stick closed?
A: You create the storage area by folding your duct tape fabric into a simple envelope shape. A small piece of hook-and-loop fastener or a magnetic snap works perfectly to keep it secure without tearing the tape.
Q: Can I wash a duct tape pocket?
A: Do not wash duct tape crafts with water or detergent. The adhesive can break down quickly. To clean, gently wipe the surface with a slightly damp cloth and let it air dry completely.
Q: How long does it take to make one?
A: Most of these projects take about 30 to 60 minutes. The exact time depends on the complexity of the petal arrangement. Simple designs like the sunflower or daisy are great quick weekend projects.