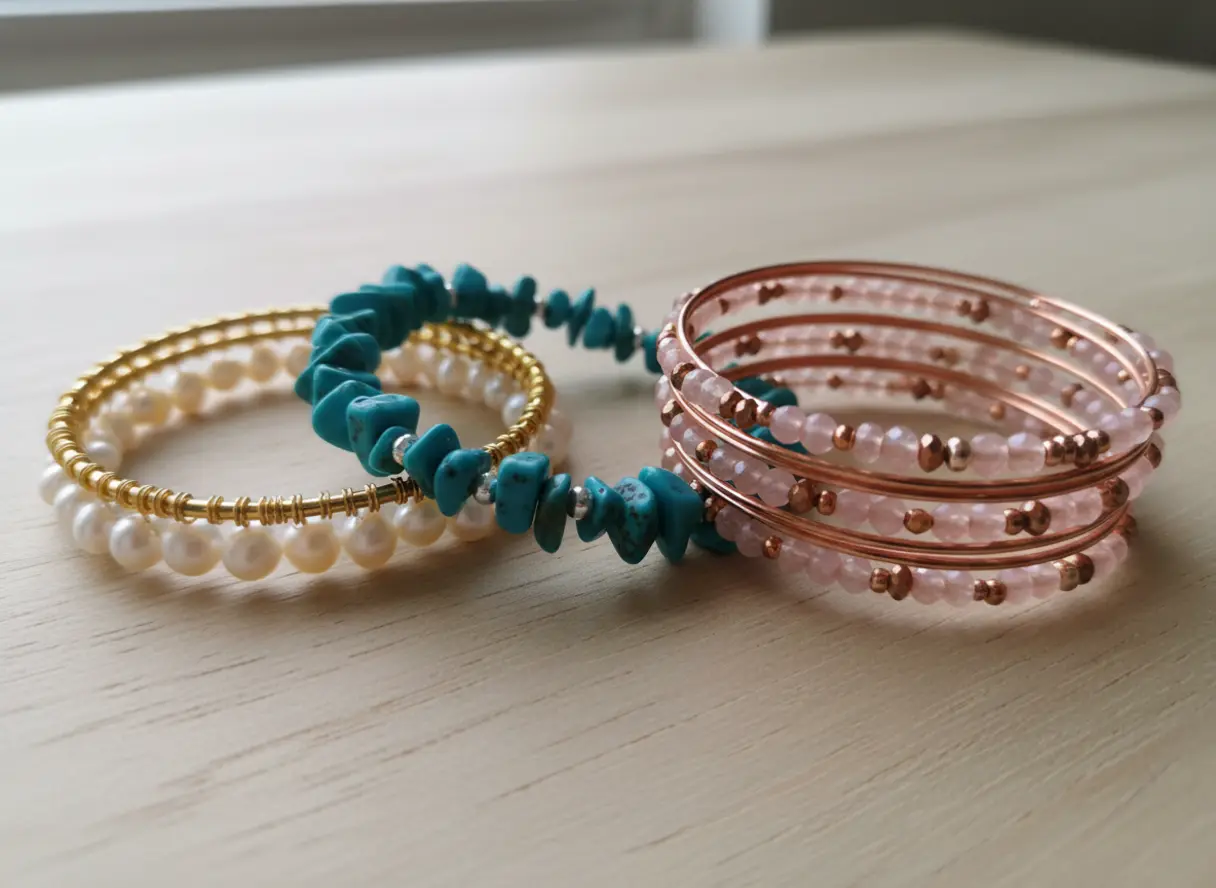
They combine the satisfying geometry of a rigid form with the endless creativity of bead selection. I’ve gathered ten designs that range from elegantly minimalist to playfully bohemian, each one achievable with basic tools and a bit of patience. Let’s find your next favorite accessory.
Selecting Correct Memory Wire Diameters for Wrists
When sizing your DIY beaded bangle bracelet, the standard memory wire diameter for most women’s bracelets is 2.5 centimeters. It fits an average wrist snugly without pinching, so you will not feel restricted during wear.
You can measure your own wrist with a soft tape and add about one centimeter for a comfortable fit. The wire’s tension will keep it secure, while a 2-centimeter diameter gives you that stackable feel for a looser, layered look. The wire’s inherent springiness is its best feature, so choose a size that holds its circular shape without needing to stretch it open too far on your arm.
A common beginner error is picking a diameter that is too large. It then creates unwanted gaps between your beads when the bracelet expands to fit.
Essential Wire Cutting Tools for Beaded Bangles
Starting any DIY beaded bangle bracelet project means standard jewelry pliers will be ruined if you try to cut memory wire with them. You need a pair of hardened steel wire cutters designed specifically for this tough, springy material. Trust me on this, the right tool makes a clean, flush cut that is safe to handle and easy to finish.
Without it, you risk a jagged end that can snag your clothes or scratch your skin. These specialized cutters have a reinforced jaw that won’t notch or dent, so they last for countless projects. Investing in this one tool from the start protects your entire toolkit and sets you up for professional-looking results every single time.
1. Gold Wire Wrapped Pearl Bangle
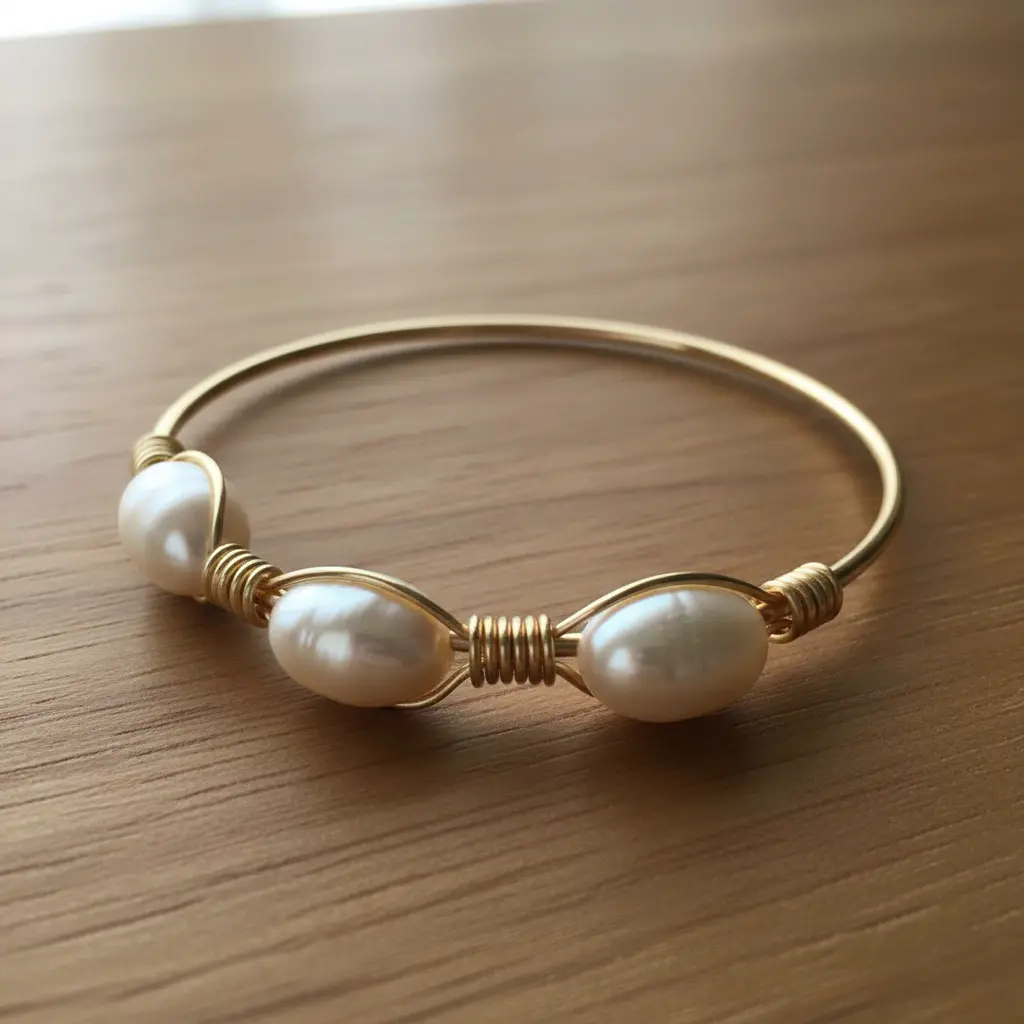
Ever wondered how to get that elegant, handcrafted look? This gold-filled wire wrapped pearl piece is your answer. You will start by shaping the material into a simple circle.
Then, you secure your chosen pearl by wrapping a smaller piece of wire tightly around it and the main base. I love this project because it looks intricate but is surprisingly approachable. The trick is practicing consistent tension on your wraps so the pearl feels rock-solid.
This design works so well because the combination of warm gold and soft pearl is timeless. Trust me, mastering this technique opens up a whole world of elegant wire wrapped jewelry you can make. It is a fantastic first project before tackling more complex designs like crafting jelly bean bracelets, as it teaches you the essential skills of shaping and securing.
2. Turquoise Stone Chip Bangle Design
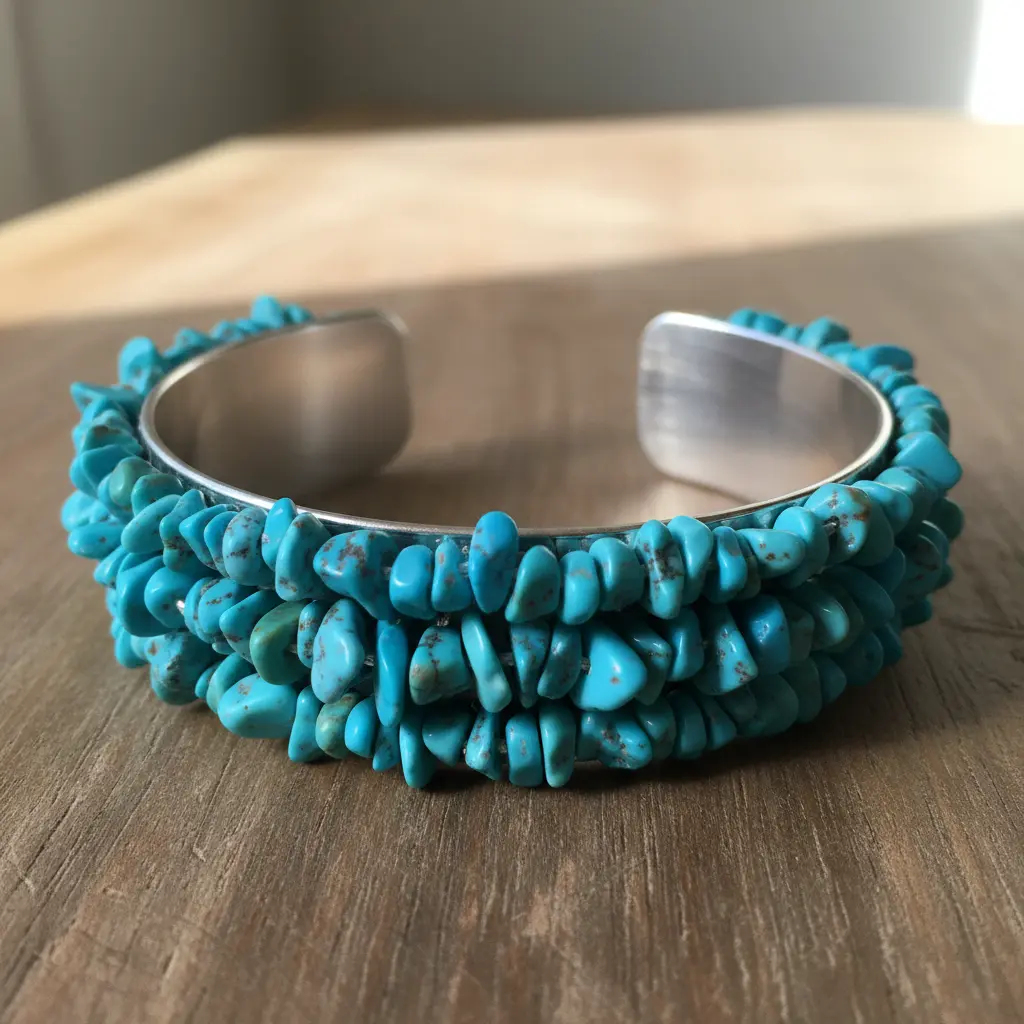
Ever wondered how those stunning, earthy bangles are made? This DIY beaded bangle bracelet celebrates the natural, irregular beauty of turquoise stone chips by wrapping them onto a metal base. You simply secure each unique piece with a snug coil of wire, creating a textured, bohemian look.
I love how the stone’s natural veining shines through in every single piece. It feels authentic and personal, not like something from a store. For a similar project that uses wire-wrapping skills on a different shape, look at the process for making gold beaded hoops. The key is to wrap each chip firmly so it does not move, allowing you to feel that rush of pride when you slip on your handmade creation.
3. Colorful Faceted Glass Bead Bangle
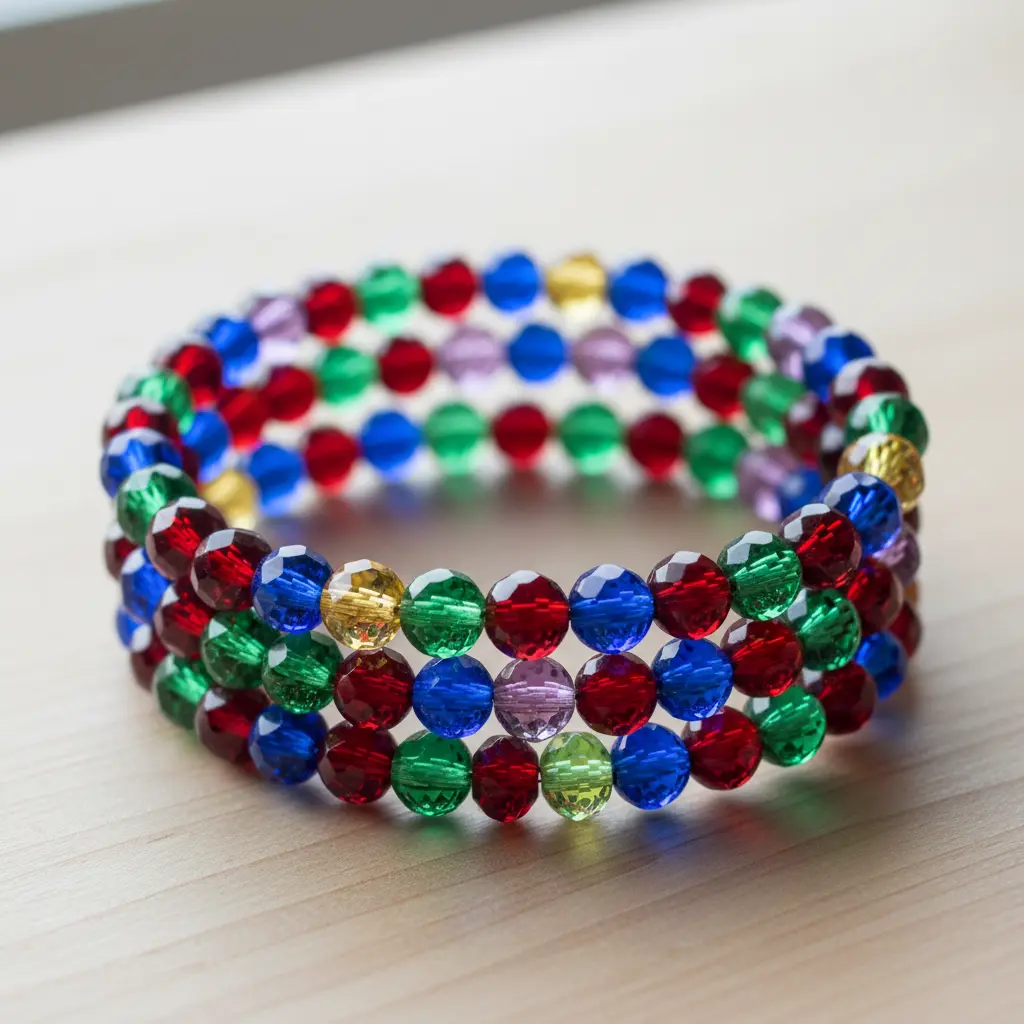
Ever wondered how those bracelets manage to look like expensive jewels without the price tag? This DIY beaded bangle bracelet is your answer. You start with a rigid metal bangle core and string on a rainbow of faceted glass beads. Their little flat surfaces catch every bit of light, creating a sparkle you will love.
It works because the structure lets you wear it alone as a bold statement or stack it for a fun, colorful look. Trust me, the key is using a strong core wire and securing the ends well so your beautiful beads stay put. If you enjoy planning your color stories, you will find the process of designing crystal jewelry uses a similar joyful mindset.
Feel proud when you slip on your finished, sparkling piece.
4. Minimalist Silver Seed Bead Bangle
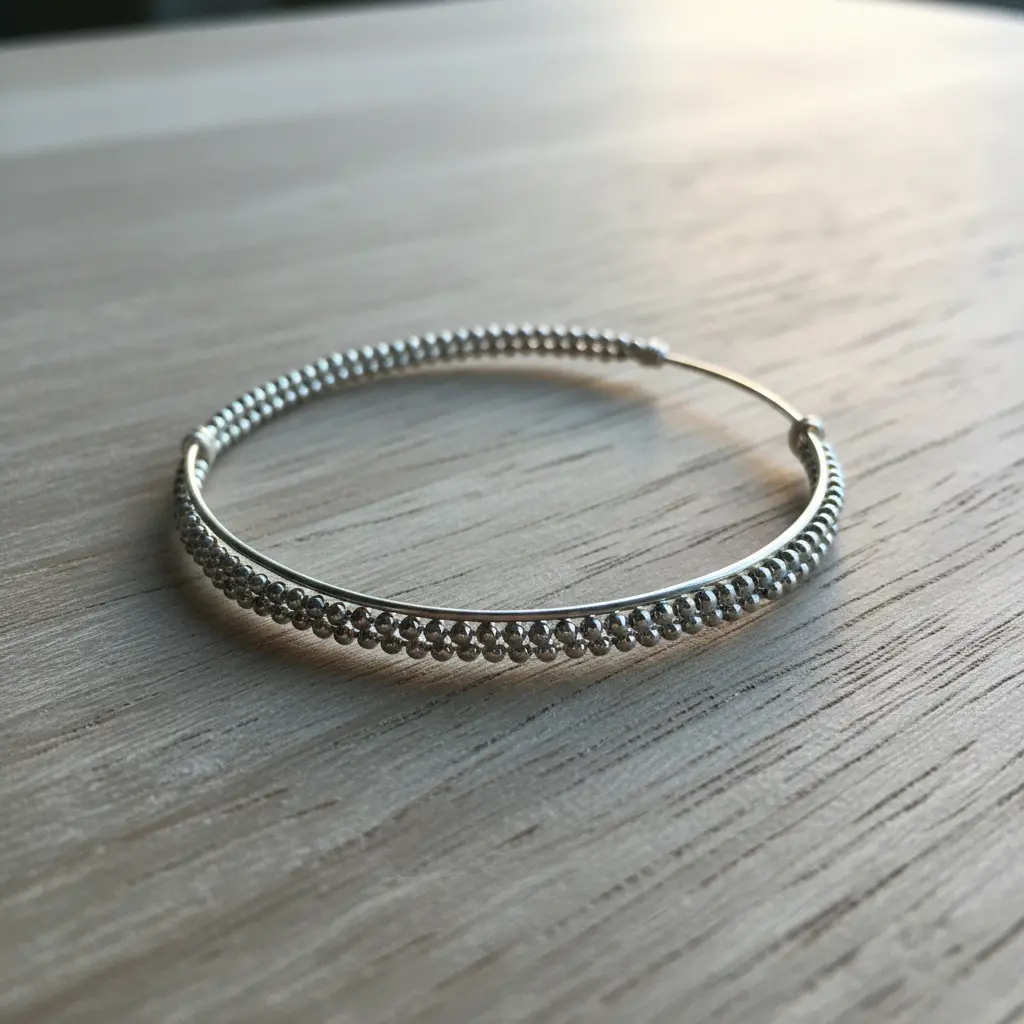
Ever feel like a piece can be both simple and incredibly elegant? This DIY beaded bangle bracelet nails that balance perfectly. You’ll start with a sterling silver wire base, shaping it into a smooth circle.
Then, carefully string tiny seed beads in a metallic or neutral tone onto a thin beading wire. The trick is wrapping that strand snugly around the frame, keeping your tension perfectly even. I love how the clean, single row of beads lets the quality of the materials shine.
A great next step for any jewelry maker is mastering creating a rolled flower necklace, as it builds on similar fine motor skills. Doesn’t that final, sleek piece just feel so satisfying?
5. Boho Style Wooden Bead Bangle
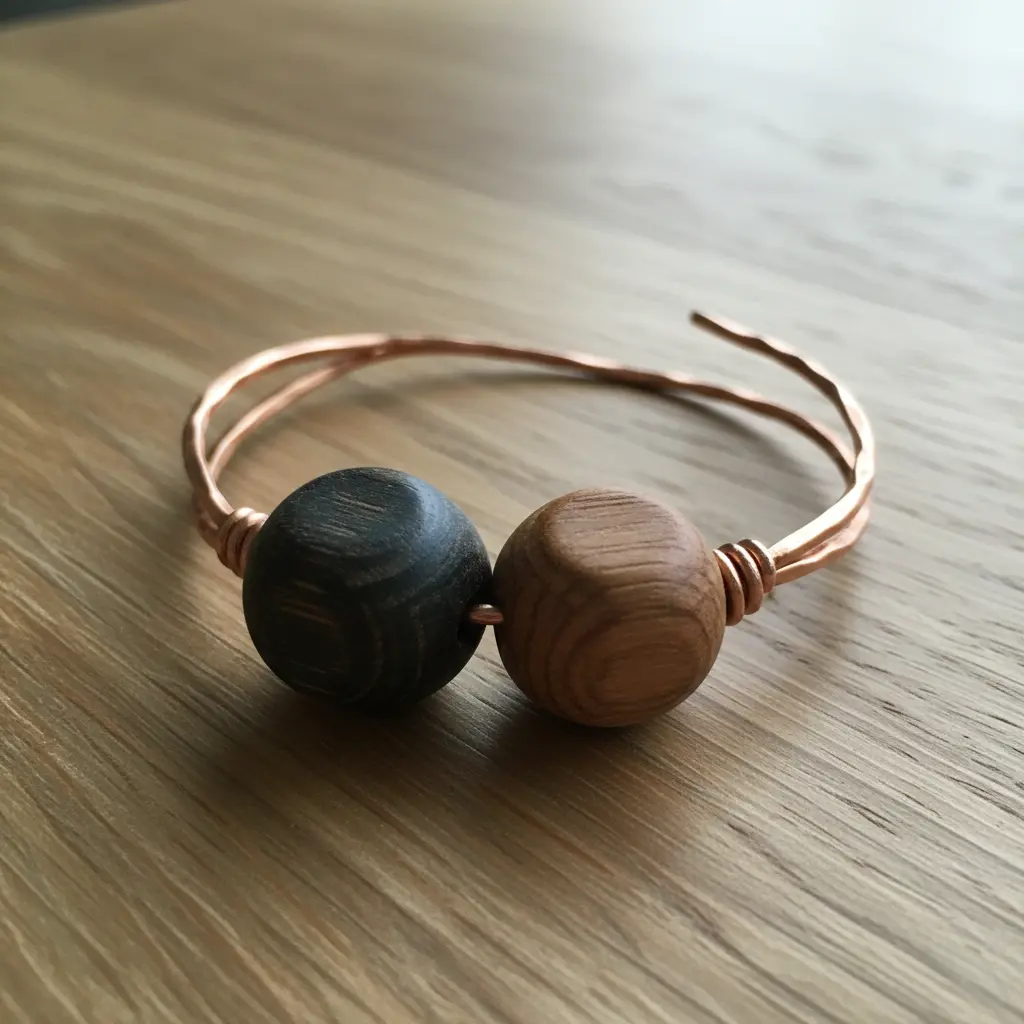
Who says building a DIY beaded bangle bracelet has to be complicated? This look is all about that earthy, handcrafted feel you get from mixing natural wooden elements. Start by choosing a variety of shapes and sizes, from round sandalwood to faceted acacia, and thread them onto a strong piece of elastic jewelry cord. Trust me, the quality of your cord is non-negotiable for a durable piece.
Incorporate small charms or a fabric tassel as you string to capture that free-spirited vibe perfectly. The joy here is in creating a piece that feels uniquely yours and stacks beautifully with others. After you tie a secure knot, reinforce it with a tiny drop of clear craft glue for absolute peace of mind. It is a wonderfully tactile project, and the natural tones pair beautifully with a simple feather earring tutorial for a complete, layered look.
6. Copper Wire Cluster Crystal Bangle
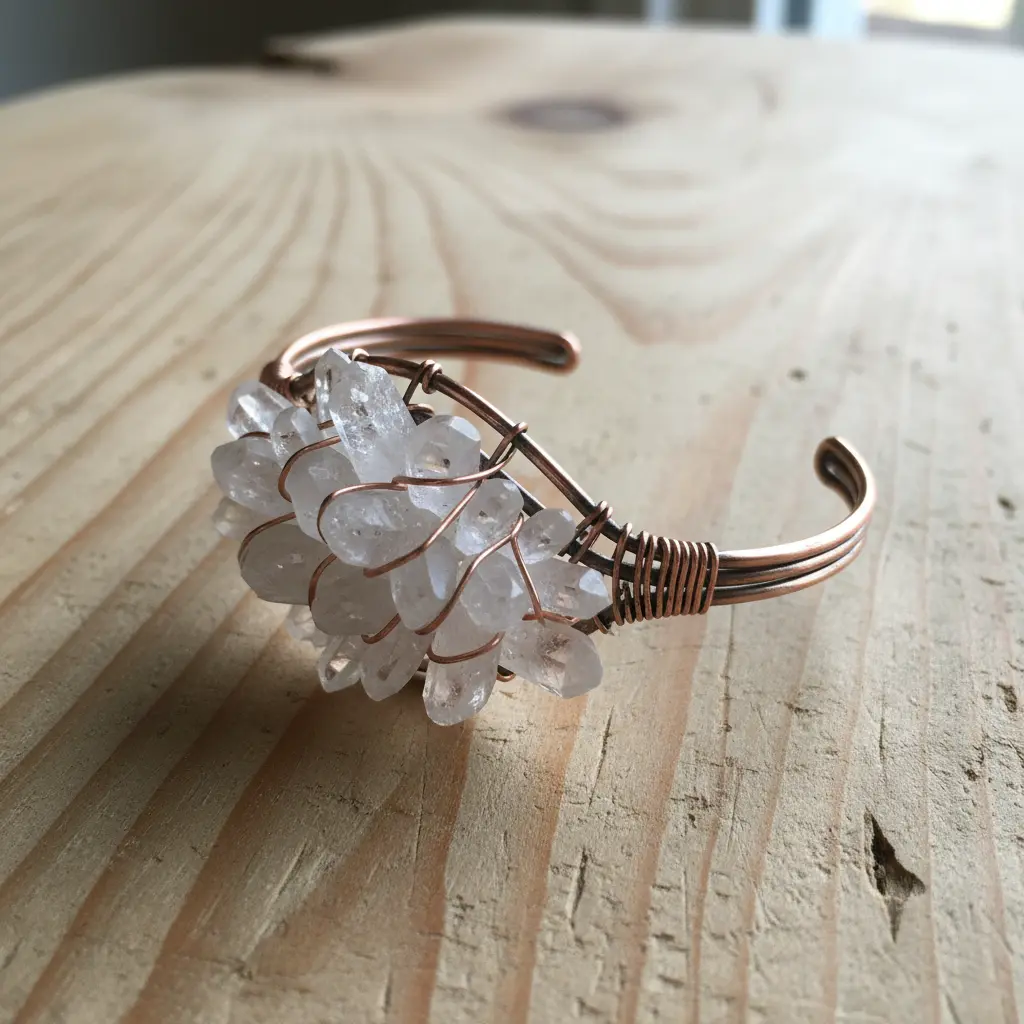
Who would have thought combining earthy copper with brilliant crystals could look so elegant? This DIY beaded bangle bracelet uses a sturdy copper wire base that you shape into a circle. Then you get to play jeweler by wrapping and grouping your favorite sparkly elements right onto it.
I love how the clusters create these little pockets of light and texture against the warm metal. It is a fantastic way to use up smaller crystal beads and make a real statement piece. The key is in the wrapping, where you use a much finer gauge wire to tightly secure each grouping to the frame.
Trust me, taking your time here makes all the difference for a piece that lasts. That secure technique is the same one you would use for crafting a heart necklace with wire and gems. Does that not look stunning?
7. Black Onyx And Silver Bangle
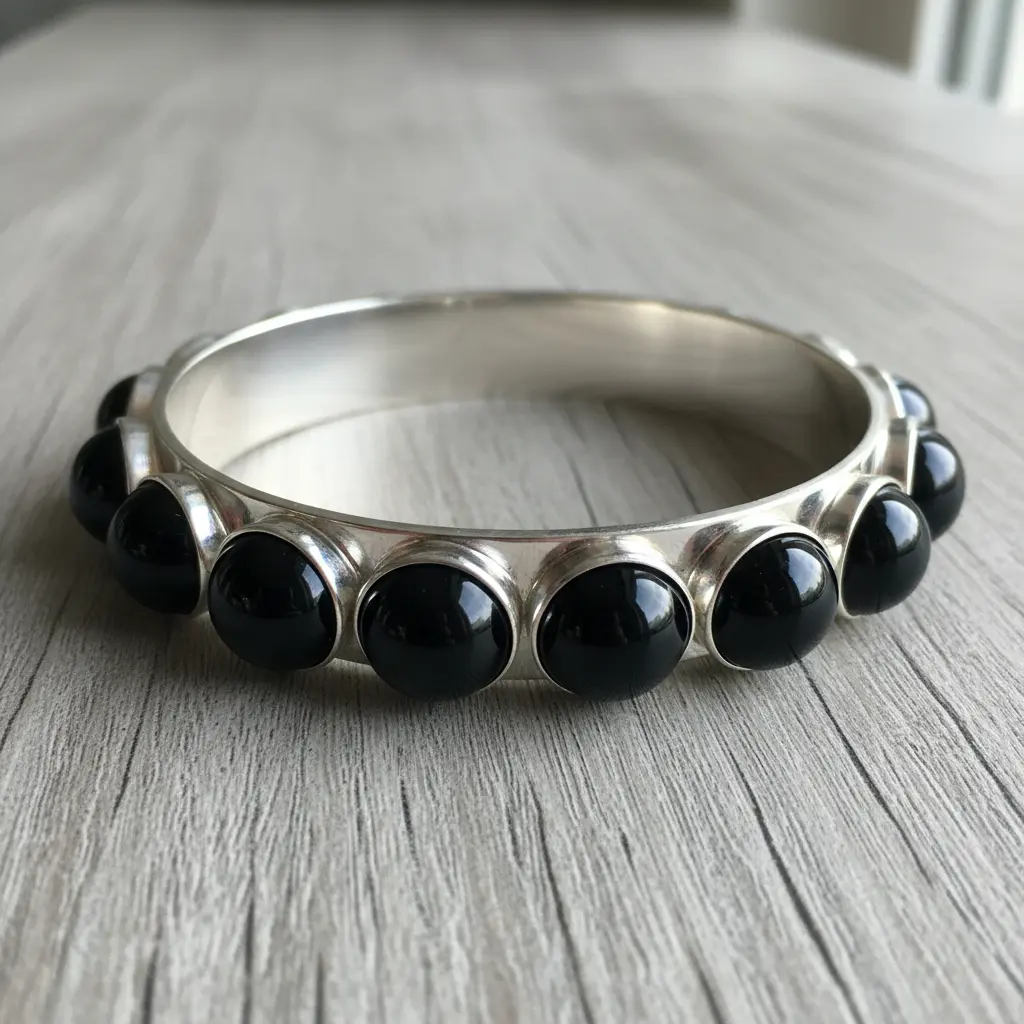
Does a piece of jewelry feel both elegant and protective when you design a DIY beaded bangle bracelet? This combination pulls off that magic trick effortlessly. You start by forming a sterling silver bangle base on a mandrel, either as a solid band or a hinged cuff. Then you carefully set the deep black stone into a secure bezel you have soldered on.
The final polish brings out that brilliant silver shine against the onyx’s opaque depth. I love this pairing because it works with absolutely everything in your wardrobe, as the contrast remains entirely timeless. For a similar bold, natural statement, you might look into the process of using druzy stones in jewelry. They offer a sparkling texture that is just as versatile.
Always include a care card with your finished piece to explain how to prevent tarnish. Feel that sophisticated weight on your wrist.
8. Rose Gold Memory Wire Bangle
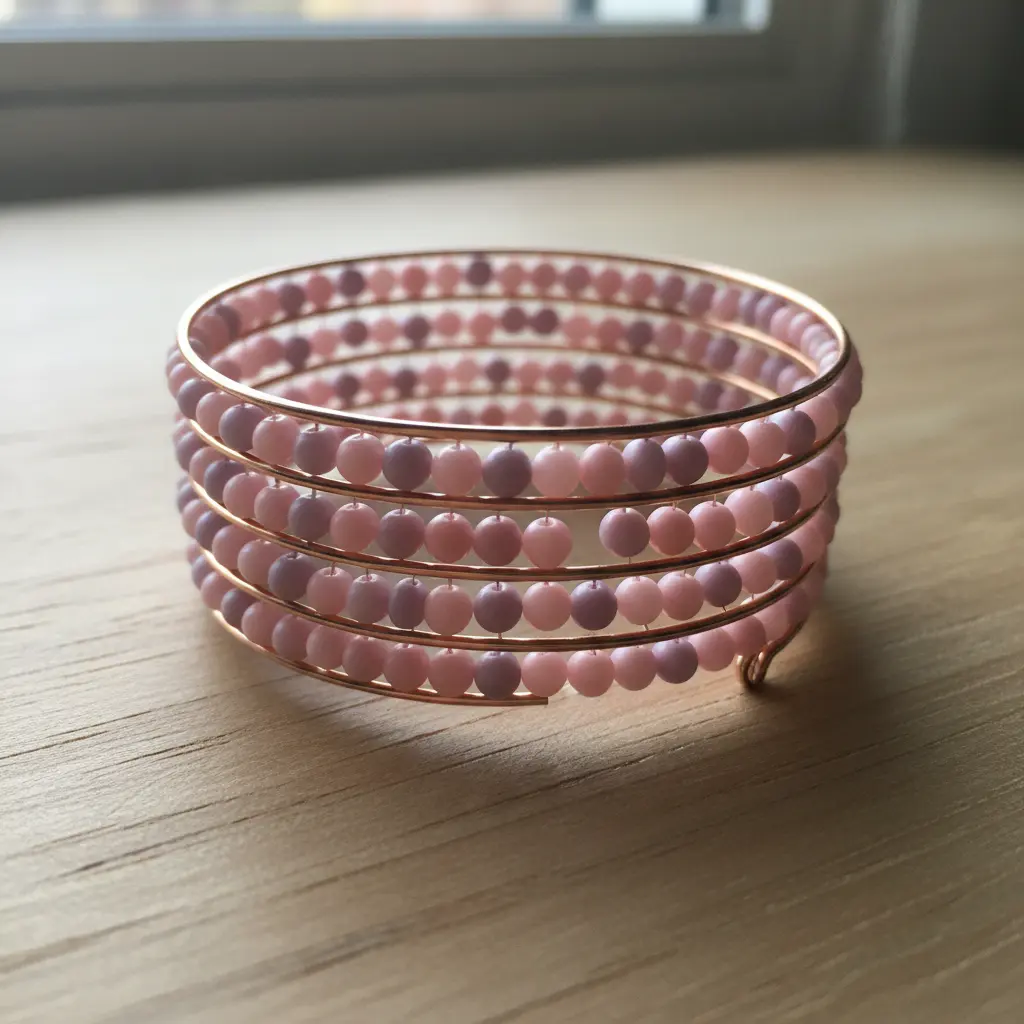
This one looks fancy, but it is honestly one of the easiest DIY beaded bangle bracelet projects you will ever attempt. You simply string your favorite glass or crystal beads onto a pre-coiled rose gold wire. The metal does all the work, springing right back into shape after you stretch it over your hand.
I love the layered look you get from the multiple coils, requiring no clasp at all. The trick is to leave a little space between beads so the wire can flex comfortably. Use your round-nose pliers to make tight, secure loops at the ends, and you are done.
Before you start a project like this, it is smart to read up on understanding necklace closures. The same principles for securing ends apply, and it will help you avoid any frustrating bead spills.
9. Translucent Pastel Acrylic Bead Bangle
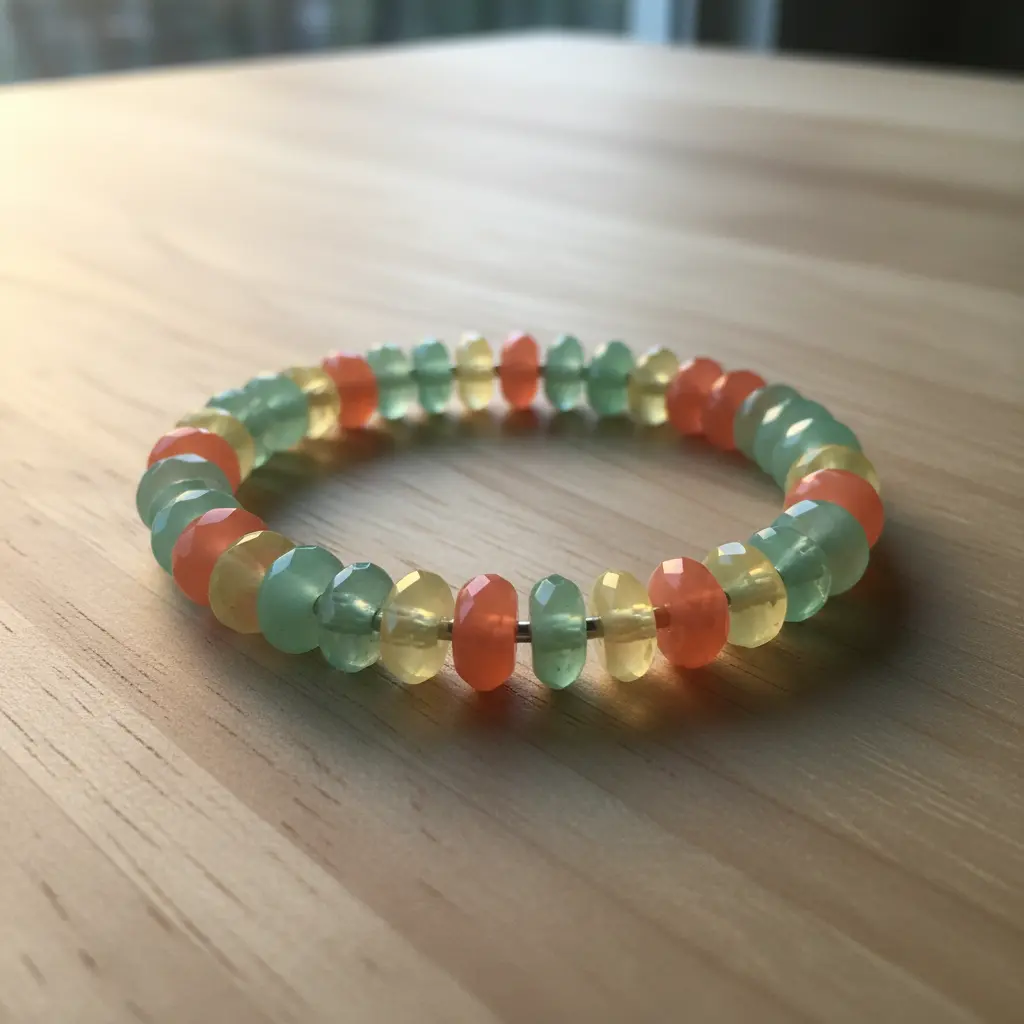
Ever wondered how to make a bracelet that looks like it’s glowing from within? This DIY beaded bangle bracelet is all about that soft, dreamy light. You will string a collection of translucent pastel acrylic beads onto a strong elastic cord, creating a circle of color that feels both playful and elegant.
The magic is in the beads letting light pass through them, giving your piece an ethereal, sophisticated look. I love this project because it adds a subtle pop of color without ever feeling too heavy or loud. It works so well because the translucency creates a gentle, charming aesthetic that goes with nearly anything in your wardrobe.
My go-to tip for success is to always secure your final knot with a tiny drop of clear beading glue to make sure your beautiful work stays together. And if you enjoy working with found, luminous materials, the process feels quite similar to designing a sea glass necklace.
10. Metallic Spacered Boho Charm Bangle
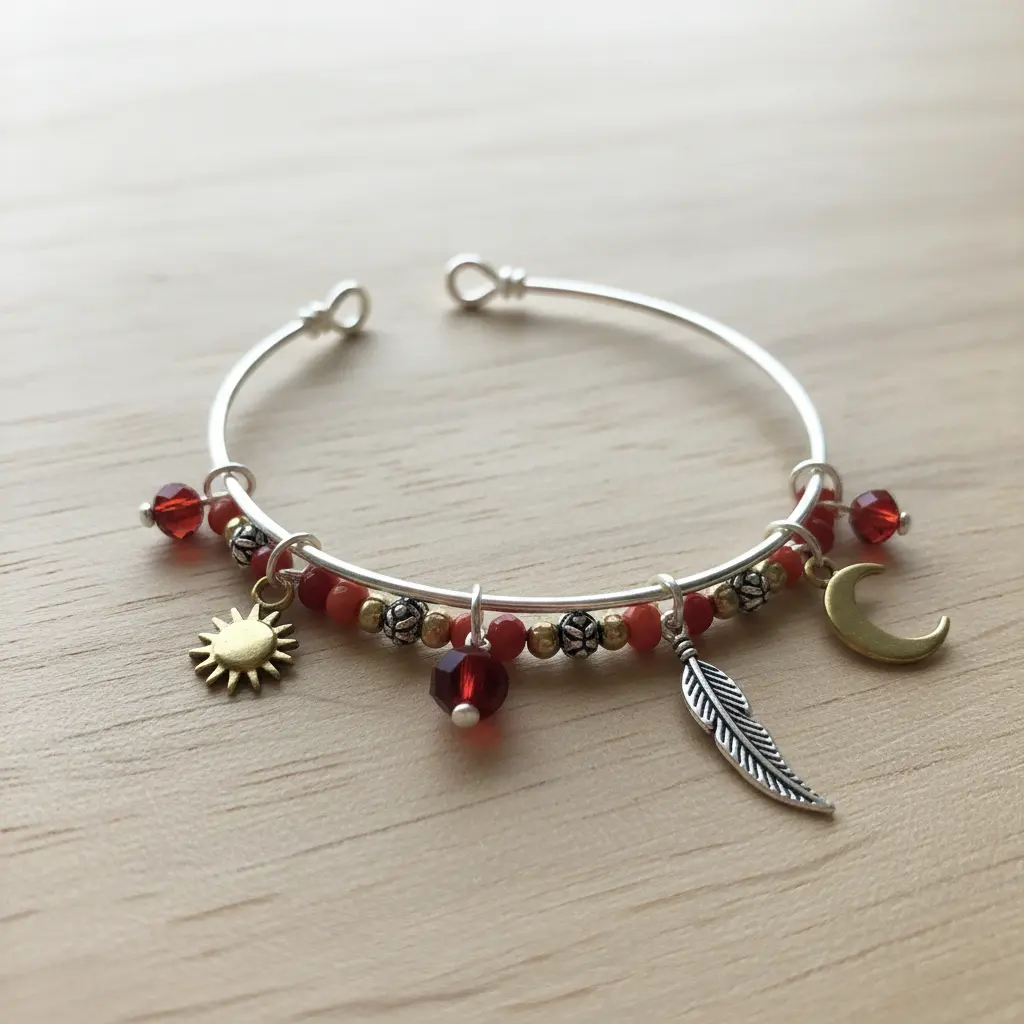
This one looks like a festival-ready masterpiece, but trust me, it is one of the simplest DIY beaded bangle bracelet designs to put together. You start with a solid metal bangle and slide on a few metallic spacer beads to create neat little sections. Then, you use jewelry pliers to open a jump ring, hook on your chosen charm, and attach it right in one of those spaces.
Why does it work so well? The spacers give your charms room to breathe and shine, preventing a cluttered look. It is all about that eclectic, personal mix. A little tip from my bench: always use two pairs of pliers to twist your jump rings open and closed. This keeps their shape strong so your charms stay put. The finished piece has such a wonderful, free-spirited energy, and making a DIY dream catcher uses a similar, meditative process of attaching meaningful symbols.
Securing Memory Wire Ends With Loop Pliers
A simple closed loop on each end is the only thing keeping all your beads from sliding off your DIY beaded bangle bracelet. You create this loop by gripping the very tip of the wire with your round-nose pliers and bending it back over the tool’s jaw in one smooth motion.
The goal is a neat, tight circle that lays flat against the first bead, acting as a permanent stopper. Here is the thing, you must make sure this loop is completely closed with no gap for bead holes to catch on. Once both ends are secured, your bracelet is functionally complete and ready to wear.
Conclusion
So, which of these DIY beaded bangle bracelet ideas sparked your imagination? Whether you are drawn to the earthy feel of wood and turquoise or the clean lines of silver and onyx, each project is a chance to create something uniquely yours. The real magic happens when you pick up the wire and beads and feel them come together in your hands.
My best advice is to start with the design that makes you most excited, since enthusiasm is the best teacher for a beginner. Gather your chosen materials, find a cozy spot with good light, and enjoy the process of making. You will be surprised at how quickly a simple coil transforms into a piece of jewelry you will be proud to wear and share.
FAQs
Q: What is the easiest type of wire for a beginner to use?
A: Twenty-four gauge craft wire is an excellent starting point. It is sturdy enough to hold a bangle shape but flexible enough for easy wrapping and passing through most bead holes without frustration.
Q: How do I prevent the beads from sliding around on my bangle?
A: Using a tight wrap with your wire or adding a small dot of jewelry glue at the connection points will secure beads. On a bangle blank, you can use headpins or eyepins to attach beads, which creates a fixed point.
Q: Can I make a bangle without any special tools?
A: Absolutely. For many simple designs, you only need your hands, wire, beads, and wire cutters. Round-nose pliers are helpful for making loops, but you can start by making simple wraps without them.
Q: How do I choose beads that will look good together?
A: Start with a simple color scheme. Pick one main color bead, a complementary accent color, and a neutral spacer. Laying them out on your table before stringing helps you visualize the final look.
Q: My wire ends are sharp and snagging. What did I do wrong?
A: This is a common issue. Always trim your wire ends as close as possible to the wrap, then use your pliers to gently press the cut end flat against the bangle. Tucking the end into a bead hole or wrap also hides it.


