
Looking for a fun and colorful accessory to add to your wardrobe? Jelly Bean Bracelets are the perfect solution! These sweet and stylish bracelets are not only a fun fashion statement but also a delicious treat to enjoy throughout the day.
Jelly beans have been a beloved candy for decades, known for their vibrant colors and irresistible flavors. Incorporating them into a bracelet design adds a playful twist to traditional jewelry.
Whether you’re looking to add a pop of color to your outfit or simply enjoy a sweet treat on the go, Jelly Bean Bracelets are a trendy and versatile accessory that is sure to delight both kids and adults alike. Stay tuned to learn more about how you can create your very own Jelly Bean bracelet to show off your unique style and satisfy your sweet tooth.

Easy Jelly Bean Bracelets
Looking for a great project to do with the kids that is pretty easy? Jelly bean bracelets are perfect as a boredom buster project that the kids will absolutely love. I do have to say that this was a super fun family project. Plus, they make great gifts for kids to give to their friends for Easter.
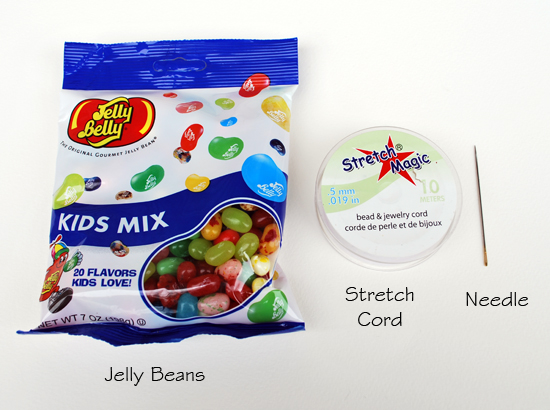
Here’s What You Need:
Step 1: Cut the elastic cording to about 6″ in length. Keep it a little extra long since it’s much easier to trim it to length than to re-string the Jelly Beans.
Step 2: Tie a few knots in the bottom of the cording. Keep the knot an inch or so from the end. This will really help you to tie the bracelet off when you’re done. If you tie the knot right at the end and slide the jelly beans all the way to the knot, you will have a difficult time tying it off.
Step 3: Thread the cording through the needle. With younger kids, you will probably have to assist them with this, but it’s great hand eye coordination practice for them.

Step 4: Thread the jelly bean through the needle and onto the cording. My nine year old had no trouble with this part. With my four year old, I would get the jelly bean onto the needle for her and then she would slide it down onto the cording. The other thing that really helped us was to use a hard surface (like a tabletop) to help press the bottom of the needle into. You could use a thimble but we found this was just an easier way to slide the needle through the jelly beans. We also used a damp paper towel to periodically wipe the jelly bean guts off of the needle when it gunked up so it would slide through easier.
Step 5: Measure the bracelet on your child’s wrist. Once it is long enough and you have enough jelly beans to wrap around, triple knot the bracelet and trim off the excess.

There you have it! My kids absolutely LOVED making these bracelets. It was a great afternoon activity. Have fun making these!
Bringing a pop of color and sweetness to your accessories, jelly bean bracelets are a fun and easy DIY project to try. These playful bracelets are not only simple to make but also a delightful way to showcase your creativity. Whether you’re crafting them for yourself or with loved ones, the process is sure to bring joy and charm to your day. So, grab your favorite jelly beans, get creative with your designs, and don’t forget to share your colorful creations with us in the comments below! Let’s spread some sweet inspiration together.
Frequently Asked Questions
Q: How do you make Jelly Bean Bracelets?
A: To make Jelly Bean Bracelets, you’ll need elastic string and an assortment of jelly beans. Thread the jelly beans onto the elastic string, alternating colors to create a pattern if desired. Once the bracelet reaches your desired length, tie the ends of the elastic string together securely. Be sure not to make it too tight to allow for stretching when worn. Enjoy your tasty accessory!
Q: Can Jelly Bean Bracelets be eaten?
A: While Jelly Bean Bracelets are made using edible jelly beans, it’s not recommended to eat the bracelet itself once it’s been assembled. Over time, the elasticity of the bracelet can weaken, and there’s a risk of it breaking and releasing the jelly beans, which could pose a choking hazard. It’s best to admire and enjoy the Jelly Bean Bracelet as a colorful accessory rather than as a snack. If you’re craving jelly beans, it’s safer to enjoy them straight from the bag!
Q: How long do Jelly Bean Bracelets typically last before they become too brittle to wear?
A: The lifespan of a Jelly Bean Bracelet can vary depending on factors like the quality of the jelly beans used, the tightness of the string, and how often it’s worn. Generally, if stored in a cool, dry place away from direct sunlight and moisture, a Jelly Bean Bracelet can last for several weeks to a few months. However, over time, the elasticity of the string may degrade, causing it to become brittle and prone to breakage. It’s a good idea to inspect the bracelet regularly for any signs of wear and tear and to replace it if necessary to avoid any mishaps.


