
Why Make Homemade Bath Bombs?
You might wonder why you should make bath bombs when you can buy them. The answer is simple: customization, cost, and the joy of making DIY Easter egg bath bombs. DIY Easter egg bath bombs are a delightful addition to your Easter celebrations. allow you to control the ingredients, ensuring they are safe for egg bath bombs for kids. Plus, bath bombs are simple to create in bulk, making them a cost-effective filler for every Easter basket on your list. I thought it would be fun to experiment with different scents, and it turns out, it It would be fun to make DIY Easter egg bath bombs together. them as a yearly tradition!
DIY Easter Egg Bath Bombs Tutorial

I started with the bath bomb recipe I used previously but modified it for the egg shape. I discovered that because I was packing two halves of the egg molds together, the mixture needed slightly more moisture to hold its shape. While you can add a spritz of water using a spray bottle, you have to be careful because it will activate your Citric Acid. Using more oil is a safer bet to prevent premature fizzing.
Bath Bomb Ingredients
- 1 Cup Baking Soda
- 1/2 Cup of baking soda is essential for creating bath bombs. Citric Acid
- 1/2 Cup Corn Starch Powder (or cornstarch)
- 1/2 Cup Epsom Salt
- 8-10 Tablespoons of Oil (melted coconut oil Coconut oil or almond oil works well as a moisturizing agent in your bath bomb recipe.
- 2 Teaspoons Essential Oil (peppermint or lavender are great choices)
- 6-9 drops Food Coloring
- Plastic Easter eggs (for the mold)
Directions
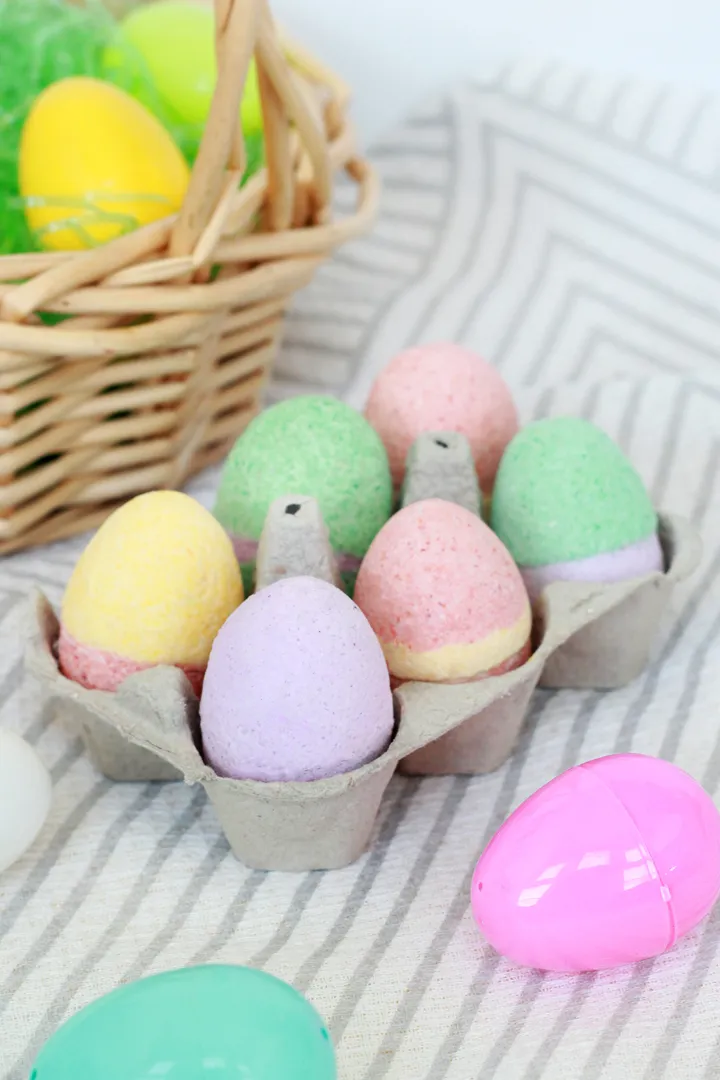
1. Mix Dry Ingredients: In a large bowl, combine the baking soda, citric acid, cornstarch, and Epsom salt is a key ingredient in DIY Easter egg bath bombs. salt. Use a whisk to mix well and break up any clumps. If you want to make multiple colors, divide this dry mixture Pour the mixture into separate bowls now to prepare for your Easter egg bath bombs. 2. Add Wet Ingredients: Working with one color batch at a time, add the oil and a couple of drops of food coloring. You can also add your essential oils at this stage. Remember, when the food coloring hits the citric acid, it will begin to react, so mix quickly to minimize the reaction. 3. Check Consistency: Your bath bomb mixture The mixture should be crumbly, like wet sand, but not saturated, to ensure your bath bombs hold together. You should be able to squeeze a handful together into a clump, and it should hold its shape before you rub your hands together to break it back up into crumbles. If it’s too dry, add a tiny bit more oil or use a spray bottle to mist it lightly with water (be careful!). 4. Fill the Molds: Next, scoop the mixture into your plastic egg molds. Pack the mixture into one half of the egg Pack it super tight into the mold, and pile it high to overflow the mixture before you squeeze the egg halves together. Do the same for the other half. Secure both parts by pressing them firmly together. As you put the halves together, extra mixture will come out the sides. Just brush away any excess and squeeze your bath bomb mixture into the mold. egg mold tight. 5 essential ingredients for your Easter egg bath bombs. Unmolding: This is the tricky part. Unlike other molds you might leave overnight, you want to take your bomb out of the egg as soon as you make it. If it dries inside the plastic, it can become tricky to open.

To remove it, gently squeeze the sides of the egg to loosen it. Then, when it feels loose, Gently slide it off in a circular motion to reveal your beautifully shaped bath bomb. — like you are screwing it off. Repeat for the other side. If the egg crumbles, just dump it back into your bowl, mix very well, and try again. If the halves won’t stick together, add another tablespoon of oil to get the mixture right. 6. Drying: Lay the egg shaped bath bombs gently on a soft towel to dry for at least 24 to 48 hours. They need to harden completely so they don’t crumble in the tub.
Gift Packaging Ideas
I packaged a couple of the Easter Egg Bath Bombs up in individual cello bags with a little tag for an easy gift or Easter Basket stuffer. This makes them a perfect easter gift for friends, teachers, or family.

To print your tags, you can use cardstock paper and punch them out with a circle punch. It adds a professional touch to your DIY Easter craft. Once dried, you should store any extras in a plastic egg to keep your bath bombs fresh. airtight container to keep out moisture and ensure the bath bombs fizz impressively when used.

Conclusion
Happy Easter! Now you know how to make these Easter egg bath bombs. All you need is a little bit of patience and creativity. Whether you are looking for an easy Easter project or a fun bath treat, these fit the bill perfectly. Get the mixture right, handle them gently, and you’ll have super cute bombs ready for bath time. Enjoy the fizz!
FAQs
Q: What are easter egg bath bombs and why are they cute easter gifts?
A: Easter egg bath bombs are bath fizzy treats molded inside plastic or real egg shells that dissolve in water, releasing color, scent, and sometimes small surprises; they are cute easter gifts because they look like holiday eggs, are simple to make, and add a playful twist to bath time.
Q: How do I make easter egg bath bombs at home—what’s the basic recipe?
A: To make your bath bombs, combine baking soda and citric acid with a bit of cream of tartar, salt, and dry fragrance or essential oils; using the whisk helps distribute dry ingredients, then slowly add water or a liquid binder while you press the mixture into egg molds, secure with lid if using two halves, and let dry until solid.
Q: Can I use real eggshells to create bombs from eggs and put them in a bath?
A: Yes, you can make bombs from eggs and put them in water, but carefully remove the egg contents first, rinse and dry the shells, then fill with your bath bomb mixture; be sure the shells are fully dry so they don’t crack and the color is consistent when dissolved.
Q: What’s the correct way to add water or liquid without activating the fizz prematurely?
A: When you add water or a liquid binder, mist it slowly and mix immediately; the key is a mixture with water added dropwise so the baking soda and citric acid don’t react early—squeeze the mixture lightly to test if it holds shape before pressing into molds.
Q: How can I create multi-color easter bath bombs—do I add another color to layers?
A: To make layered or multi-color eggs, divide the dry mix into portions, color each portion separately, then press one color into the mold, repeat this process with the next color, and gently press the mixture together so the colors stay distinct yet the egg holds as one; this ensures the color is consistent in each layer.


