
Measuring Bottle Diameters for Precision Fit
Wrap a flexible measuring tape around your water bottle’s widest point and add a full inch to that measurement when cutting the fabric for your diy water bottle holder. This built-in seam allowance prevents a frustratingly tight squeeze that strains your stitches and distorts the finished shape. Your pattern width determines the finished holder’s ability to slide on and off easily without letting the bottle rattle around. The good news is, a precise fit also creates a natural thermal barrier against condensation. Trust me on this, taking thirty seconds to measure correctly saves you from a wobbly holder that looks homemade in the worst way. You will notice a stable, professional-looking finish starts with this single step.
Selecting Textile Weights for Load Bearing
A mid-weight canvas or repurposed denim provides the necessary structure to support a full bottle without sagging over time. These fabrics have the inherent body to hold their shape, which is half the battle for a tidy final piece. The other half is adding a layer of fusible fleece to the exterior panels before you sew. This interfacing acts like a built-in cushion, protecting your hand from cold condensation and giving the holder a pleasing, padded feel. Lightweight quilting cotton might look pretty, but it simply lacks the tensile strength for this job. Your finished carrier needs to handle daily weight and movement, so choosing a robust textile is non-negotiable for your diy water bottle holder.
1. Braided Cotton Jersey T-Shirt Sling
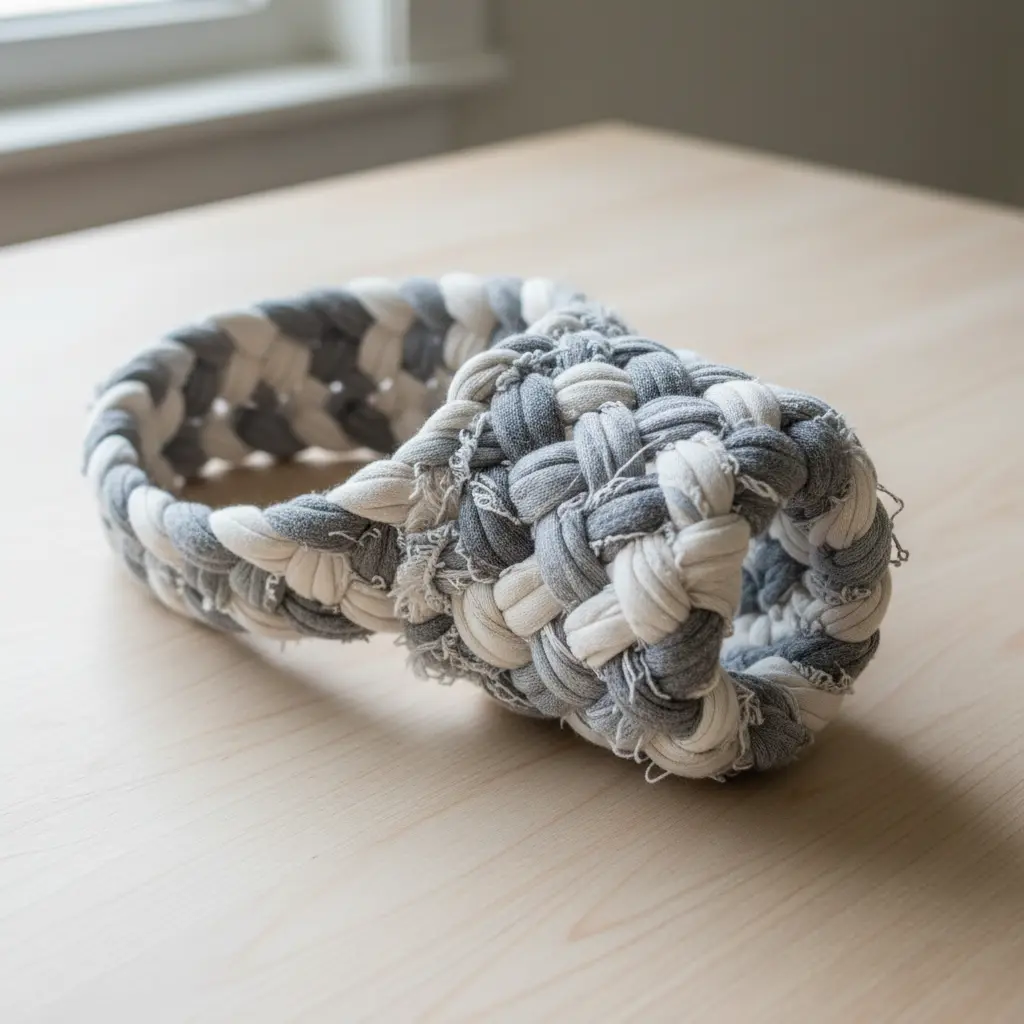
Who would have thought a few old t-shirts could become something so cozy and useful? This sling is all about turning soft cotton jersey into long strips and braiding them together. The process creates a flexible, textured loop that feels like a big, comfy hug. I love this one because the braiding technique naturally spreads weight across your shoulder, making it super comfortable for longer carries. Your success hinges on picking the right fabric. You need a good quality cotton jersey with plenty of stretch so it supports without feeling stiff. That stretch is what lets the sling snuggle your little one safely. For another project that repurposes simple materials, have a look at these DIY popsicle holders.
Keep your tension even as you braid, and you will end up with a supportive, breathable carrier perfect for quick trips. That steady rhythm ensures your diy water bottle holder stays securely shaped. Feel that soft, secure comfort.
2. Upcycled Denim Jean Leg Carrier
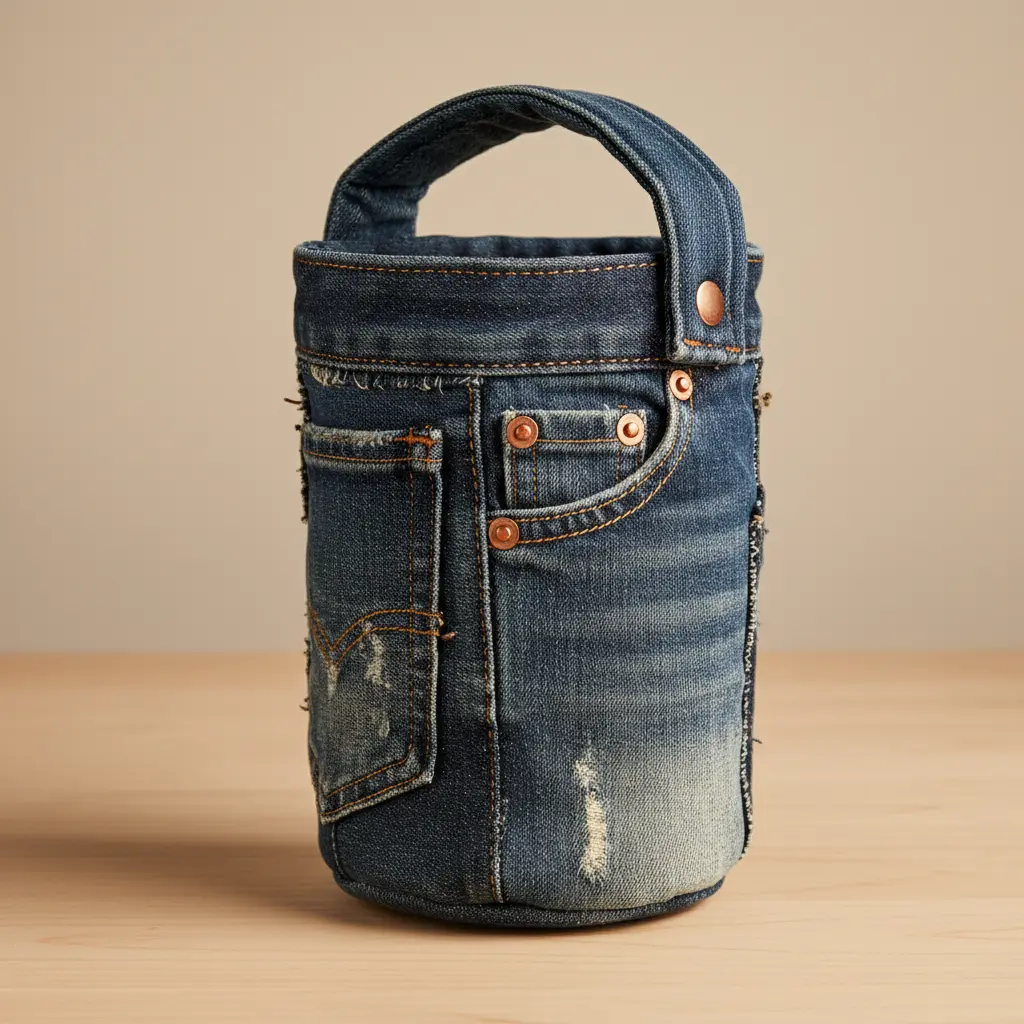
Ever wondered how to make a baby carrier that feels both sturdy and personal? This project turns your favorite old jeans into a cozy, secure wrap for your little one. You will use the strong denim to cut out a main body panel and straps, then reinforce every seam with heavy-duty thread and multiple stitches. The result is a unique carrier that shows off the original pockets and fading.
It works because denim is naturally tough and built to last, making it perfect for holding weight. Plus, you are giving a second life to fabric that might otherwise be wasted. Trust me, the satisfaction of creating something so functional from a worn-out pair is amazing. Before you start sewing, I recommend reading up on creating unique pencil holders to practice your upcycling skills on a smaller, simpler project first. That foundational practice guarantees a neat finish on your diy water bottle holder.
3. Macrame Cotton Cord Bottle Net
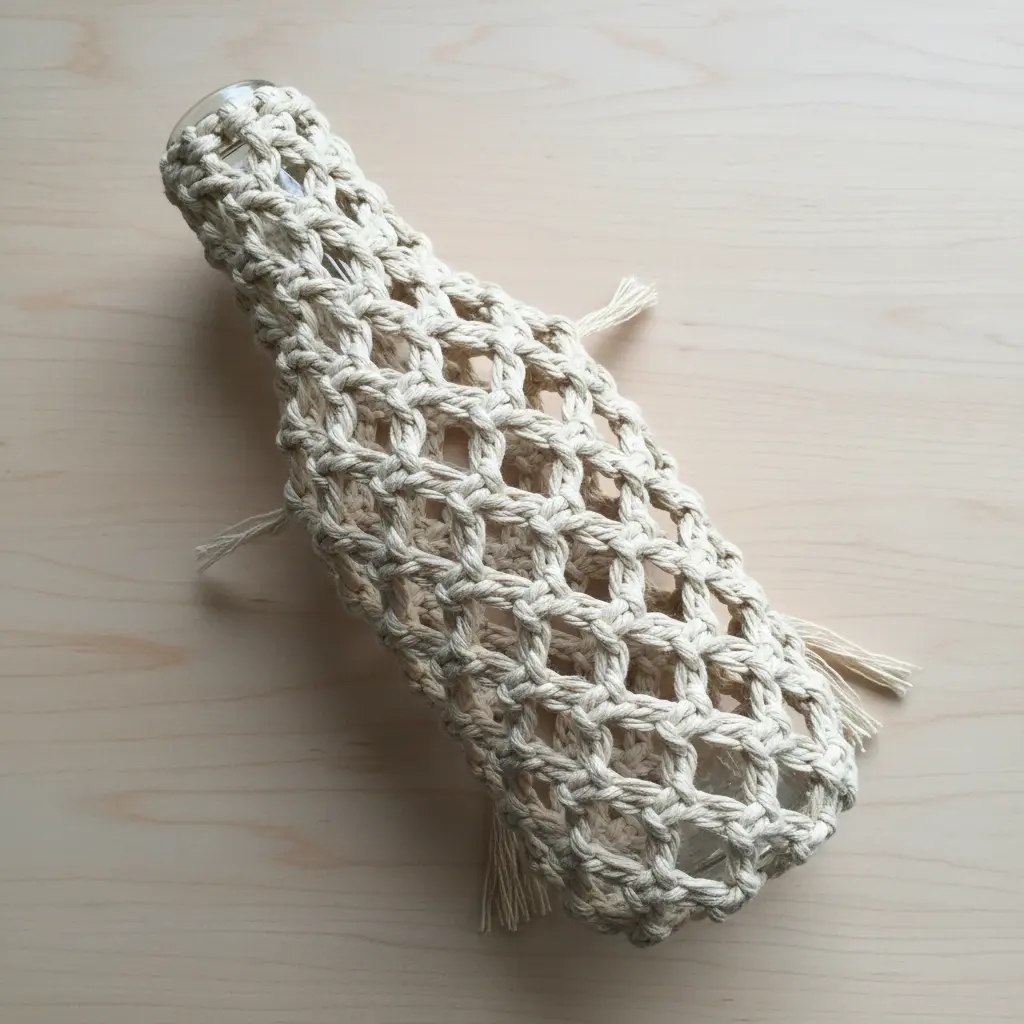
This project looks intricate, but it’s surprisingly beginner-friendly. You create an airy, decorative net using simple knots like the square knot. The natural cotton cord gives it a lovely bohemian feel while securely cradling your bottle.
You’ll cut several long cords, fold them in half, and attach them to a top loop. Then, you knot downwards, checking the fit with your actual bottle as you go. The final result is a functional and beautiful holder perfect for carrying or hanging.
I love how customizable this is. You can make it for a standard water bottle or try repurposing old wine bottles for a unique vase or gift. Isn’t that a satisfying way to combine craft and function? That same knotting logic applies whenever you build a diy water bottle holder from scratch.
4. Canvas Tote Patchwork Utility Pouch

Ever feel like your bag is a jumble of small essentials? This pouch solves that with serious style. You start by sewing together a colorful panel of fabric scraps into a unique patchwork. That becomes your durable outer shell, which you then line and add a zipper to create a secure, organized home for your bits and bobs.
I love this project because it turns leftover materials into a genuinely useful diy water bottle holder. The structure from the canvas and lining means it holds its shape beautifully, keeping your pens, chargers, or craft supplies from becoming a tangled mess. Isn’t it satisfying to make organization look this good?
For a super quick and fun project that also organizes small items, try making duct tape chapstick holders. It is a great way to use up colorful tape and get instant results. Your finished pouch will feel like a personal victory every time you use it.
5. Woven Old fabric Strip Cradle
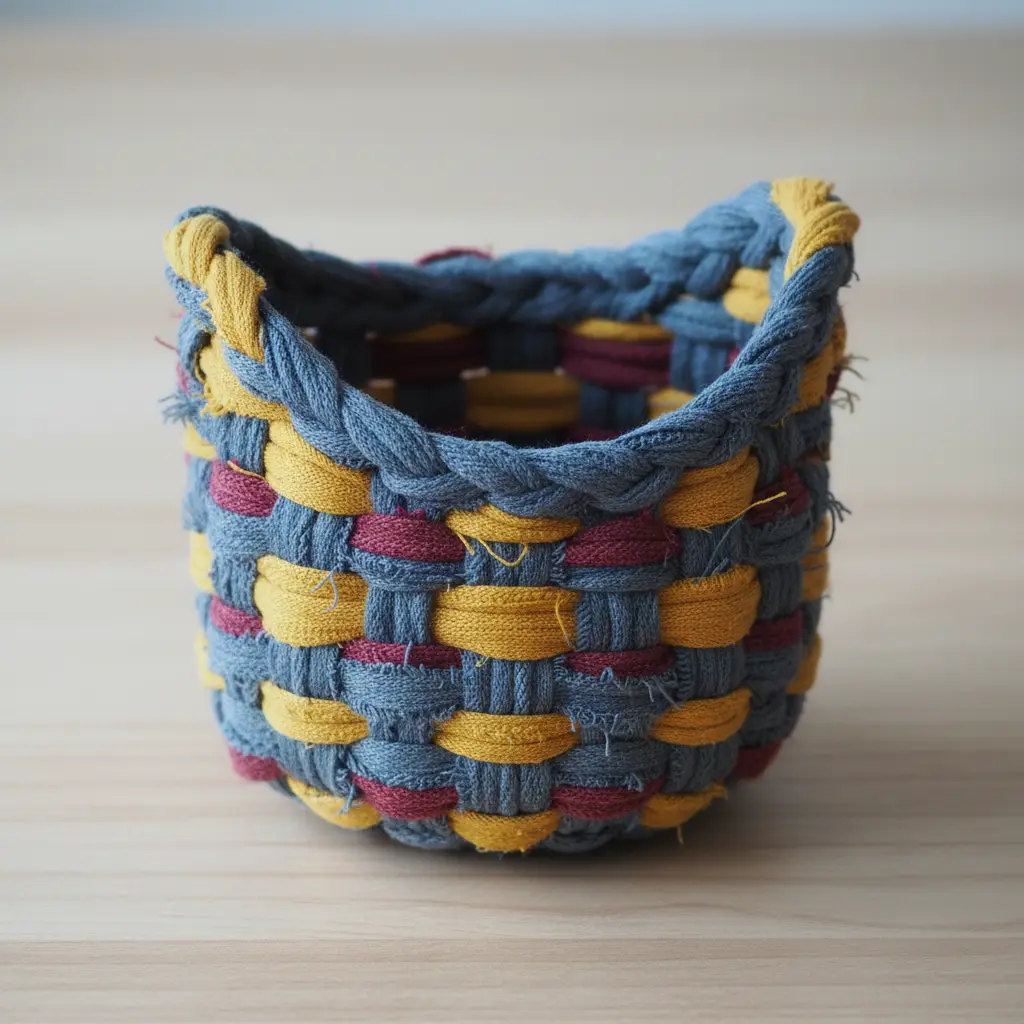
This project looks intricate, but the rhythm of weaving is surprisingly meditative once you start. You will take strips of old fabric and weave them tightly over and under a simple frame. The key is to push each new weft strip down firmly against the last one, creating a dense and sturdy fabric wall. I love how this transforms a pile of scraps into something solid and functional.
It works because that tight weave creates incredible strength from soft materials. For a sturdier structure, especially if you are making a baby’s cradle, always start with a robust wooden frame to bear the weight. Your finished piece will have a wonderfully unique, cozy look no store-bought item can match.
Getting a piece this size right requires studying crafting wooden candle holders for foundational joinery and support techniques. That knowledge ensures your frame is rock-solid before you even begin weaving. Trust me, that prep work makes the whole process smoother and the final result something you will feel proud of.
6. Quilted Thrifted Shirt Bottle Cosy
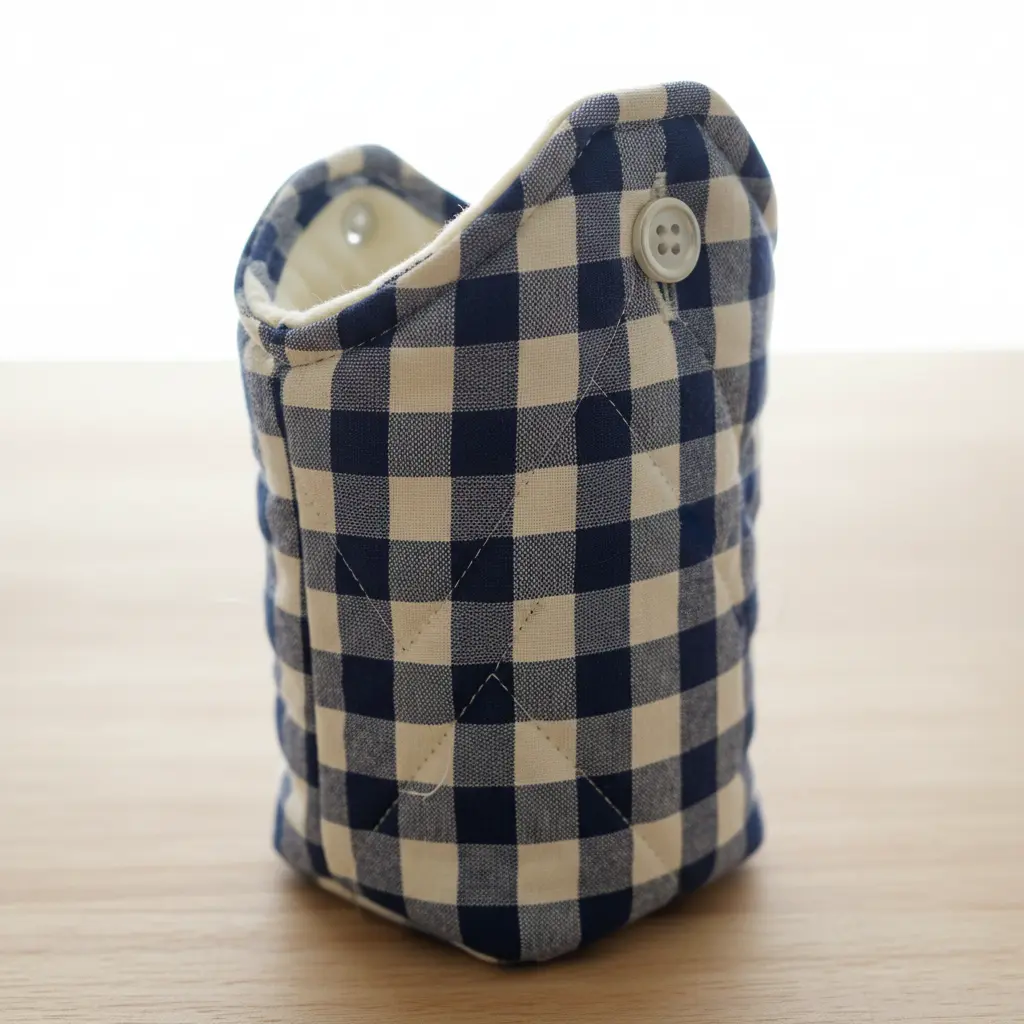
This one looks complex, but trust me, it is surprisingly straightforward. You will start by cutting panels from your favorite old shirts and quilting them with a layer of insulating batting. This creates a soft, padded fabric sleeve. Sew the quilted piece into a cylinder, add a lining, and finish it with a drawstring top.
The quilting does a fantastic job of keeping your drink cool or warm. I love how personal you can make it by choosing shirts with memories or fun patterns. For another fun way to upcycle small items, you can find inspiration with creative bottle cap crafts. The final result is a cozy that is both practical and full of character. Does that not sound wonderfully satisfying?
7. Crocheted Plastic Bag Yarn Holder

Ever wondered how to turn a pile of plastic bags into something genuinely useful? This project transforms them into a sturdy, water-resistant holder for your yarn. You will need a significant quantity of plastic grocery bags, which you cut into loops and knot together to make your own plarn. Then, with a large crochet hook, you work it up into a tidy basket shape. I love how this gives those single-use bags a permanent purpose, and the result is surprisingly durable. It is a perfect project for organizing your craft supplies, just like those handmade photo display holders you might use to show off your favorite memories.
Trust me on this one, consistency is key. Aim for uniform strips when cutting your bags, as this makes your plarn thickness even and your finished piece much sturdier. The texture is unique, and you get to create a one-of-a-kind pattern based on the bag colors you collect. Feel the satisfaction of making something both practical and eco-friendly from items you already have. That steady tension technique works wonders for any diy water bottle holder.
8. Leather Belt Repurposed Bottle Loop
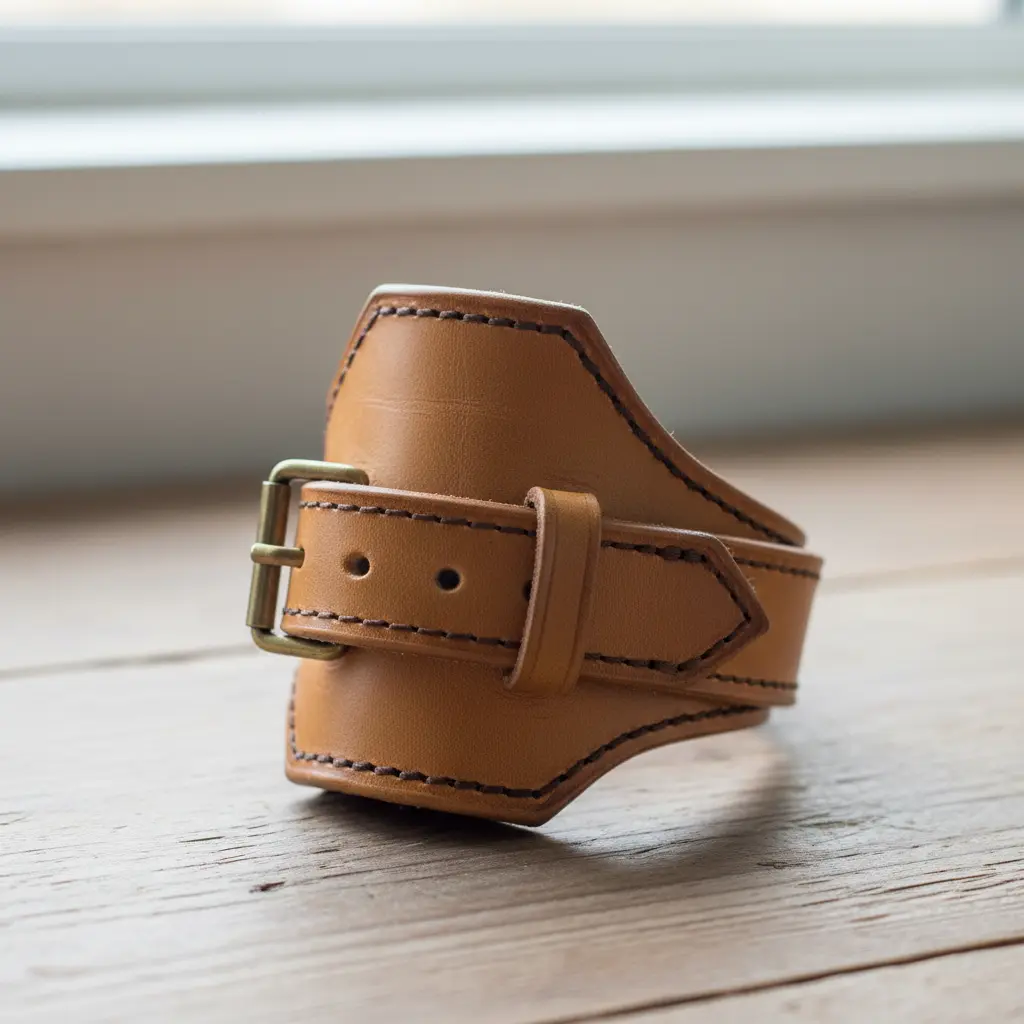
Who would have thought an old accessory could become your most useful one? This project takes a worn-out leather belt and transforms it into a rugged loop that clips right onto your bag. You will cut a strip to fit your bottle’s circumference, punch holes, and secure it with rivets or snaps. I love how the original belt buckle or tooling adds instant character.
It works so well because leather is naturally strong and only gets better with age, forming a perfect grip. Your finished holder solves the problem of carrying a bottle hands-free, whether you are hiking or just running errands. For another great way to upcycle drink containers, look at our guide to Do it yourself soda bottle crafts for more inspiration. Trust me, the satisfaction of making something this durable and handsome from a throwaway item is unbeatable.
9. Felted Wool Sleeve Water Carrier
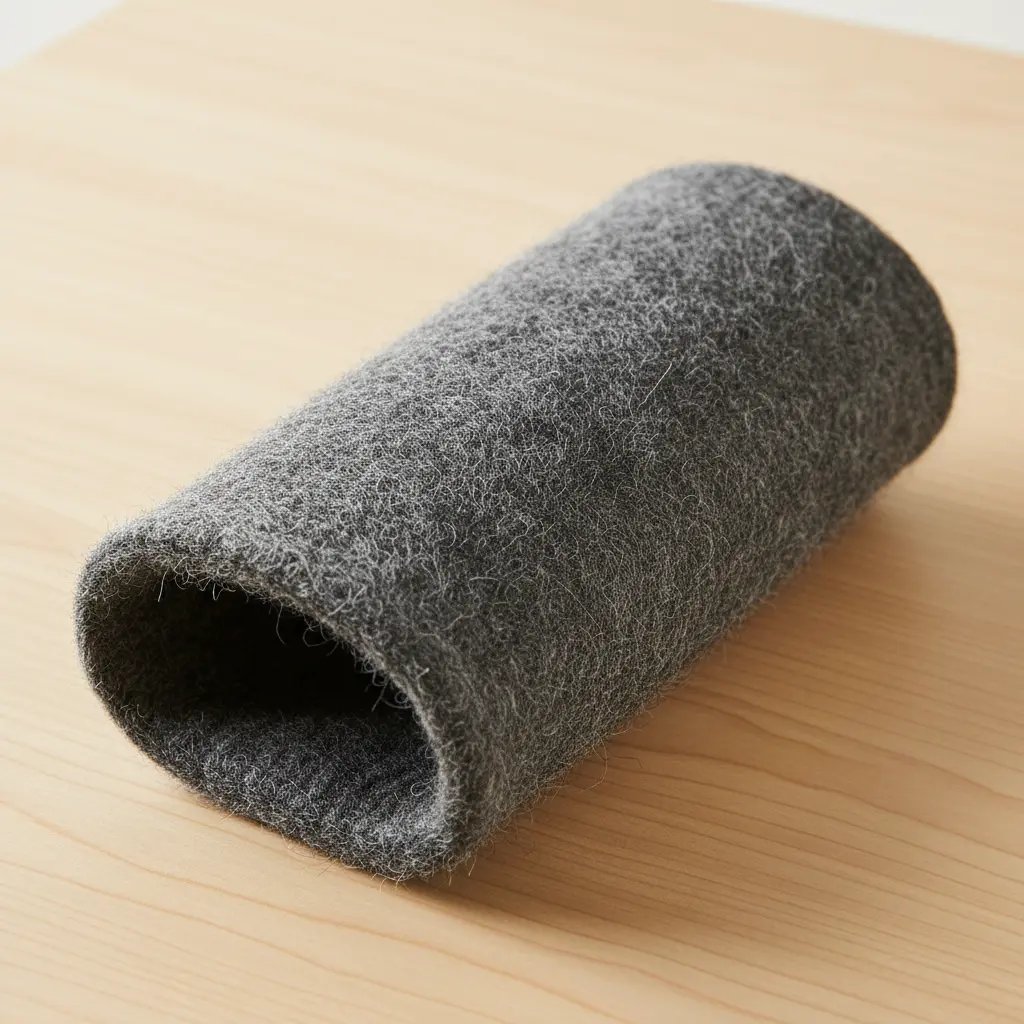
Ever wondered how to make a bottle cozy that feels like a warm hug? This project uses dense felted wool to form a protective sleeve. You can wet felt roving around your bottle or sew a tube from a repurposed sweater.
The magic is in the snug fit. I love how the wool naturally traps air, keeping your drink insulated. That dense fabric also prevents dents and stops that annoying clanking sound.
For a polished finish on your diy water bottle holder, add a strap using the same method you’d use for sewing a tote bag strap. Trust me, the final result is so satisfying and uniquely yours.
10. Canvas Webbing Military Style Holster
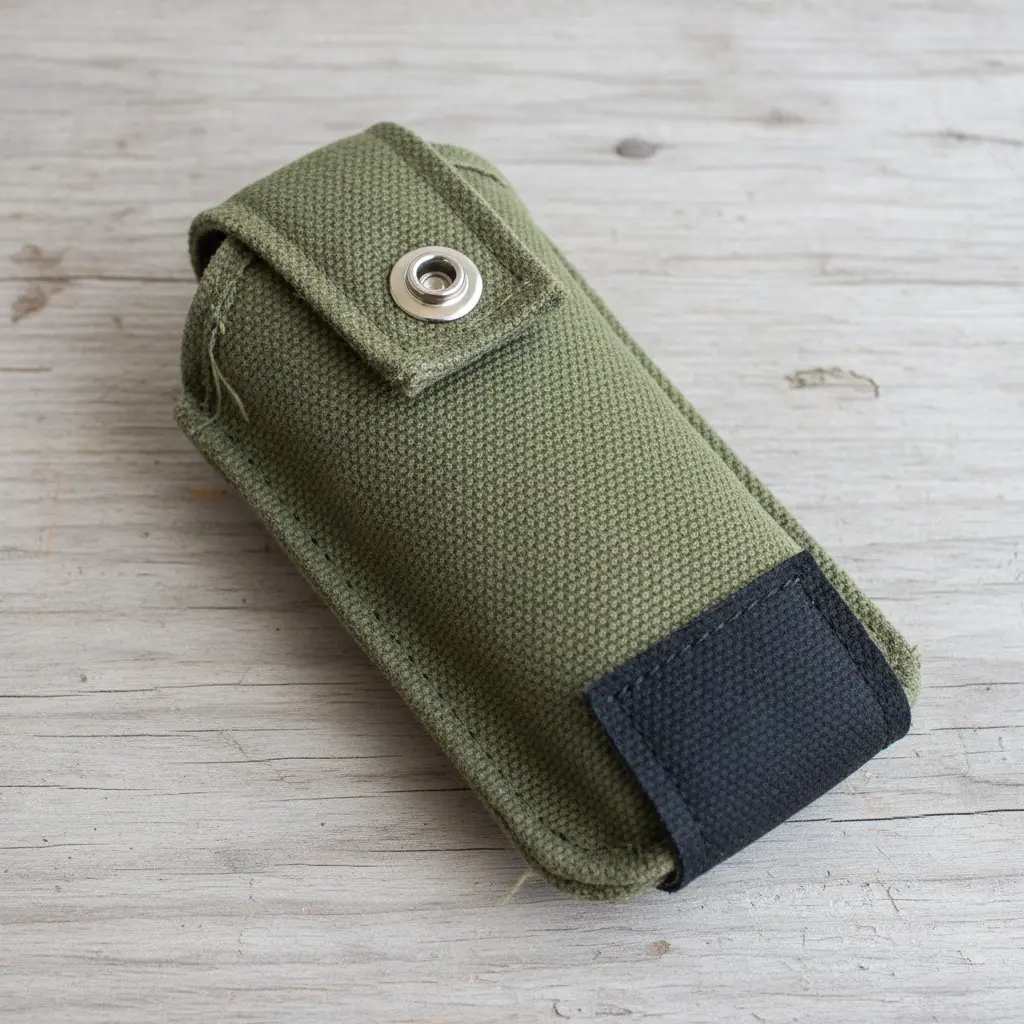
This rugged design looks intimidating, but its construction is wonderfully straightforward. You will be working with heavy-duty canvas and strong webbing straps, cutting and stitching them into a secure pocket for your bottle. I love how the classic flap with a sturdy snap keeps everything locked in place during a hike.
Why does it work so well? That thick canvas and double-stitched webbing are built to last, offering serious protection against bumps and scrapes. It is a no-fuss, get-it-done style that feels incredibly reliable.
Once you have mastered this holster, you will have the skills to tackle other sturdy projects, like sewing your own pool bag. Feel that surge of pride when you clip it to your belt and head out the door.
Reinforcing Stress Points for Maximum Durability
The spot where your strap attaches to the body of the holder is the single point most likely to fail. You want to avoid a simple straight stitch here, as the constant pulling force will rip the threads right out. Instead, sew a small box with an X through its center directly over the strap ends. This boxed topstitching technique distributes the load across a much wider area of fabric. Backstitch at the beginning and end of every seam for extra security. This reinforcement takes one extra minute but adds years of life to your project, ensuring your bottle stays securely in place no matter how much you move.
Conclusion
Each of these projects starts with seeing potential in what is already around you, turning an old pair of jeans or a worn-out t-shirt into something useful and personal. That is the heart of making things, isn’t it? My best advice is to pick the idea that speaks to you and the materials you have closest to hand. Do not worry about perfection, simply enjoy the process of creating a simple, practical diy water bottle holder that reflects your style. I hope this list gives you that little nudge to start a project that makes your daily routine a bit more colorful and a lot more sustainable.
FAQs
Q: What is the best fabric for a sturdy DIY water bottle holder?
A: Look for durable, medium-to-heavy weight fabrics like denim, canvas, or upholstery samples. These materials support the weight of a full bottle well and withstand daily use.
Q: How do I make sure the strap is strong enough?
A: Reinforce the strap attachment points with box stitches or multiple rows of stitching. For longer straps, consider using a folded and top-stitched fabric strip or a repurposed belt for extra strength.
Q: Can I make a no-sew water bottle holder?
A: Yes. Several ideas here, like the macrame net or the braided t-shirt sling, require only knotting or braiding techniques, no sewing machine needed.
Q: How do I adjust the holder for different bottle sizes?
A: Measure your bottle’s circumference and height before you cut fabric. For a versatile fit, add an inch to the width and use an adjustable strap or a drawstring closure at the top.
Q: What is the easiest project for a beginner?
A: The repurposed leather belt loop or the simple woven fabric strip cradle are great starting points. They involve minimal cutting and straightforward assembly, perfect for a first try.


