


Choosing Wreath Base Materials For Structural Integrity
Your mummy needs a skeleton, and for this project, that means a sturdy, dense base that disappears under layers of fabric. A lightweight foam wreath form is my top pick because its pliable surface lets you embed the ends of fabric strips securely with pins or craft glue, preventing any slipping or sagging over time. You want a base thick enough to build the illusion of a wrapped body, not a flat, uniform circle. Wire forms work in a pinch, but you will need to create a solid backing layer of cardboard or burlap first, otherwise your bandages will have nothing substantial to cling to and the final look feels hollow. The good news is, a simple foam circle provides the perfect foundation for exploring diy mummy wreath ideas.
Achieving Realistic Aged Fabric Textures And Tones
The fastest way to make your mummy look like a fresh victim is using bright white, perfectly cut fabric strips. Trust me on this, you need to distress your materials before you even touch the wreath base. Tear your cotton strips or cheesecloth into uneven widths, then pull at the threads along each edge to create a frayed, worn look. For that ancient tomb aesthetic, soak your fabric in a bath of strong black tea or watered-down brown acrylic paint, wring it out, and let it dry completely. This aging process adds subtle tonal variation that reads as centuries of decay from a distance. The result is a bandage material with authentic character, ready to be layered for maximum depth while you follow diy mummy wreath ideas.
1. Tea Stained Aged Cheesecloth Mummy Wreath

This one surprised me with how authentic it looks, and the secret is all in the staining. You start by brewing a super strong black tea solution to soak your cheesecloth, giving it that perfectly aged, sepia-toned color instead of plain white. Once it’s dry, you simply wrap and layer the strips around your wreath form until it looks convincingly mummified. This simple layering technique is a staple across my favorite diy mummy wreath ideas.
I love this because the tea stain provides an instant antique and slightly creepy vibe that store-bought materials just can’t match. It works so well for a rustic Halloween look. Before you start wrapping, you need a solid collection of spooky Halloween wreath ideas to inspire your final embellishments, like adding googly eyes or plastic spiders.
My go-to tip is to buy way more cheesecloth than you think you need, at least 10 yards for a standard wreath. Trust me, running out mid-wrap is a real mood killer. Feel the satisfaction when you hang up your uniquely eerie creation.
2. Oversized Googly Eye Fabric Wreath

This one always gets a laugh from guests. It looks like a craft store monster came to life on your door. The magic is in the simple technique of tying fabric strips onto a wire wreath form. You fold each strip, loop it under the wire, and pull the ends through to make a knot. Keep going all the way around, mixing up your fabric colors and patterns for a wonderfully messy texture that highlights these diy mummy wreath ideas perfectly.
It works so well because the oversized eyes are an instant, playful focal point. Trust me, use a generous amount of hot glue to make sure they stay put through the season. Isn’t that a fun way to welcome trick-or-treaters? Feel the silly joy it brings.
3. White Burlap Textured Mummy Wreath

Ever wondered how to get that perfectly frayed, ancient mummy look? This project nails it by using simple white burlap ribbon wrapped tightly around a foam wreath form.
You just keep overlapping the strips as you go, which creates that awesome bandaged texture. I love finishing it with a pair of huge googly eyes for instant personality. The overlapping technique makes these burlap designs some of my favorite diy mummy wreath ideas to display all season.
It works so well because the burlap’s natural color and weave are a dead ringer for old linen wraps. Trust me on this one, adding a simple seasonal fall wreath project to your skills makes decorating for any holiday a breeze.
4. LED Lit Gauze Mummy Wreath

Ever wondered how to get that spooky, glowing effect without using a single jack-o-lantern? I love how this one transforms a simple grapevine wreath into a glowing mummy. The trick is wrapping your battery-operated LED string lights around the base first, then layering on the gauze.
You get a soft, eerie light peeking through the bandage texture, which looks amazing on a front door at night and proves why these glowing diy mummy wreath ideas work so well. It works because the gauze is sheer enough to let the light through but thick enough to create that classic mummy look. I like to use cheesecloth since it is inexpensive and drapes perfectly. A great tip is to secure the battery pack on the back with a little hot glue so it stays hidden. You will feel so proud when you flip the switch and see that warm, spooky glow.
This project pairs beautifully with other natural fall decor, like a unique acorn autumn wreath, for a cohesive seasonal look on your porch. Try it and see how that gentle light makes all the difference.
5. Layered Torn Sheet Mummy Wreath
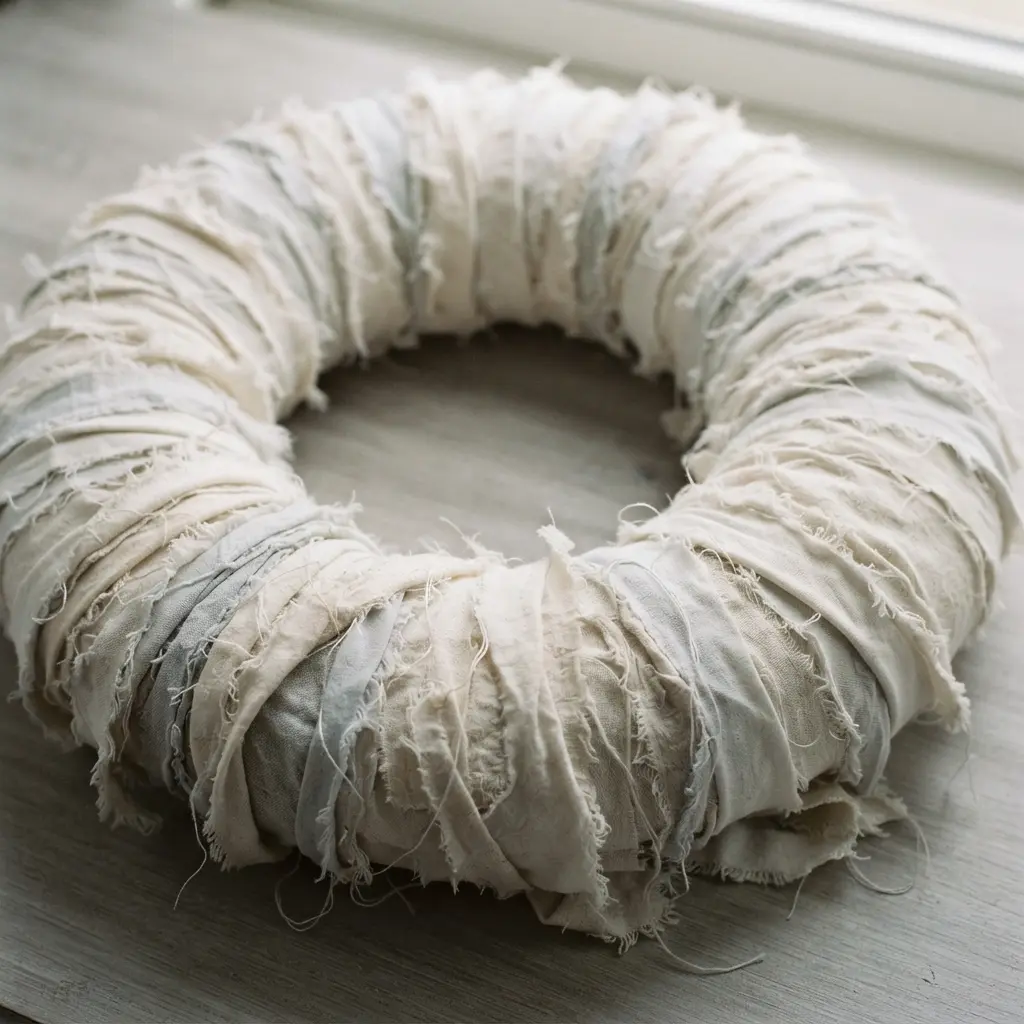
This one looks so much more intricate than it actually is. The secret is in the torn white fabric strips. You simply wrap them around a wreath form, overlapping them unevenly to create that perfect layered, frayed look. I love how the messy, organic texture instantly gives it an ancient, spooky vibe. This uneven wrapping method anchors most of my diy mummy wreath ideas.
Do not wrap the strips too tightly or evenly. The charm comes from the imperfections. For the finishing touch, you will add two big googly eyes peeking out from the bandages. Trust me, the best part is how satisfying it is to tear all that fabric. It is a great project to do with leftover sheets, and it pairs wonderfully with other easy DIY Halloween witch crafts to build out your front porch display. Does that not look like it came straight from a tomb?
6. Spider Infested Medical Gauze Wreath

Who knew sterile medical supplies could be so spooky? This is my go-to project when I want a truly unsettling Halloween wreath that makes people do a double-take. The whole trick is in the contrast. You wrap a simple wire wreath frame with torn gauze and cheesecloth, making it look haphazardly bandaged and abandoned. Adding arachnid decorations is a classic twist on these diy mummy wreath ideas.
Then comes the fun part. I love hot gluing an assortment of plastic and fuzzy spiders all over the surface, varying their sizes and positions. Drape some fake spider webbing between them to complete that infested, dusty feel. Want it extra creepy? Try staining a few strips with cold tea first for an aged look.
Isn’t that contrast satisfying? The sterile white bandages against the creepy crawlies create a fantastic sense of unease. Your front door will never look more macabre.
7. Button Eyed Craft Foam Mummy

This one is a personal favorite because it looks so charmingly spooky but is incredibly simple to make. You start by cutting out a basic mummy shape from white craft foam, then wrap it with thin strips you cut from the same sheet. The key is to glue those foam strips on in a crisscross pattern, letting them overlap a bit to create that classic wrapped look. Don’t worry about making them perfect, as slight imperfections add to the character and make these diy mummy wreath ideas stand out.
Once your bandages are set, the magic happens when you add those two button eyes. They instantly give your mummy personality, whether you go for classic black or something fun like glow-in-the-dark. This project is so effective because the tactile foam and those simple button features make it feel alive. It’s a perfect, quick project to do with kids, and you can easily turn it into a decoration by adding a loop of ribbon to the back. Pair it with fun pumpkin craft ideas that share this hands-on, festive spirit.
8. Black Velvet Ribbon Mummy Wreath

This one feels surprisingly fancy, doesn’t it? The secret is wrapping a plain wreath form with black velvet ribbon before adding your mummy strips. Pull the ribbon taut and overlap it slightly for a smooth, plush base that looks so elegant. Then, tear up some muslin or cheesecloth and drape it over the velvet in a messy, layered way to create that bandaged look. The high contrast here is what elevates these elegant diy mummy wreath ideas.
I love the dark velvet that makes the lighter wraps pop, which is what makes this design so visually striking. It is a perfect blend of spooky and stylish for your front door.
If you have leftover cheesecloth from this project, you can use it to make some spooky cheesecloth ghost decorations for your mantel. The key to a good mummy is embracing the imperfection, so do not worry about making those fabric strips neat. Your haphazard wrapping will give it the perfect eerie charm.
9. Rustic Twine Wrapped Mummy Wreath

Who says mummies have to be spooky? This project gives you that classic Halloween shape with a wonderfully earthy texture. You simply take a straw wreath form and wrap it completely with jute twine, pushing each pass tight against the last until it is fully covered. I love how the natural twine creates a subtle, rustic look that feels elegant, not gory.
It is perfect for adding a touch of seasonal charm without going over the top, proving how versatile these rustic diy mummy wreath ideas truly are. For an extra bit of fun, you can nestle a decorative sign decor into the wrapped twine before you add your spiders and webs.
Trust me, keeping a consistent tension is your secret to a smooth, gap-free finish. You will feel so proud hanging this handmade piece on your door.
10. Miniature Skull Accented Mummy Wreath

This one surprised me. It looks like something from a museum display, but it is so easy to put together. The secret is in the wrapping. You will tear or cut strips of muslin or cheesecloth and wind them tightly around your wreath base, securing them with hot glue as you go. Leave some edges frayed for that perfect, ancient bandage look.
Once your base is wrapped, you get to place the star accents. Those little miniature plastic skulls add such a spooky, gothic touch. I love clustering a few of them together or tucking them under a loose fabric flap. The contrast between the soft, frayed fabric and the hard, smooth skulls is what makes this design so visually interesting, turning ordinary materials into premium diy mummy wreath ideas.
This is a fantastic project to personalize. You could weave in some fairy lights for a glowing effect or add a few plastic spiders. When it is done, it makes a wonderful gift. Just remember to include some DIY Halloween gift tag ideas so the recipient knows it is handmade.
Weatherproofing Wreaths For Outdoor Door Displays
A sudden rain shower will turn your hard work into a soggy mess unless you seal it with a protective spray. After your wreath is completely assembled and dry, take it to a well-ventilated area and apply two or three light, even coats of a clear acrylic sealer, letting each coat dry fully. Look for a formula labeled for outdoor or multi-surface use, as these are designed to resist moisture and UV fading from the sun. Pay special attention to sealing any paper or cardboard elements, like the backs of plastic eyes you may have glued on. This final step takes minutes but protects weeks of decorative work, ensuring your spooky diy mummy wreath ideas survive the entire Halloween season on your front door.
Conclusion
I hope looking through these ideas has sparked that creative excitement you get when you find a project that feels just right for your home. The best part about making a mummy wreath is how forgiving it can be. Embrace those loose, chaotic layers and do not worry about perfect symmetry. It is all about that wonderfully textured, hand-wrapped look. Whether you are drawn to the rustic charm of burlap or the eerie glow of hidden lights, your finished piece will be a unique welcome. The next time you are gathering supplies, grab an extra skein of that textured yarn or a bit of extra fabric you have been saving. Those small details can make your diy mummy wreath ideas feel truly personal.
FAQs
Q: What is the best fabric for a mummy wreath?
A: Cheesecloth or medical gauze gives a classic look and is easy to work with. For more texture, try burlap or torn cotton sheets. The key is choosing a material you can layer loosely to achieve depth and character.
Q: How do I keep the fabric from looking flat on the wreath?
A: Avoid pulling the fabric tight. Wrap it in uneven, overlapping layers and vary the width of your strips. This creates dimensional shadows and that authentic, chaotic mummy texture.
Q: What can I use for the mummy’s eyes?
A: Large buttons, black felt circles, or foam cutouts work well. For a playful touch, oversized googly eyes create a fun focal point. Secure them with strong craft adhesive.
Q: Can I make a mummy wreath without a wreath form?
A: Yes. You can shape a base from rolled cardboard or bundle straw together. A wire coat hanger bent into a circle also makes a simple and sturdy foundation for beginners.
Q: How do I attach the fabric to the wreath?
A: Start by securing the end with hot glue or a staple. Then wrap freely, tucking or gluing the end when finished. For a less permanent option, you can simply tie the ends together.








