
Bunny Mason Jars make a charming and creative gift idea, especially for springtime or Easter celebrations. These adorable, personalized jars can be filled with candies, small trinkets, or homemade treats, making them both functional and festive. With the addition of free printables, you can easily customize your Bunny Mason Jars for a unique touch that will delight anyone who receives them. Whether you’re a DIY enthusiast or looking for an easy gift project, these jars are a fun and thoughtful way to spread joy.
Here’s a really fun and simple gift idea for the Easter season. I put these together for my daughter’s teachers.

Bunny Mason Jars
Here’s what you will need:
- Jelly Sized Mason Jar with Ring and Lid
- Contact paper (I use clear)
- Spray Paint
- X-Acto Knife
- Bunny Cut Out Template
- Ribbon or twine for Trim
- Goodies for Filling
- Hoppin’ Great Tag (Optional. You can make your own or print )
There are 2 ways to do this project. The first is to cut out the Bunny and spray it, leaving the rest of the jar clear. This is how to do it if you want your finished jars to look like this
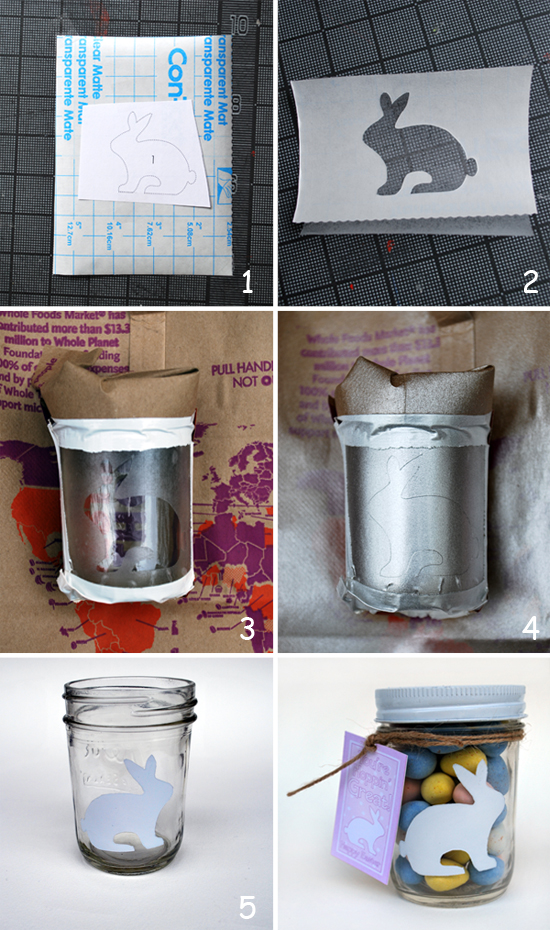
1. Tape the bunny cut out onto your contact paper. Then cut it out with your X-Acto knife. Keep the center cut out area but set it aside.
2. Take another piece of contact paper and lay it over your cut out area. This helps you to be able to more accurately locate your shape and it helps keep the shape from stretching or becoming deformed when applying it to your jar.
3. After your bunny shape is stuck on your Mason jar, very carefully & slowly peel off the piece of contact paper that helped hold it’s shape. Then go ahead and mask off the rest of your Mason jar.
4. Spray paint your cut out area and let it dry. Also, go ahead and spray paint the outside of your ring and the top of the Mason jar’s lid.
5. Once all parts are dry, very carefully and slowly peel off the contact paper.
That’s it for this method.
Now, if you want your finished jars to look like this, here’s how to do it…
1. Tape the bunny cut out onto your contact paper. Then cut it out with your X-Acto knife. If you made a jar using the method described above you can use the bunny cut out that you set aside.
2. Take another piece of contact paper and lay it over your cut out area. This helps you to be able to more accurately locate your shape and it helps keep the shape from stretching or becoming deformed when applying it to your jar.

3. Locate your bunny cut out. With this method, the entire rest of the jar will be solid and the bunny shape will be the window that your candy shows through.
4. Mask off the top of your Mason jar. You don’t want paint to get onto the inside and come into contact with the goodies.
5. Go ahead and spray the jar. Also spray the ring and top of the lid. Let it dry completely. Then you can go ahead and slowly & carefully peel away the contact paper cut out.
That’s it! Fill ‘em up with jelly beans, chocolates, or whatever yummy goodness you want. I think these are a super cute, affordable and special gift idea for teachers, neighbors or just anyone you want to wish a Happy Easter.
Bunny Mason Jars with printables offer a simple yet heartwarming way to give a personalized and thoughtful gift. They’re perfect for various occasions, from Easter to birthdays, and can be easily customized to suit your style. Have you tried making your own Bunny Mason Jars? Let us know in the comments below – we’d love to hear how you’ve used this creative idea!
FAQs
Q: How Can I Make Bunny Mason Jars as Gifts?
A: To make Bunny Mason Jars, decorate jars with bunny-themed printables, add some festive embellishments like ribbons, and fill them with treats or small gifts. Free printables can be found online to help customize the design.
Q: What Are Bunny Mason Jars Used For?
A: Bunny Mason Jars are perfect for gifting small treats, candies, or keepsakes, especially during spring holidays like Easter. They’re a creative and personalized way to share something special with loved ones.
Q: Where Can I Find Bunny Mason Jar Printables?
A: You can find Bunny Mason Jar printables on various craft websites or blogs that offer free downloadable designs. These printables can be used to decorate your jars with cute bunny images and festive text.


