
Are you looking for a fun and creative way to add some personality to your home decor? Look no further than this DIY washi tape star decor project inspired by Papernstitch! Washi tape is a versatile material that can be used in a variety of crafts, and this project is no exception. In this blog post, we’ll walk you through the steps to create your very own washi tape star decor that will add a pop of color and style to any room. So grab your favorite washi tape rolls and let’s get crafting!
Brittni Mehlhoff of Papernstitch got in touch last week to see if she could share a charming project that she recently created with you all: Washi Tape Stars! Aren’t they just lovely?! This is simple holiday project you could easily do while watching your favorite tv show or a new movie you’ve been waiting to see (I love multitasking while crafting). Follow Brittni’s simple steps below to create your own (and if you don’t have any time this season, be sure to bookmark it for next year). Take it away Brittni!
These last couple of weeks, I’ve been making new decorations to build up our holiday stash again because we recently moved across the country and wouldn’t you know it, the only thing that magically didn’t end up making it to our new place in Seattle was our BIG Christmas box (filled with our entire stash of ornaments and holiday decorations).
One of the projects I came up with, after we discovered we’d be starting from scratch this year, was this winter washi tape ornament diy that doubles as mantle decor. And I wanted to share it with you today. This project couldn’t be any easier to complete and you’ll only need a few supplies. So you’ll be able to knock it out quickly in an hour or two by the fire.

DIY WASHI TAPE STAR DECOR
Materials:
- Japanese washi tape in 3 colors
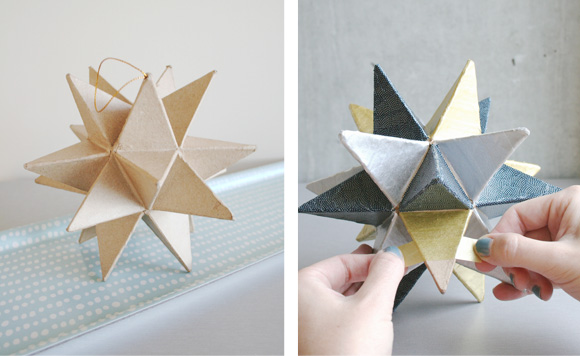
- Large kraft paper mache ornament
- Scissors
Step by Step Instructions:
1. Start with a kraft ornament or decor object. I picked mine up from Paper Source. Choose three washi tapes in different colors or patterns and grab your scissors.
2. Cover each point in sections with your tape, starting towards the top and working your way down.

3. Cut excess from the sides and move on to the next point.
4. Continue this process until all surfaces have been covered with tape.
Tip: If you don’t want any of the points to touch that are the same color, you’ll want to map out where you would like each color to be beforehand. Other than that, it is really a simple project to complete. Use your finished piece as a decoration around the holiday mantle or hang it on the Christmas tree. This shape in particular would also make a great tree topper.
Brittni Mehlhoff is the founder of papernstitch, an exhibition site for art and handmade, as well as the editor of a popular blog by the same name. When not working on papernstitch, she is dreaming up simple projects like this one.
Creating your own Washi Tape Star decor is a fun and creative way to add a personal touch to your space. With just a few simple materials and some imagination, you can make beautiful Washi Tape Star decorations that will brighten up any room. Whether you choose to hang them on the wall, use them as party decorations, or give them as gifts, these Washi Tape Stars are sure to impress. So go ahead and give it a try! And if you have any questions or want to share your own creations, let us know in the comments. We would love to hear from you!
FAQs
Q: What are some facts about washi tape?
A: Masking tape with decorative and functional qualities, washi tape is available in a variety of vibrant patterns. Although it is frequently employed in papercraft crafts like bookbinding, scrapbooking, or journaling, there are a variety of other inventive uses for it around the home.
Q: Why is it called washi tape?
A: ‘Japanese Paper’ is where the word “washi” originates. Kamoi Kakoshi, a manufacturer of masking tape, is where washi tape got its start. When a group of ladies asked them to improve their variety of masking tape in 2006, they worked together to create new colors.
Q: What are other uses for washi tape?
A: You may use washi tape, a sort of masking tape, for a variety of projects, including cards, artwork, and diaries. It’s the ideal product to add decorations to your paper, create borders, or use as masking tape.


