

Happy Springtime Piggies Birthday! For my girls’ 4th birthday, I wanted to create something truly special to celebrate their big day. Since their birthday is in the spring, I decided to make a beautiful fresh flower birthday banner to put the “Springtime” in our “Springtime Piggies Birthday” theme. This banner is easy to customize and is perfect for adding a personal touch to any room. We hope you enjoy it!

Choosing the Perfect Flowers for Your Banner
The beauty of this project is its versatility. You can use any fresh flowers you like! I used green mums, but for a real pop of color, you could shop for a vibrant medley of blooms. Think about using a variety of flowers like carnation stems, hot pink roses, or even elegant lilies. A local florist can help you pick the perfect option for your design. Combining yellow and purple flowers with assorted greenery can create a truly cheerful and beautiful arrangement for your banner.
Step-by-Step: Creating Your DIY Banner
Part 1: Making the Coaster Letters
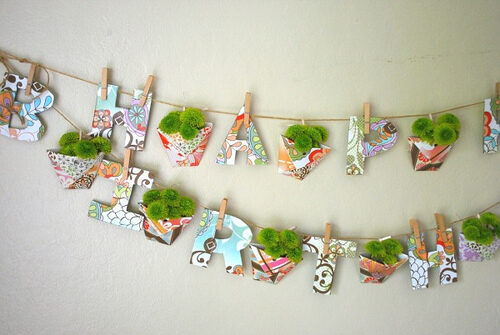
Here’s another craft I made for my girls’ 4th birthday. I was inspired by a banner made by Sisters of the Wild West so I set out to find some letters. I could not find chipboard letters in the right size, and I couldn’t find a good deal on wooden ones. So while wandering around the craft store, I saw a bunch of ladies rummaging through a 10-cent bin. So of course I had to check it out too, right? And I found a bunch of chipboard coasters for 10 cents a pack. I even had an extra 25% off coupon! The coasters are 4×4 inches.
I drew on some letters on the white side of the coasters free-hand, and used a craft knife to cut them out. It didn’t take too long, to my surprise. I did struggle at first with cutting out the middle part of the letters, but I got the hang of it after a while. I also made sure they were all the same size as the previous letters I cut. The resulting letters are about 3.5 inches tall. Then using my cut letters, I traced them onto scrapbook paper and cut them out. After that, I mod podged the paper onto the coaster letters. I used mini clothespins to hang them from some twine.
Part 2: Assembling the Origami Flower Pouches
I then made some origami pouches to hold the flowers. Cut a 6×6 inch square of scrapbook paper. Then cut a corner of scrapbook paper and tape that onto the wrong side of the square at one corner. This will be the front flap of the pouch. That part isn’t necessary if you don’t mind the back of the paper showing, or if you have two-sided paper.
Making sure the flap with the paper-covered corner is at the top, fold the square into a triangle. Then take one corner and fold it up to the opposite side of the triangle, so it forms a horizontal line. Then do the same with the other corner. Fold the flaps down on either side to secure the whole pouch. You’ll see the corner you covered with scrapbook paper as you fold it over. You can further secure the pouch with a little bit of tape.
Cut the flowers so they will fit into the pouch. I used about 5 green mums. Then I wrapped the stems in a wet piece of paper towel (about a 1/4 square of a paper towel), and then wrapped that in a small piece of plastic wrap. I made 11 of these to go between each letter. But before you insert the flowers, punch a hole through the flaps on both sides for a hanging ribbon. Then insert the flowers and tie to the twine, in between the letters. Repeat with the rest of the pouches, and you’re done!

A Quick Alternative Using a Floral Arrangement
If you’re short on time but still want a touch of fresh floral beauty, here’s a great idea. You can order a beautiful floral arrangement for same day delivery. Use the main bouquet as a centerpiece and then carefully snip a few blooms to put into the banner pouches. It’s a great way to get a coordinated look for the whole party and still add a handmade touch.

Conclusion
We hope you enjoyed this tutorial for a Springtime Piggies Birthday! This DIY project is more than just a decoration; it’s a way to add personal happiness and beauty to a special occasion. Since their birthday is in the spring, I thought I’d combine some fresh flowers and some happy prints to make a birthday banner to put the Springtime in our theme. Creating your own fresh flower birthday banner is a rewarding experience, and we are so excited to see how people react to it. Do you like it? Let us know in the comments below!
FAQs
Q: What is a flower birthday banner?
A: A flower birthday banner is a decorative piece designed to celebrate someone’s special day, featuring vibrant floral designs. It often adds color and sparkle to any birthday party, making it an unforgettable part of the celebration.
Q: How can I order a happy birthday banner?
A: You can easily order a happy birthday banner through our website. Simply choose your design, customize it if needed, and proceed to checkout. We offer next day delivery for those last-minute celebrations.
Q: What types of flowers are typically used in these banners?
A: Our flower birthday banners can feature a variety of blooms, including Asiatic lilies, Peruvian lilies, and Alstroemeria. Each arrangement is hand-designed to ensure every bloom contributes to a stunning visual display.
Q: Can I customize the message on the birthday banner flower?
A: Yes, we offer a custom option where you can add a personalized message to the birthday banner flower. This makes it a unique gift that truly reflects the celebrant’s personality.
Q: Are the banners available in different colors?
A: Absolutely! Our banners come in a variety of colors, including bright shades like orange and more subdued hues. You can choose the color scheme that best fits your event theme.


