Grab your favorite holiday floss and let’s add some stitched sparkle to your season.
Fabric Selection for Small Scale Holiday Embroidery
When stitching a cross stitch christmas tree, your fabric count determines the entire character of your miniature project. Stitch on 14-count Aida for a quick, chunky look that is perfect for beginners and reads clearly from a distance on a gift tag.
For a more delicate, heirloom feel, 18 or 22-count linen creates finer detail but demands sharper needles and more precise tension. The good news is that rustic red or cream linen provides a built-in festive background, saving you from stitching hundreds of background stitches.
You want a fabric with enough body to mount cleanly, so avoid anything too flimsy. This choice impacts your thread visibility and the final scale, so trust me, pick your base fabric first before you choose a single floss color.
Stitching Techniques for Adding Festive Texture
When adding ornaments to a cross stitch christmas tree, metallic blending filaments give your design a true sparkle, but they require a gentle hand. The trick is to use shorter lengths and maintain consistent tension to prevent frustrating snagging. For tiny, dimensional lights, a single French knot in a bright gold or white adds perfect texture.
You also couch down a metallic thread with a matching cotton to outline a star, securing the shine without the pull. Backstitching is your best friend for defining those delicate branches and ornament shapes, especially on finer linen where the Xs might blend. A size 24 tapestry needle helps with this detailed work without splitting your threads.
Remember, the goal is festive texture, not a flat image, so mix these techniques for a tree that feels alive with holiday light.
1. Minimalist Blackwork Pine Outline Motif

Stitching a minimalist cross stitch christmas tree surprised me with its quiet elegance. It uses only a single color of black embroidery floss to create a clean pine outline. You stitch the trunk and downward-sloping branches, leaving the entire interior empty for a striking, minimalist look.
It works because the simplicity feels sophisticated and versatile. You attach it onto gift tags or ornaments for a touch of classic charm. I love how quick it is to complete once you have your pattern centered.
For more seasonal inspiration, browse our collection of ideas for crafting Christmas trees in different styles. Your finished piece will have that perfect, subtle holiday feel.
2. Metallic Gold Star Topped Sapling

Who says a cross stitch christmas tree has to be huge? A metallic gold star on a small sapling creates a magical focal point without needing a corner of your living room. You simply secure the star to the topmost branch, using its built-in coil or clip.
This combination of natural green and sparkling gold gives you a dose of traditional holiday cheer in a perfectly compact package. I love how it adds a festive touch to a side table or mantel.
The trick is picking a star that is light enough to bend the sapling’s tip. You want it to sit straight and proud. For an extra festive touch, pair your sapling with some printable Christmas ornament activities for a fun family craft session. Seeing that little golden star shine feels like pure holiday magic.
3. Rustic Twine Framed Mini Tree

Stitching this rustic cross stitch christmas tree looks intricate, but trust me, it is wonderfully simple and forgiving. You will start by removing the glass from a small wooden frame and adding a cozy background, like burlap or kraft paper. Then, you create your tree shape on a piece of cardboard and cover it completely by wrapping or gluing on natural jute twine. Isn’t that a satisfying way to build texture?
The rustic charm comes from the materials themselves, and it works because it feels handmade and personal. I love how you customize it for any season just by changing the colors or adding tiny seasonal accents. For a perfect holiday pairing, you hang this finished tree next to a handmade festive flannel star ornament craft on your mantel.
My top tip is to use small dots of hot glue and press the twine down firmly to avoid any messy strings. You will be amazed at how professional your mini tree looks when it is done.
4. Pastel Scandinavian Folk Art Tree

Who would have thought a folk art cross stitch christmas tree could feel so fresh and modern? This style takes the classic motifs you love, like stylized birds and flowers, and paints them in a soft, dreamy palette. You start with a light base coat on your wooden or felt tree shape, then sketch your design lightly in pencil. I love using a fine detail brush to fill in those patterns with dusty pinks and mint greens, outlining them with a slightly darker shade for definition.
It works so well because the pastel colors give a serene, whimsical feel that fits perfectly with a calm holiday vibe. The clean, symmetrical patterns are surprisingly approachable, even if you are new to painting. Pro tip: build up your colors with thin layers to keep that delicate look, and seal your finished piece with a matte acrylic varnish to protect it. This makes a lovely handmade gift, similar to the personal touch of creating a personalized state ornament for someone special.
5. French Knot Ornamented Green Spruce

Ever wondered how those little textured dots elevate your cross stitch christmas tree? This one is all about creating a charming felt piece decorated entirely with French knots. You will start by cutting your green felt into a simple spruce shape, then fill it with tiny, raised knots in festive colors. The result is a wonderfully tactile decoration that feels special and handmade.
I love how the knots add so much cozy dimension, mimicking tiny lights or snow. Your finished piece has that perfect homemade charm. For another way to showcase special ornaments, a unique shadow box ornament makes a fantastic display option.
6. Geometric Pixelated Tri-Color Tree

Stitching a geometric cross stitch christmas tree looks complex, but it is one of the most beginner-friendly projects you will find. You work with a simple three-color palette on Aida cloth, filling in squares to build a blocky, digital-looking tree. The whole design comes together from basic geometric shapes, and seeing it emerge is incredibly satisfying.
I love how the clean, pixelated aesthetic gives a modern twist to a classic holiday motif. The trick is to pick colors with clear contrast so your trunk, foliage, and highlights all pop. When you finish, the bold graphic look is perfect for pairing with your vintage-style Christmas ornaments for a fun, eclectic tree. Does that not look stunning?
7. Whimsical Curly Branch Tree Design

Ever feel like stitching a whimsical cross stitch christmas tree needs a touch of magic? This design is pure joy to work on, with its spiraling, dancing branches that look like they grew in a storybook. You’ll focus on stitching those exaggerated, flowing curves, often using fractional stitches and backstitches to capture the delicate swirls at the branch tips. It works so well because the playful movement feels festive and full of personality, making any gift it adorns feel extra special.
Your key to success is following the chart’s lines with absolute precision to keep the curves fluid, not stiff. I love using a water-soluble marker to lightly trace those complex loops on the fabric before I start. This design pairs wonderfully with other handmade holiday touches, like festive paper mache Santa decorations, for a completely coordinated gift presentation. Does that not sound like a fun project?
8. Christmas Word Art Tree Silhouette

Designing a word art cross stitch christmas tree looks intricate, but honestly, it is one of the quickest festive projects you will make. You feed a list of your favorite holiday words into a word cloud generator, shape it into a tree, and watch the magic happen.
I love how personal this gets. You choose every word, from family names to favorite carols, and pick fonts and colors that feel like your Christmas. The result is a unique piece of art that feels full of meaning, not decoration. It makes a wonderful gift because it is specific to the person receiving it.
For a cohesive look, try pairing your word art tree with another handmade project, like a creative holiday card wreath project. Does that not feel wonderfully festive?
9. Single Red Cardinal Perched Tree

There is something so classic about a single red cardinal perched on a cross stitch christmas tree, isn’t it? This design is all about creating that warm pop of color against a stark winter background. You will start by stitching the cardinal’s plump body with three shades of red floss to build depth in its feathers, then add the small, dark eye and orange beak.
Once your bird is complete, you move on to the textured tree branch using various browns. The final effect is incredibly satisfying because that brilliant red symbol feels both festive and full of quiet hope. For a lovely finishing touch, you decorate with a star wreath around your framed piece to complete the holiday display.
10. Snow Dusted White Thread Tree
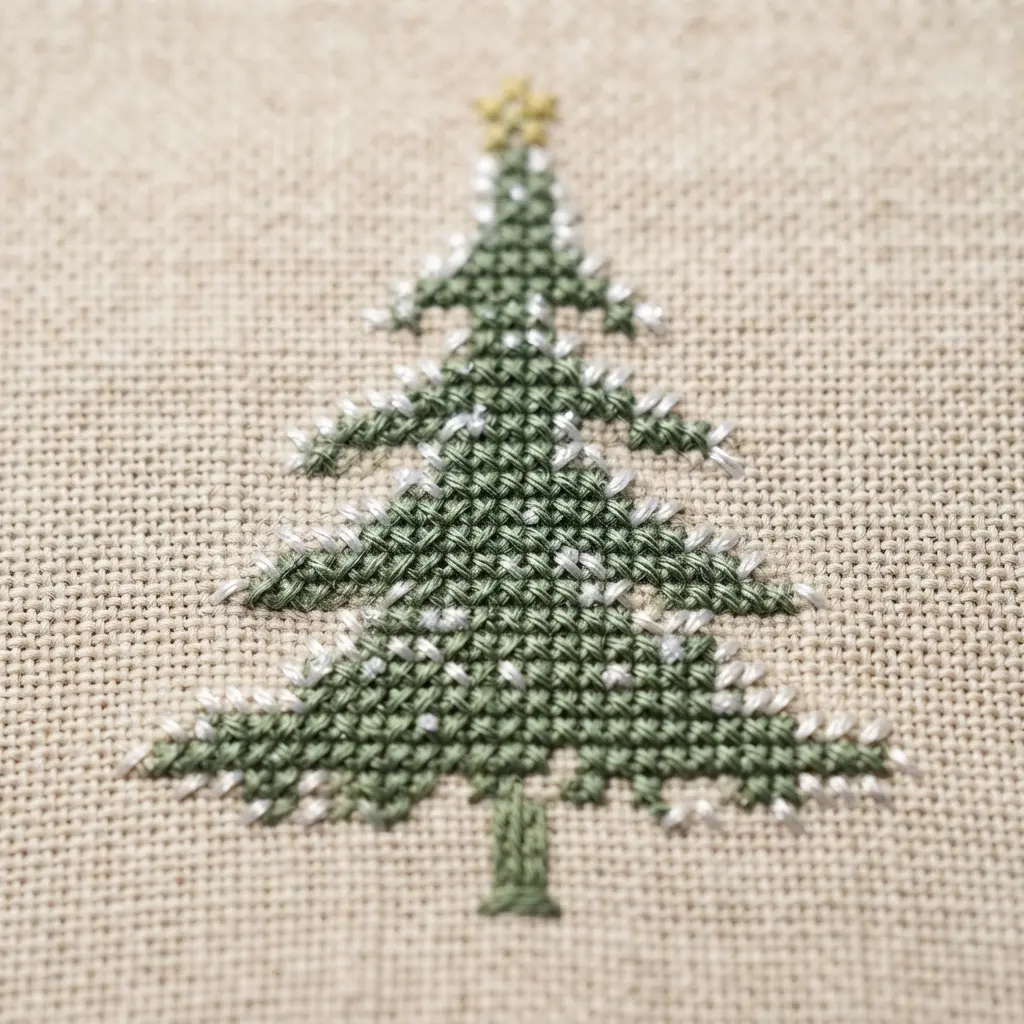
Who would have thought a cross stitch christmas tree looks so wintry and delicate? This design uses fine white stitches to create the look of frosty bark or delicate lichen on the branches. Then, you lightly scatter a few extra white stitches on top to mimic a gentle dusting of snow.
The magic happens on a dark background fabric like navy or charcoal, which makes every single white thread pop. I love using a slightly iridescent white floss for the snow specks to add a subtle sparkle. It is a wonderfully peaceful project that feels like stitching a quiet winter morning.
Once your tree is finished, it makes a stunning ornament. For a cozy seasonal display, you pair it with a handmade rustic log candle holder to complete the woodland vibe. Does that not feel serene?
Finishing and Mounting Projects for Gift Tags
The fastest way to mount your cross stitch christmas tree is with a simple iron-on adhesive backing. Cut your stitched piece with a half-inch margin, press it onto heavy cardstock, then trim neatly to create a durable gift tag. For a softer finish on linen, use a tight whip stitch around the edges with coordinating perle cotton before attaching it to a linen sachet. A dab of acid-free glue under the corners will secure your work without bleed-through.
This final step protects all your careful stitching and turns your embroidery into a keepsake. Your recipient will notice the handmade touch immediately, and that is the whole point of a festive project like this.
Conclusion
So, did any of these little trees spark that festive stitching urge? Look at the potential you have right at your fingertips—each of these cross stitch christmas tree designs is a small celebration waiting to happen. My best advice is to pick the one that made you smile the most and stitch it first; that initial success is the best motivator for making a whole set.
Whether you are adding them to gift tags, stitching them onto fabric bags, or framing them as tiny ornaments, these motifs are about sharing a piece of your creative heart during the holidays. The perfect finishing touch for your presents is not in a store; it is right there in your hoop.
FAQs
Q: What is the best fabric for making cross stitch gift tags?
A: For gift tags, 14-count Aida cloth is a great choice. It is stiff enough to hold its shape and the holes are easy to see, making for quick and tidy stitching. You cut it to size easily after finishing your design.
Q: How do I attach my finished cross stitch to a gift?
A: You attach it to a paper tag using craft glue. For fabric bags, a simple whip stitch around the edges works well. Using iron-on interfacing on the back of your stitching first helps prevent fraying and gives a clean finish.
Q: Can I make these designs if I am a beginner?
A: Absolutely. Many of these trees use simple outlines or block colors perfect for beginners. Start with the minimalist blackwork or the geometric pixel tree to build confidence before trying designs with French knots or metallic thread.
Q: What type of thread works best for a festive look?
A: Standard mercerized cotton floss gives vibrant color. For extra sparkle, incorporate a strand of metallic thread for stars or accents. Be patient, as metallic thread is a bit trickier to work with than regular cotton.
Q: How long does a small cross stitch tree take to finish?
A: Most of these small motifs are completed in one relaxed evening, often in just a few hours. Their small size makes them ideal last-minute projects that still deliver a big handmade impact.