Selecting Ribbon Width For Desired Scale
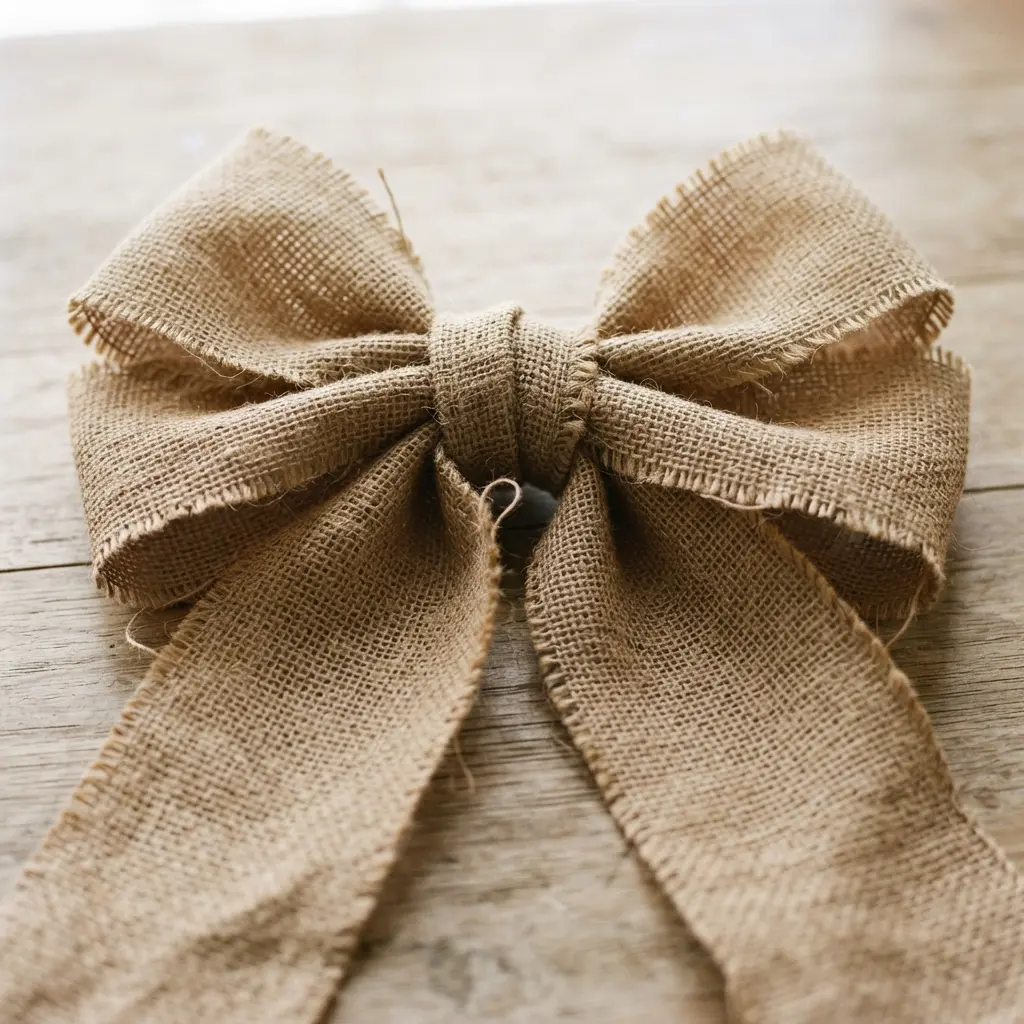
The width of your wired-edge ribbon directly dictates the final size and visual weight of your bow, so you must start with a wider ribbon than you think you need. A four-inch width is the sweet spot for a substantial farmhouse accent that holds its shape without becoming too bulky to work with. Trust me on this, unwired burlap simply collapses under its own weight, losing all the volume that makes a successful DIY big burlap bow impressive. You want a sturdy ribbon with that embedded wire along each edge, as this gives you the control to sculpt and hold those perfect, crisp loops. This wired construction is the secret to achieving that professional, deliberate look for your rustic decor.
Mastering The Center Gathering Twist Technique
A tight, secure twist with your floral wire at the very center of your gathered loops is what separates a flimsy bow from a polished one. Here is the thing, you need to pinch all your loops together firmly and wrap the wire at least five times before twisting the ends until the bundle feels solid. Beginners often make the mistake of a loose wrap, which leads to uneven loops that shift and sag over time. Use a strong 22-gauge wire for this binding step, as anything thinner lacks the grip needed for a heavy material like burlap. That final twist locks in the symmetry and creates the full, generous appearance you expect from every DIY big burlap bow.
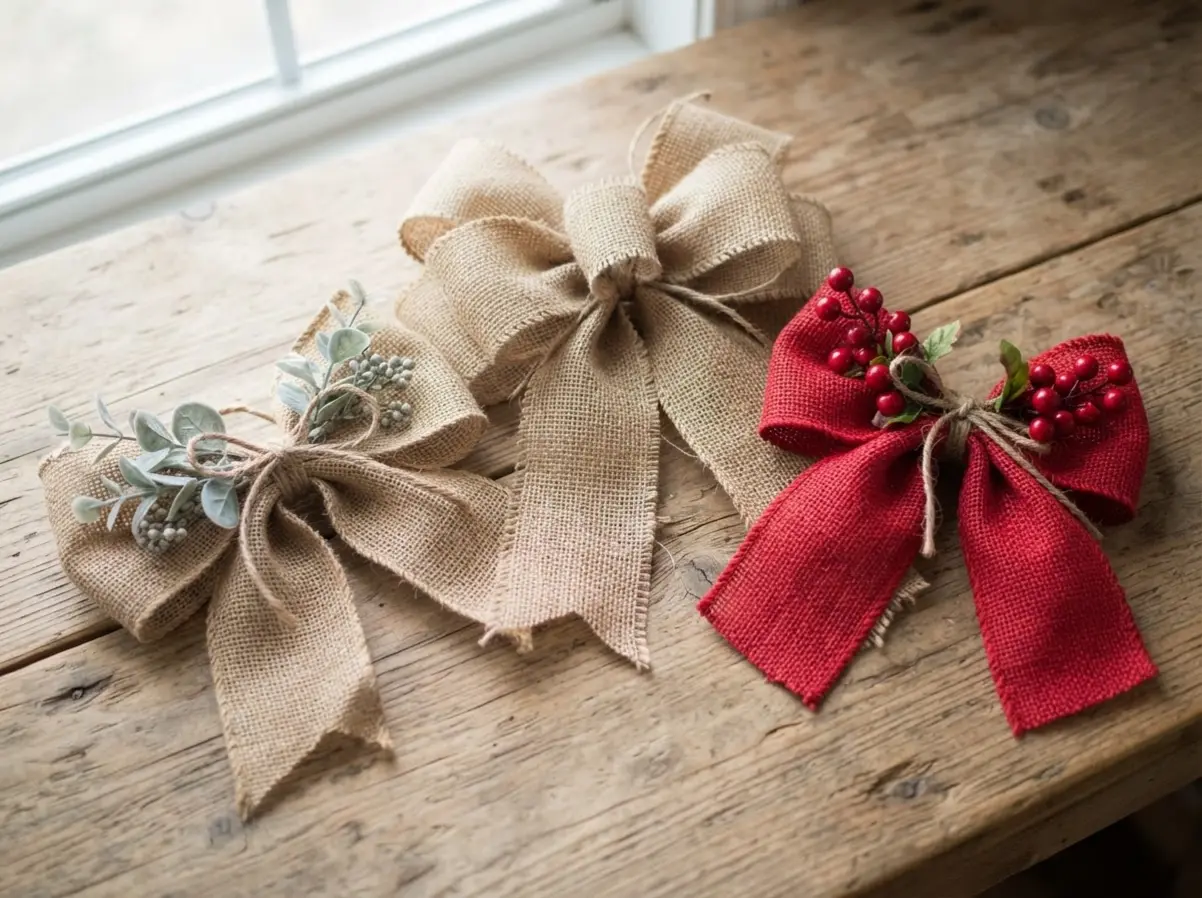
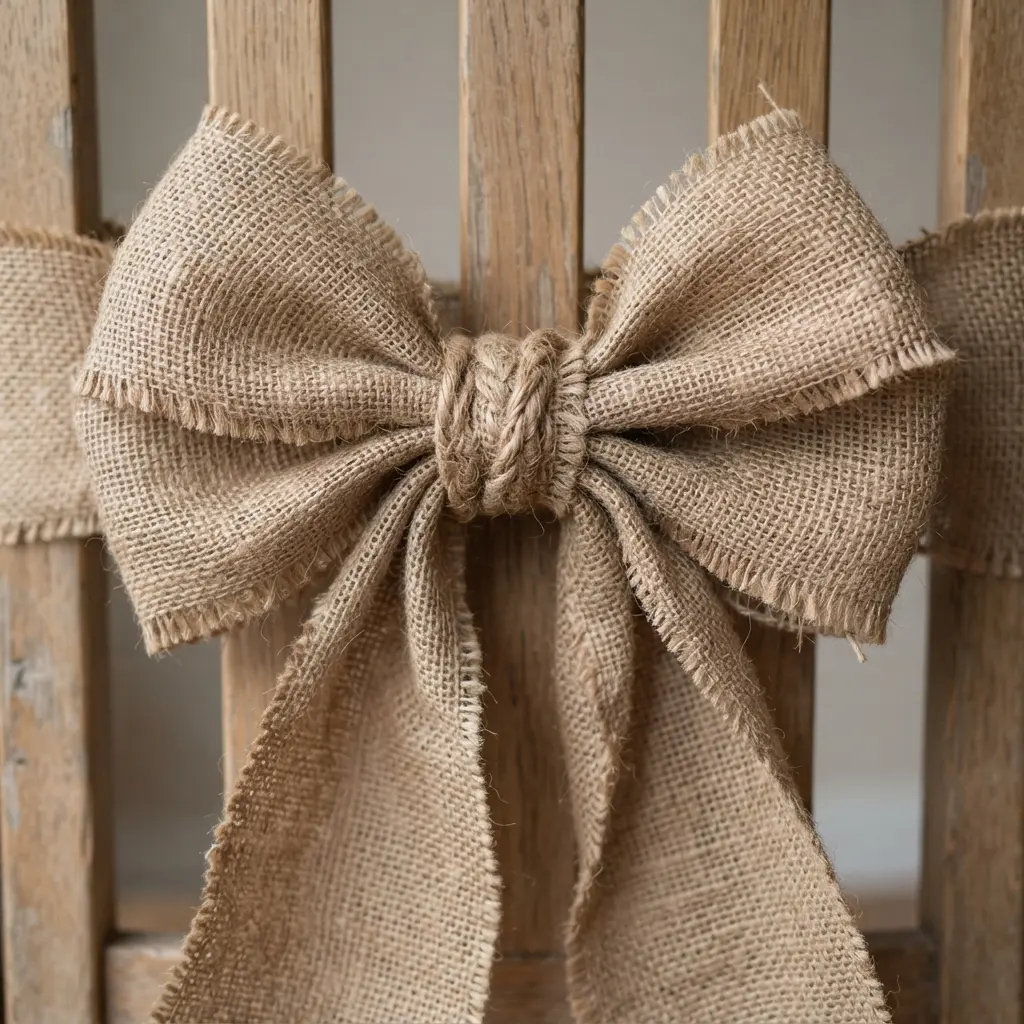
1. Wired Burlap Wreath Topper Bow — The Essential Base
Ever wondered how those gorgeous, full bows on wreaths never seem to droop? The secret is in the ribbon itself. A wired burlap ribbon is your essential base because the thin wire woven into its edges gives it a built-in skeleton.
Trust me, using unwired burlap is the most common mistake and it leads to a sad, limp result. With the wired kind, you pinch the center, create equal loops on each side, and secure it all with some floral wire. Isn’t it satisfying when you step back and see your finished DIY big burlap bow holding real volume? That foundation is ready to be layered with other decorations.
If you are new to making bows, mastering a basic zipper bow technique first builds the muscle memory you need for this bigger project.
2. Lace Trimmed Burlap Farmhouse Bow — Elegant Contrast
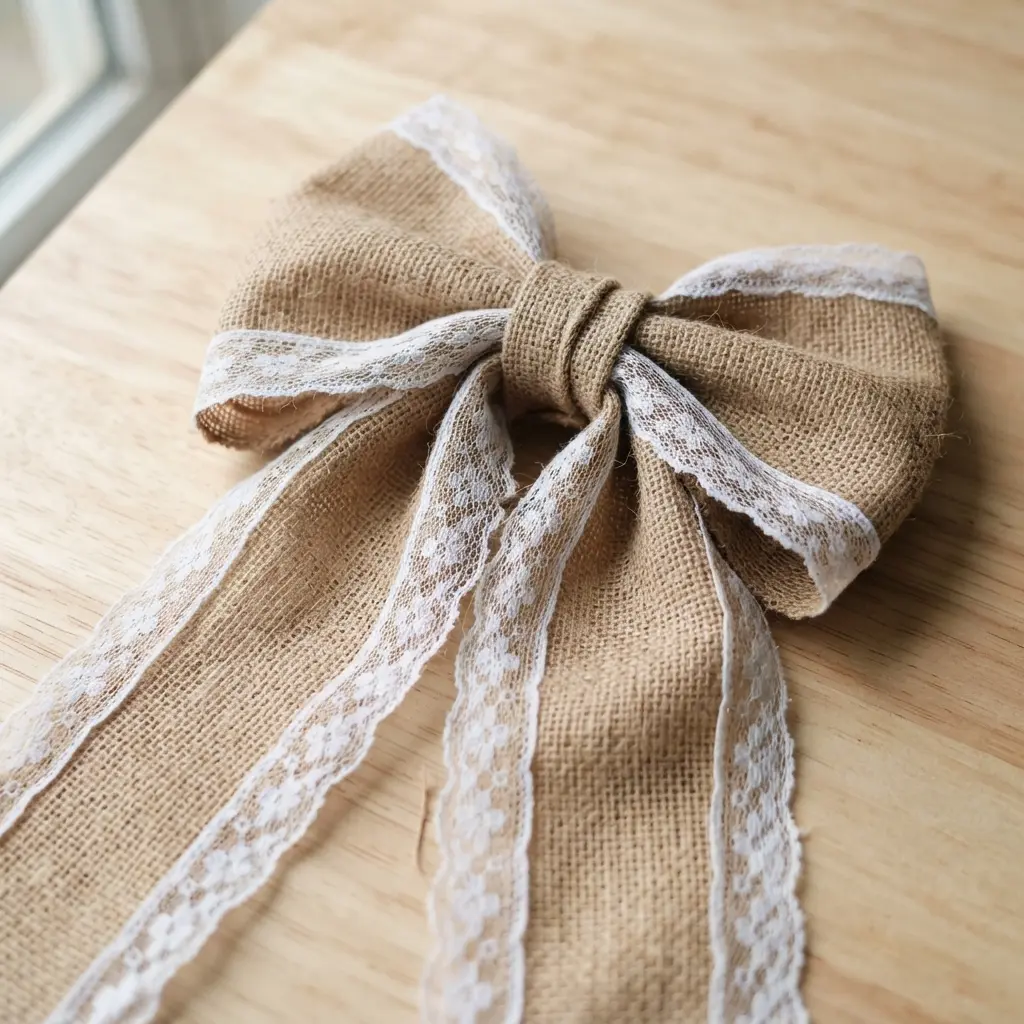
Who would have thought burlap and lace could be such perfect partners? This bow is all about that gorgeous balance between rustic and refined. You will layer a narrow lace trim over a wider piece of natural ribbon, then form it into big, soft loops before securing the center tightly with floral wire.
The magic is in the contrast. The rough texture of the material makes the delicate lace patterns pop, creating a look that is simple yet intricate. Watch those two textures merge into one elegant DIY big burlap bow that feels effortlessly styled.
I love adding this piece to a simple festive shamrock wreath decoration for a touch of handmade charm. Your finished creation will feel both down-to-earth and beautifully sophisticated.
3. Burlap Bow with Eucalyptus Sprigs — Natural Texture

Isn’t it amazing how adding a single sprig of nature transforms a simple arrangement? I love this one for its effortless style. Start by making a generous, multi-loop creation from your wired burlap ribbon, which holds its shape beautifully.
Tuck one or two small eucalyptus sprigs right into the center, securing their stems with a bit of floral wire. The cool, silvery greens soften the rough texture instantly. For a project that shares this rustic, handmade vibe, planning some diy halloween wreath decor uses many of the same principles of texture and natural elements.
Fluff your loops and let the greenery cascade a bit for that organic DIY big burlap bow finish.
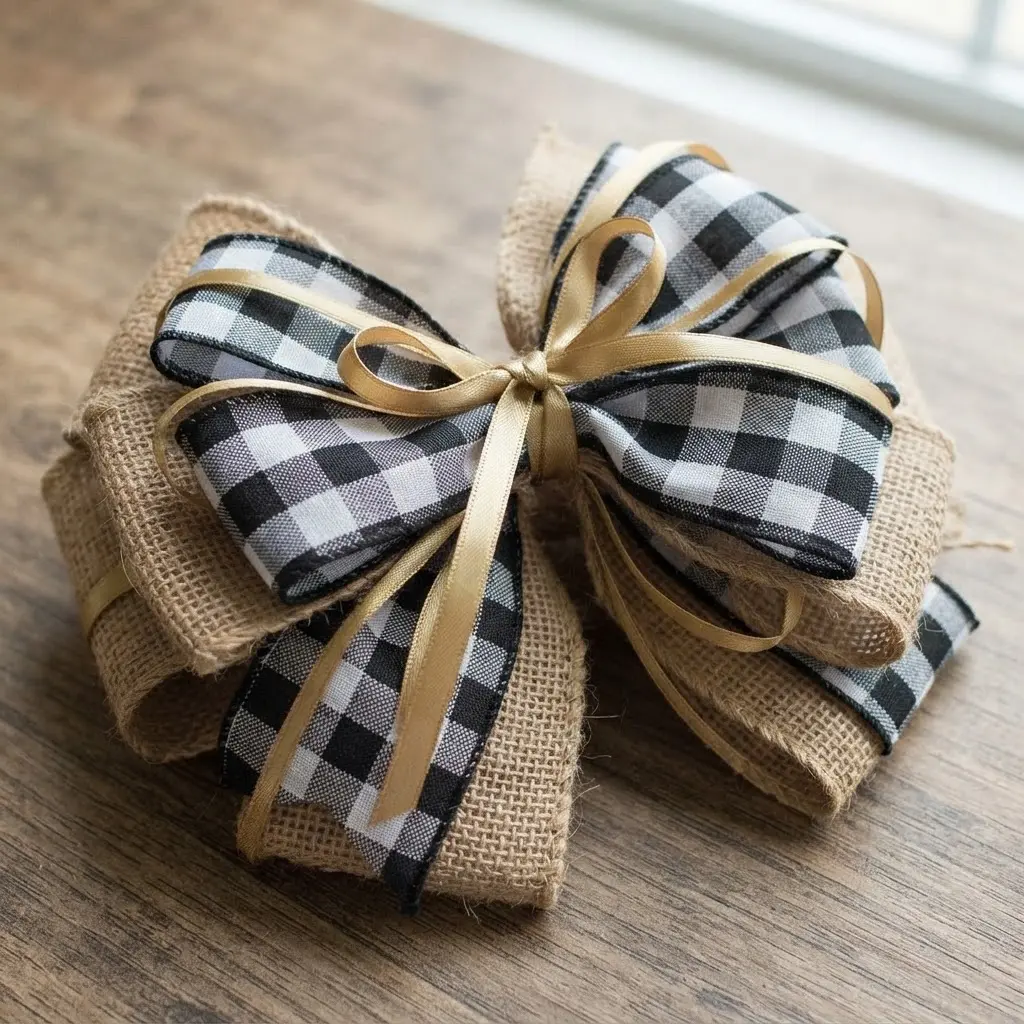
4. Double Layer Plaid Burlap Bow — Cozy Pattern Mix
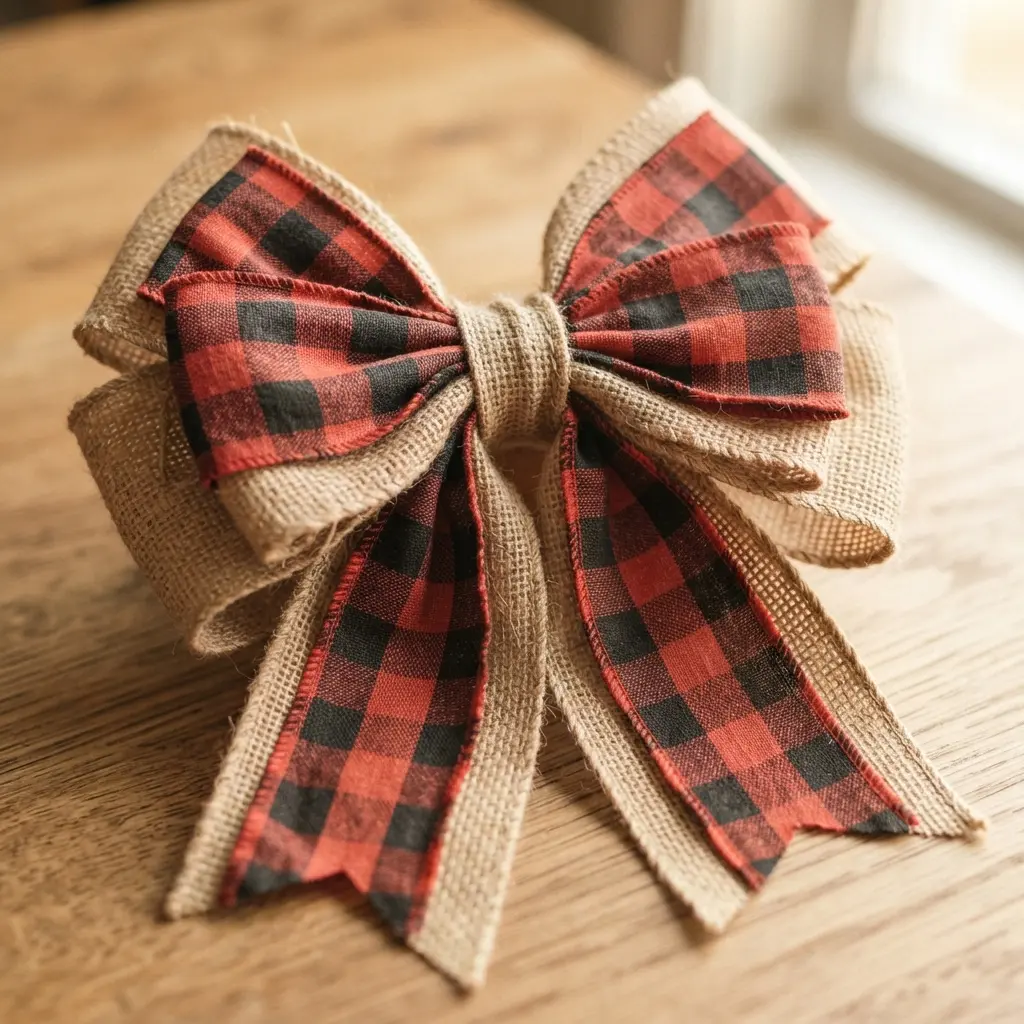
Ever wondered how to get that cozy, layered look that feels both rustic and polished? This one looks complex but is satisfying to put together quickly.
You start by making two separate pieces, a larger base one and a slightly smaller plaid one, using wired ribbon for each. After securing each with floral wire, you stack them together, align their centers, and tie them into one gorgeous shape.
The magic happens because the raw texture plays perfectly against the structured pattern of the plaid, creating tons of visual interest. For a super charming final touch, try adding a cute cupcake liner wreath to the center to complete your DIY big burlap bow display.
5. Large Burlap Chair Back Bow — A Statement Detail
You know how sometimes a simple chair looks a bit incomplete? This seating accent acts as a deliberate, eye-catching feature. You will take a long, wide strip of natural burlap, drape it over the chair back, and tie a generous arrangement right in the center.
The magic is in the scale and texture. By using plenty of material, you create voluminous loops and tails that hang with a graceful, substantial presence. I admire how the coarse, earthy texture adds a warm, organic layer to your room. It works beautifully because the repetition across multiple chairs creates a powerful visual rhythm.
My top tip is to be generous with length to avoid a skimpy look. Attaching a few crafting paper flowers to the center mixes textures for a memorable DIY big burlap bow.
6. Burlap Bow with Berry Accents — A Pop of Color
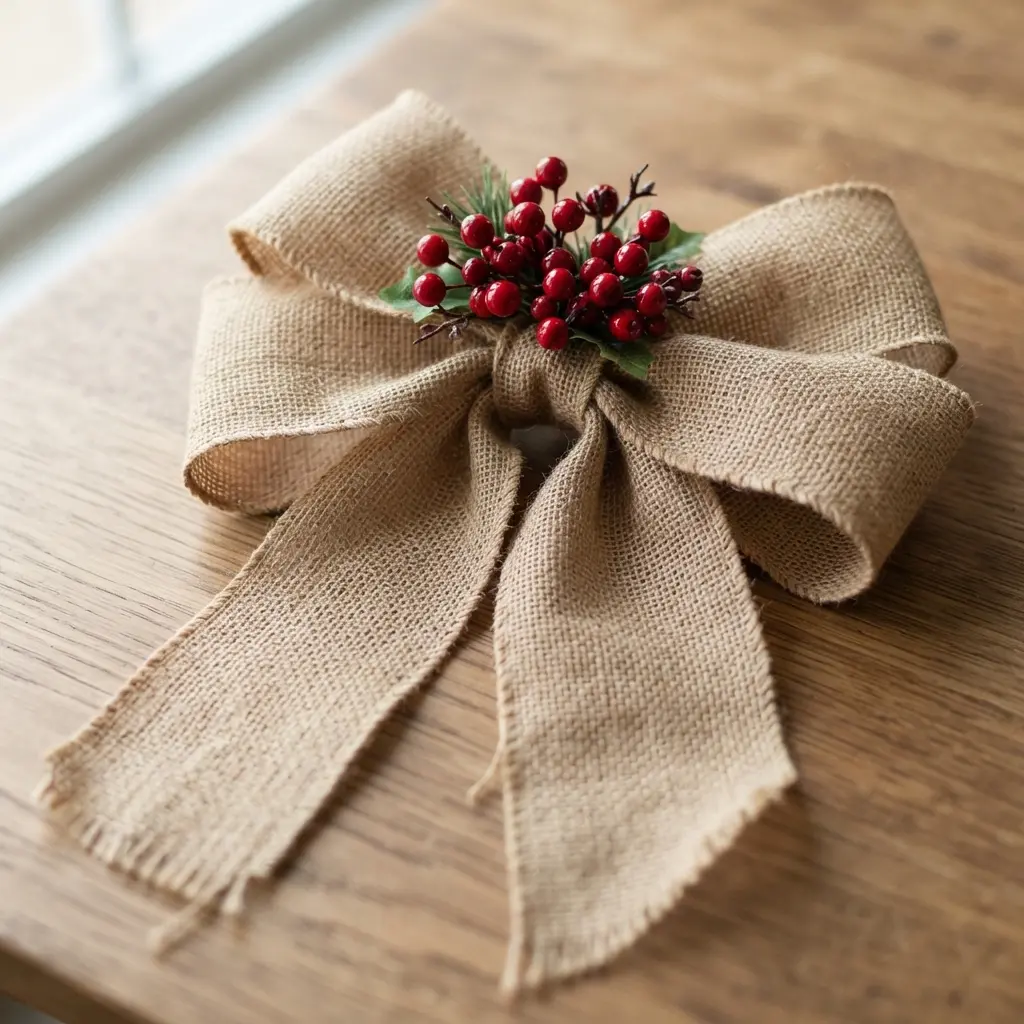
Ever wonder how to make a rustic arrangement look instantly festive? This is the trick I turn to often. You start with your base shape, then tuck a few artificial berry stems right into the loops and knot. The key is to nestle them in naturally.
The contrast makes this combination shine. The rough, neutral backdrop allows those glossy red or purple berries to stand out without losing farmhouse charm. A well-placed cluster creates the perfect DIY big burlap bow accent.
This same principle of adding rustic charm works beautifully if you are also making a seasonal holiday ornament. Trust me, it adds a stunning focal point to any table.
7. Triple Ribbon Rustic Burlap Bow — Rich Layering
This one looks so full and complex, but it simply involves three ribbons playing together. You start by making a classic arrangement with your widest base, then add loops from a second, smoother option like satin or velvet.
Why does it work so well? The magic is in the contrast between textures. That rough base makes the softer, shinier layers pop, giving you incredible depth without fuss.
My go-to tip is to use floral wire to secure each layer tightly before adding the next. This keeps everything sturdy while you fluff it into shape. It is the perfect finishing touch for a gift or to pair with a make a rustic flannel ornament accent. You will love the results of this layered DIY big burlap bow technique.
8. Miniature Burlap Pinecone Winter Bow — Seasonal Charm
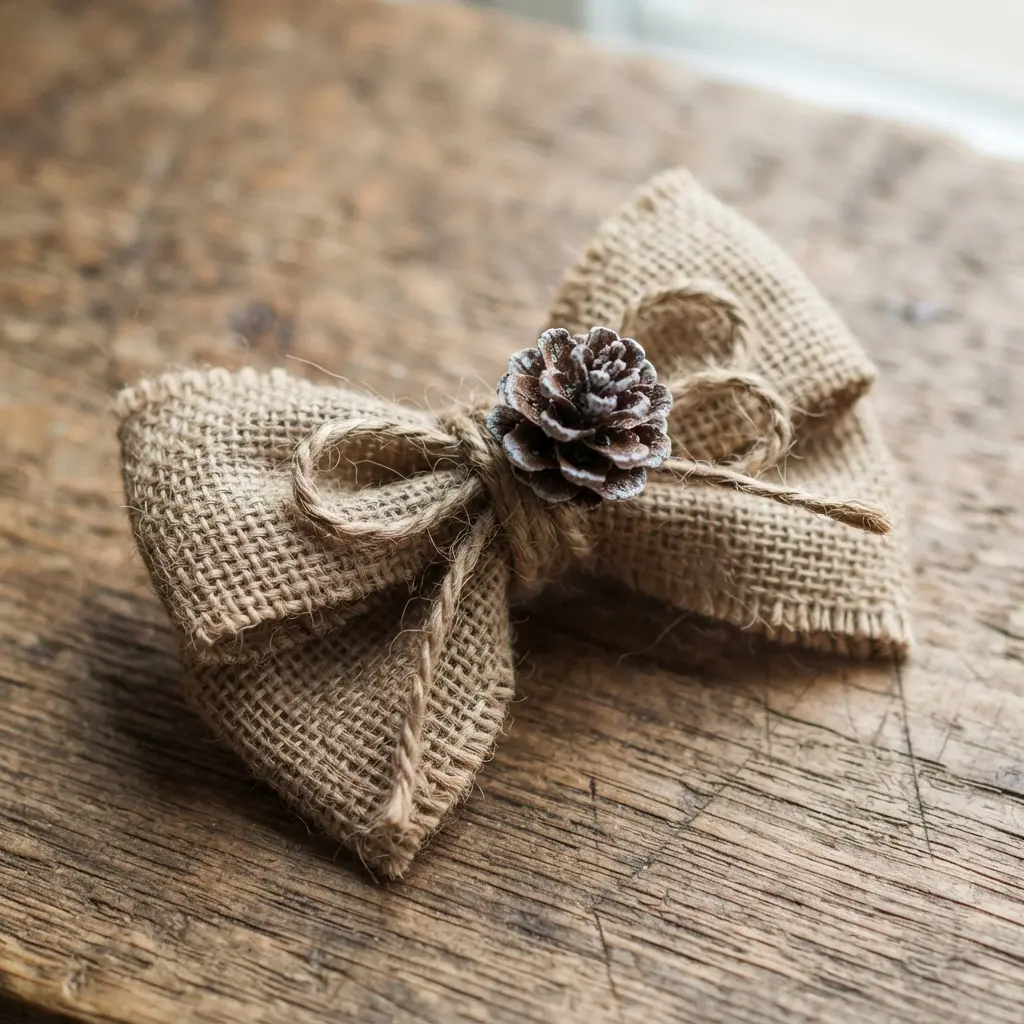
Isn’t it amazing how the tiniest details bring a whole room to life? This miniature piece proves that size matters less than execution. You start by shaping a small strip of burlap fabric into a simple arrangement, securing the center with a dab of glue. The magic happens when you nestle a tiny pinecone right in the middle for instant woodland charm.
Keeping everything small and intentional ensures a delicate result. A miniature pinecone fits perfectly here, as one that is too large overwhelms the design.
This approach offers a charming alternative to the standard DIY big burlap bow when you need smaller accents for gift wrapping or simple wreaths. Once you make a few, you will notice how they elevate your festive space with handmade warmth.
9. Wide Striped Burlap Seasonal Bow — Bold Graphic Lines
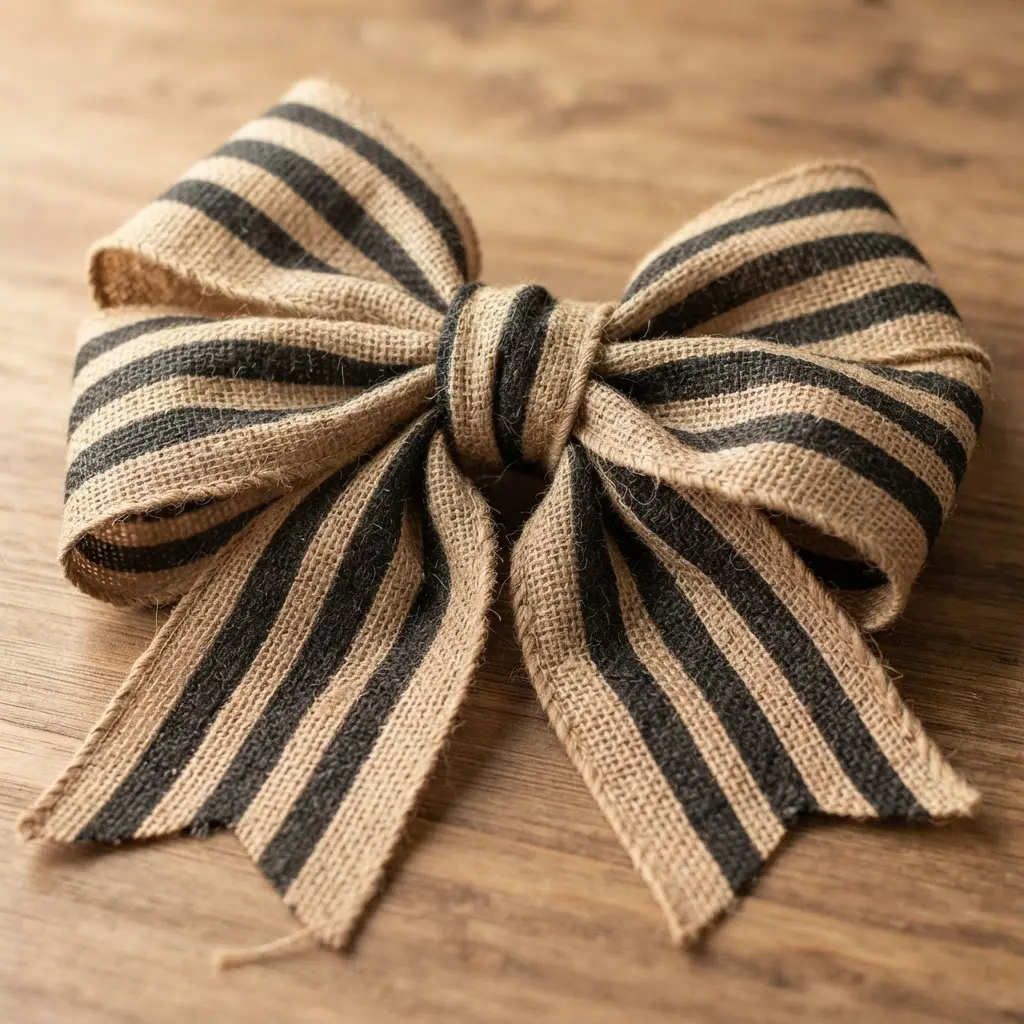
Who knew bold stripes on rustic fabric could feel so modern? This design gives you that perfect blend of earthy texture and graphic punch.
You start by cutting lengths of wide striped burlap ribbon and forming your loops carefully. The key is keeping those stripes aligned so they create clean, strong lines. Cinch the center super tight with floral wire to lock it all in place.
It works because the graphic pattern makes it a statement piece, while the natural fiber keeps it from feeling cold. Trust me, using sturdy material makes shaping those loops a breeze. It pairs wonderfully with other projects like crafting decorative doily bowls to complete your seasonal DIY big burlap bow display.
10. Natural Burlap Bow with Twine — Simple Rustic Finish
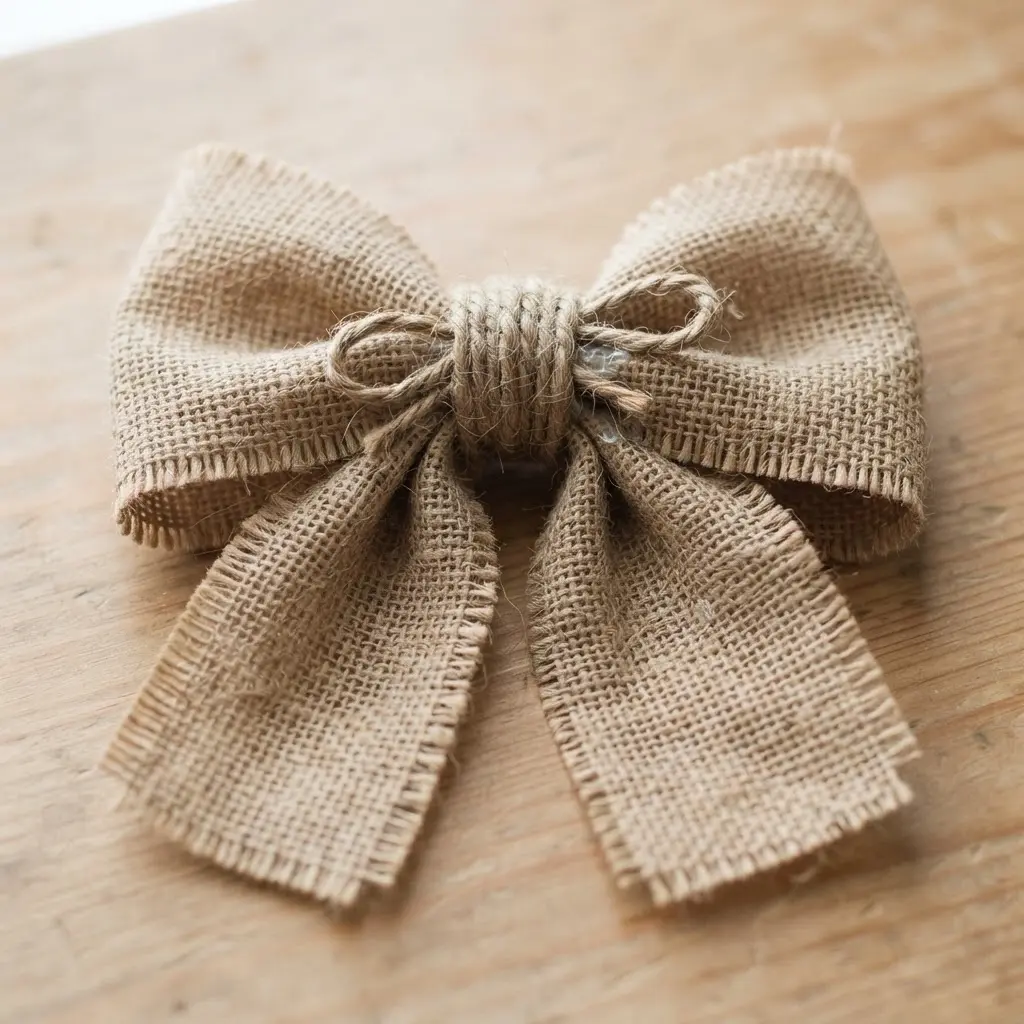
Ever feel like a project needs to be perfectly polished to be beautiful? This approach proves otherwise. You simply cut a long strip of unbleached burlap, fold it into loops, and gather the center. The magic happens when you cinch it all tight with a piece of natural jute twine. I love how the raw edges and coarse texture are the whole point, giving it that authentic charm.
Its neutral color palette is incredibly versatile, making it a perfect fit for farmhouse wreaths or bohemian gift wrapping. Pull that twine as tight as you manage to keep the shape full. That satisfying final step is to fluff the loops until you achieve your ideal DIY big burlap bow.
Once you have the hang of this simple technique, you can use it to create an inspirational felt banner for a coordinated handmade look. Does that not feel wonderfully organic?
Preserving Texture Against Indoor Humidity
A light mist of fabric stiffener applied to your finished piece prevents the natural fibers from going limp in a humid room. The good news is, this takes two minutes and protects weeks of work by locking in that crisp texture. Focus the spray on the inner curves of the loops and the tails, which are the first areas to absorb moisture and soften. For a decorative center you have added with hot glue, a dot of clear craft adhesive on the back of any foliage inserts adds extra insurance against drooping. This simple step ensures your DIY big burlap bow maintains its sculpted volume as a long-lasting part of your decor.
Conclusion
I hope this collection has sparked that wonderful feeling of possibility you get when you spot a project suited for your home. The beauty of a successful DIY big burlap bow is that it starts with a simple, textured material and becomes something uniquely yours. My best piece of advice is to start with wired ribbon if you are new to this, as it makes shaping those loops easier and helps your creation last. Remember, the most satisfying projects reflect your personal style, so feel free to mix textures or swap out accents to make each one your own. I cannot wait to see what you create.
FAQs
Q: What is the best type of burlap to use for a big bow?
A: Wired burlap ribbon is highly recommended, especially for beginners. The wire embedded along the edges makes it easier to shape and hold those large loops without collapsing. It also helps prevent excessive fraying.
Q: How do I keep my burlap bow from looking limp?
A: Using wired ribbon is the first step. When you form the loops, twist the ribbon slightly to give them more body. Fluff and adjust each loop individually after tying the center, and consider using a double-layer technique for extra volume.
Q: Can I wash a burlap bow if it gets dirty?
A: Washing is generally not advised, as it shrinks, loses its shape, or frays significantly. For dust, gently vacuum with a brush attachment. For spot cleaning, use a slightly damp cloth and blot the area, then allow it to air dry completely.
Q: What can I use to attach embellishments like berries or greenery?
A: A hot glue gun provides a strong, quick bond for most accents. For a more natural look, you can also use floral wire or a thin, clear elastic band to secure items like sprigs of eucalyptus or pinecones to the center.
Q: How long should the tails be on a large chair back bow?
A: For a dramatic chair back piece, plan for tails that are at least 12 to 18 inches long. You can always trim them shorter once secured. Starting with longer pieces of ribbon ensures adequate length.


