Easter is just around the corner, and that means it’s time to start thinking about decorating eggs! While traditional dyeing methods can be messy and time-consuming, there’s a fun and easy alternative: decorating Easter eggs with Sharpie markers.
In this blog post, we’ll show you how to create unique and vibrant designs on your eggs using Sharpie markers. Whether you’re a seasoned artist or just looking for a fun activity to do with your kids, this technique is perfect for everyone. So grab your Sharpies and let’s get creative!
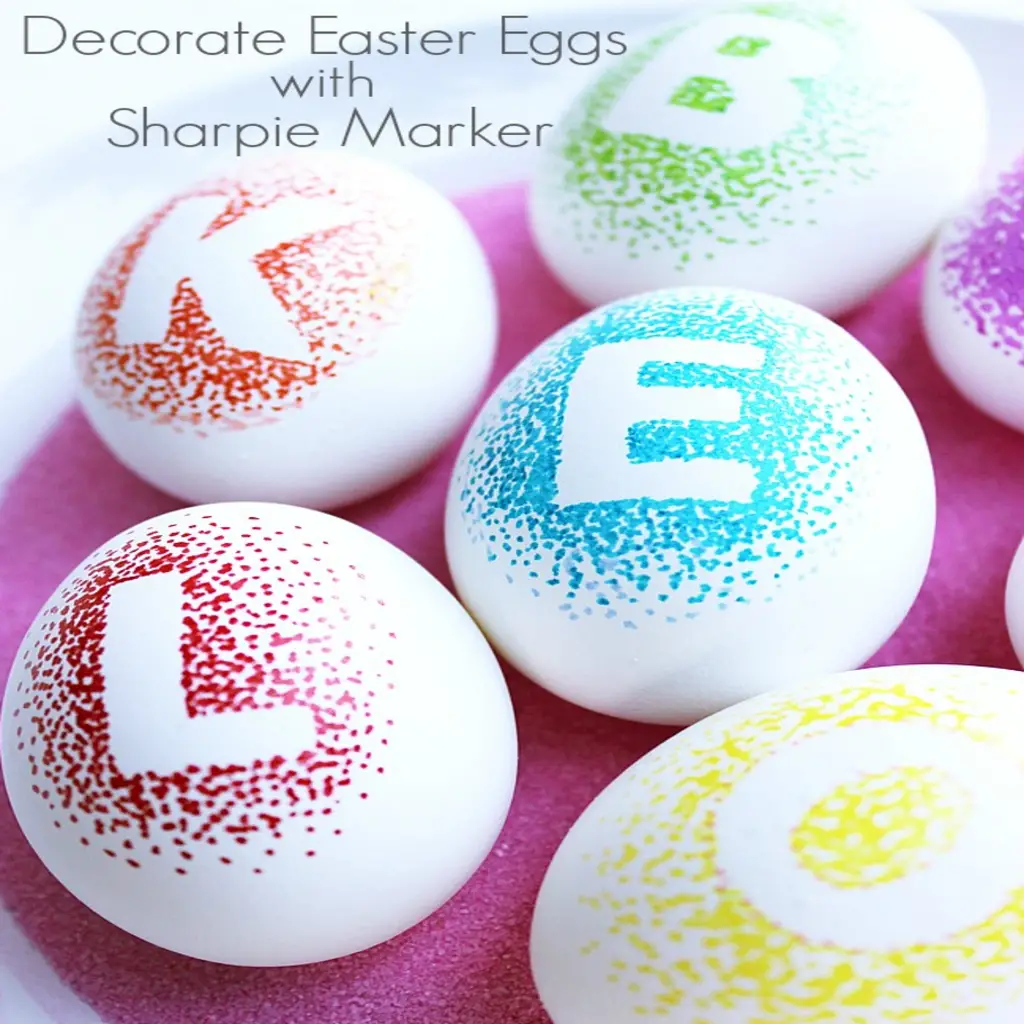
I’m always looking for fun and easy ways to decorate Easter eggs. This technique of making dots using Sharpie markers and stickers is so fun and easy you won’t want to stop at just a few. Did I mention this is virtually mess free! It’s so fun to personalize the eggs for all of your family members too. So, grab your Sharpie markers for a little Easter egg fun and let’s get started!

DECORATE EASTER EGGS WITH SHARPIE MARKERS
Supplies You Need:
- Eggs
- Letter Stickers ( I found these at Michael’s.)
- Sharpie Markers

Step 1: Boil your eggs. I found that if you bring the eggs to a boil and let them sit for 13 minutes you will end up with the perfect eggs. Also, you won’t have a lot that crack like if you bring them to a hard boil and keep boiling. Try it! I think you’ll find it works pretty awesome.
Step 2: Put letter stickers on your eggs.

Step 3: Add dots around the letters. Build up the dots around the letters and have fewer dots as you get to the edges.
Try something new this year when decorating your Easter eggs without all of the mess of dying and have fun.
Enjoy!
Decorating Easter eggs with Sharpie markers is a fun and creative activity that can be enjoyed by people of all ages. Sharpie markers offer a wide range of vibrant colors and fine tips, allowing you to create intricate designs and patterns on your eggs. Whether you prefer bold and colorful designs or delicate and detailed artwork, Sharpie markers provide endless possibilities for decorating Easter eggs. So grab your markers, unleash your creativity, and have fun decorating your Easter eggs this year! We would love to see what you come up with, so be sure to let us know in the comments below.
FAQs
Q: What is a Sharpie marker made of?
A: A Sharpie marker is primarily made up of the following components:
Ink: The ink used in Sharpie markers is a mixture of solvents, pigments, and dyes that provide vibrant colors and permanent markings.
Reservoir: The ink is stored in a reservoir within the marker, which allows for continuous flow and prevents drying out.
Nib: The nib or tip of the marker is typically made of porous material, such as felt or fiber, which helps control the flow of ink onto the surface being marked.
Barrel: The barrel of the marker is usually made of plastic and provides a comfortable grip for the user.
Overall, the combination of these components makes Sharpie markers durable, long-lasting, and suitable for various writing and marking purposes.
Q: How does a Sharpie marker work?
A: A Sharpie marker works by utilizing a combination of ink and a porous tip. The ink is made up of solvents, pigments, and resins that are designed to be long-lasting and adhere to surfaces. When you write with a Sharpie, the ink flows through the tip and onto the surface, leaving a bold and permanent mark. The porous tip allows the ink to flow smoothly and evenly, while also preventing it from drying out too quickly. This combination of ink and tip design makes the Sharpie marker a reliable tool for creating vibrant and durable marks on various surfaces.
Q: What type of ink is Sharpie?
A: It needs to be pumped because it is a valve action marker. Permanent ink is used in the Fine, Ultra-Fine, Twin Tip, Chisel, Retractable, Mini, and Super pens. Although they also contain ethylene glycol monobutyl ether, alcohols are the main solvents. Permchrome ink is used in all other Sharpie ink colors.


