Selecting Optimal Green Palettes and Textures
The fastest way to make a monochromatic wreath look muddy is to use only one shade of green. Trust me on this, exploring diy shamrock wreath ideas will show you why you need at least three distinct tones like lime, emerald, and forest to define your shapes and create visual depth from across the room. The good news is, this principle works with any material. Pair a soft felt shamrock with a crisp cardstock accent and a reflective satin ribbon to achieve that layered texture. This mix of finishes prevents the whole piece from looking flat or plastic. You will notice the difference immediately when you place a matte element next to something with a slight sheen.
Evaluating Wreath Form Bases for Structure
Your base determines the final shape and whether your decor sags after a week on the door. For a traditional circular look, a sturdy straw or foam ring works perfectly for lightweight materials like paper or felt. If you are set on that iconic silhouette, a custom wire frame is your best bet, but you must reinforce any joints before adding weight. We tend to forget that vertical hanging puts more stress on the structure. Gathering supplies for your diy shamrock wreath ideas requires testing your loaded base before final assembly, especially if you are incorporating heavier wood or metal accents. This one check saves you from a drooping disappointment later.
1. Overlapping Felt Shamrock Layered Wreath
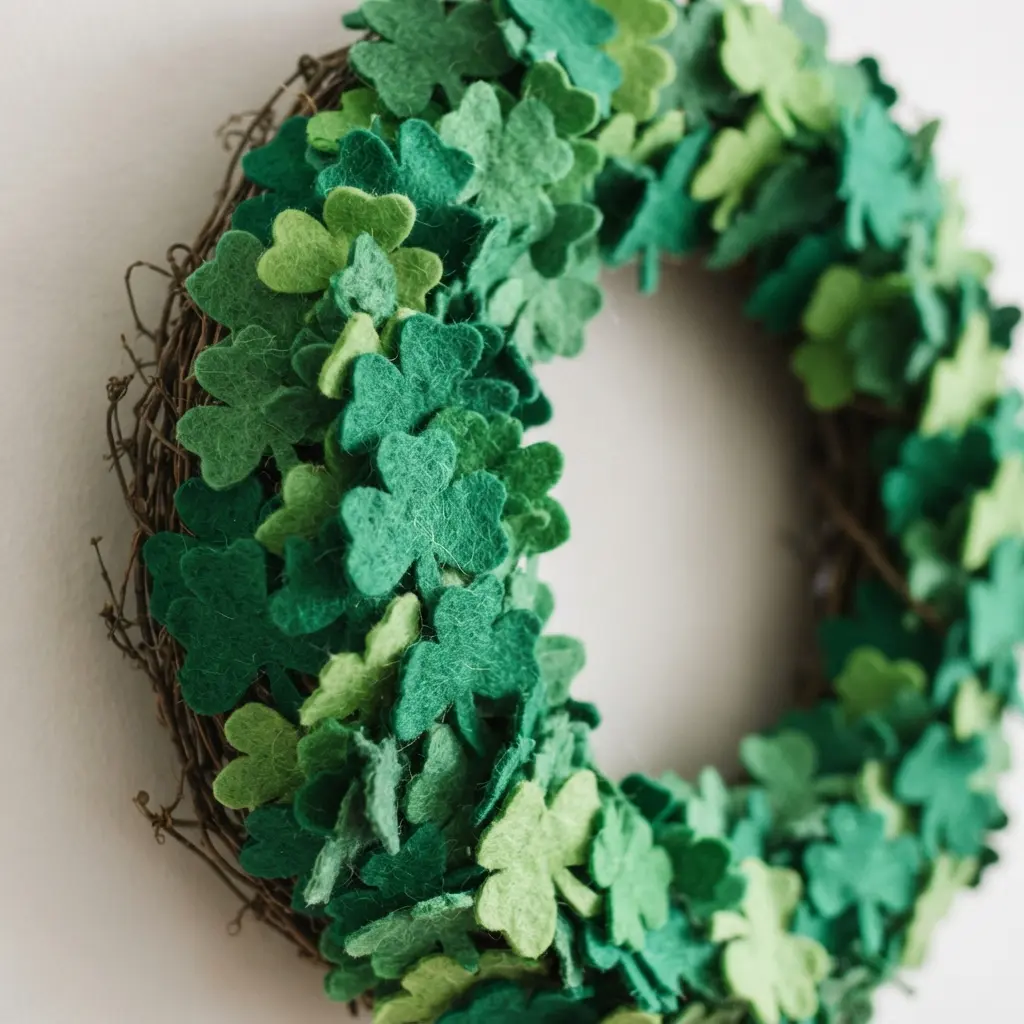
This one looks so intricate, but it is a wonderfully forgiving first project. You cut loads of shamrocks from different green felts and layer them on a styrofoam wreath form. The magic happens when you overlap them, mixing the shades as you go to create that lush, dimensional look. I love how the soft texture gives it such a cozy, handmade feel. Scanning through diy shamrock wreath ideas makes it clear why overlapping layers hide any little imperfections, and the variety of greens makes it pop. You need a proper shamrock template to trace before you start cutting to save time and keep your shapes consistent. Does that not look stunning when it is all filled in?
2. Rolled Green Felt Rosette Wreath

This one looks so intricate, but trust me, it is a wonderfully simple process. You will cut felt into spirals and roll them into little rosettes. Using two or three shades of green makes the result look lush and full of depth, just like real clover. Then, you simply glue each rosette tightly onto a wreath form. The key is to use a generous amount of hot glue at the base of each one to keep it from unraveling. Browsing popular diy shamrock wreath ideas shows how satisfying it feels to watch that soft, dimensional texture come together. I love this method because the handmade look is part of its charm. If you enjoy this kind of hands-on project, you will probably love crafting a festive shirt with a similar playful spirit. Your finished piece will feel wonderfully soft and full of personality.
3. Multi-Sized Paper Shamrock Punch Wreath

This one looks so intricate, but it is honestly one of the most satisfying projects to put together. The magic is in using different sized shamrock punches to create hundreds of paper shapes in various greens. You layer them, starting with the big ones and building up with the smaller ones, until your forme is a lush, textured cascade of clovers. It works so well because the varied sizes give you incredible depth without any complex folding or cutting. Collecting supplies for your diy shamrock wreath ideas means preparing way more than you think you might need. I love how you can fluff up the leaves for extra dimension. A hot glue gun is your best friend for attaching them quickly and securely. The technique is similar if you want to create a beautiful spring display later with different seasonal shapes. Trust me, the final effect is stunning and looks like you spent hours more than you thought.
4. Rustic Grapevine Shamrock Burlap Wreath

Who says rustic has to be simple? This piece combines the earthy charm of a grapevine wreath base with the cozy texture of burlap for a look that feels both festive and perfectly handmade. You will cut burlap into shapes and secure them to the vines with hot glue, then tuck in bits of moss or berries for extra texture. Many popular diy shamrock wreath ideas naturally lean into natural materials like grapevine to capture that warm, inviting feel. It works so well because it avoids looking like a store-bought decoration. My favorite tip is to arrange all your elements before you glue a single thing down. This lets you play with balance and get the placement right, which is helpful for a handmade wreath that you will want to show off. Once you are happy, a loop of jute twine makes the perfect hanger. Feeling inspired for more seasonal projects? You can use the same rustic approach for a clever holiday card wreath to display memories all year long.
5. Glittered Cardstock Shamrock Silhouette Wreath

Who says a wreath has to be made of leaves or flowers? This one swaps all that for pure sparkle. You will cut out dozens of glittered cardstock shamrocks in different sizes and shades, then layer them onto a simple cardboard ring. It sounds like a lot of cutting, but the effect is absolutely worth it. Gathering paper supplies for diy shamrock wreath ideas guarantees your door catches every bit of light in the most festive way. The real secret here is using varying shades of green to create depth. I love mixing in a touch of gold or white glitter paper for a few accent pieces. Cut more shapes than you think you need to secure that lush, full look. This makes a fantastic project to do while watching a movie, and you will be so proud of the shimmering result. If you enjoy this silhouette style, the same layering technique works beautifully for other shapes too. You can apply it when you learn how to make a star display for a different holiday. Isn’t it satisfying when one skill opens up so many possibilities?
6. Green Yarn Wrapped Shamrock Wreath

This is the coziest, most inviting display you will make. You take a simple wire or cardboard shape and wrap it tightly with green yarn. The trick is to keep your wraps neat and close together to avoid gaps. Wrapping yarn stands out among diy shamrock wreath ideas for delivering that unmatched cozy appeal. I love using a few different shades to give it lovely depth and texture. It is a wonderfully simple project that feels so personal and handmade. Once your base is wrapped, you can add a ribbon for hanging or get creative with some felt accents. If you enjoy projects that personalize your space, you might want to look into personalized initial designs for other seasons, too. The finished look is soft, festive, and totally charming on your door. Does that not feel like a perfect welcome?
7. Layered Green Deco Mesh Wreath

Ever wondered how those lush, full displays get their incredible texture? This one is all about the layers. You start by creating generous deco mesh poofs on a wire frame, using a darker green as your base. Then you weave in a second roll, maybe a lighter or metallic shade, building up volume and depth until it feels rich and full. Puffing out mesh transforms basic diy shamrock wreath ideas into voluminous, weather-ready displays. I love how this technique turns simple materials into something so dynamic and inviting. The key is not to hold back with the mesh. A common mistake is making the poofs too small, which leaves the piece looking flat. Trust me on this one, use more than you think you need and secure each section tightly. The result is a durable, weather-resistant decoration that brings a cheerful pop of green to your door for the whole season. It is a fantastic project if you have ever made an autumn pumpkin yarn hoop and want to try a different, fuller material.
8. Gold Coin Accented Shamrock Wreath

Ever want a display that looks like you found a stash? This gold coin version is pure festive magic. You start with a lush base of artificial shamrock sprays, layering them for a thick, lucky look. Then, the real fun begins as you hot glue those shiny plastic coins all over the greenery. Tucking in shiny coins elevates standard diy shamrock wreath ideas into something that truly looks magical. I love how the mix of green and gold creates such a cheerful, elegant vibe. It works because it combines two classic symbols of luck right on your door. A practical tip for this decoration is to have a solid plan for storing it after the season, exactly like you would for a beautiful DIY fall wreath.
9. Felt Ball Shamrock Cluster Wreath

This one looks so intricate, but the technique is wonderfully simple. You will glue three or four felt balls together to form each little shape, then cluster them all over your base. The result is a wonderfully dense, textured piece that feels handmade and full of life. Grouping rounded spheres highlights how simple diy shamrock wreath ideas often rely on bold repetition. I love how the different shades create depth. The key to its charm is that full, lush coverage, so do not be shy with your count. Trust me, buying extra is always the right move for a piece this festive. Once you have mastered this clustered style, you might find yourself wanting to try other dimensional projects, like a delightful fall acorn display. Does that not look stunning when you hang it up?
10. Ribbon Streamer Shamrock Embellished Wreath

Ever wanted a piece that looks like it is dancing in the breeze? This one is pure festive motion. Start by attaching plenty of wired ribbon streamers in varying shades to your base. The key is to cut lots of lengths and secure them so they flow outward. Attaching flowing ribbons turns static designs into dynamic, wind-catching masterpieces. Then, tuck in your favorite fabric or glitter accents among the streamers for that iconic pop of luck. I love this design because the ribbons bring a playful energy that flat decorations simply cannot match. It feels celebratory and full of life. For a stunning finish that carries the festive spirit into another season, you can explore how to build a stunning winter wonderland wreath with similar layered techniques. Trust me, the secret is in the volume. Use more ribbon than you think you need, and you will end up with a display that looks absolutely magical on your door.
Mounting and Protecting Indoor Door Decor
A simple over-the-door hanger is the safest choice for most interior doors, as it avoids any adhesive residue or nail holes. Once your piece is up, you want to protect it from dust and the occasional bump. For paper or felt elements, a light coat of clear craft spray applied in a well-ventilated area locks everything in without altering the color. Securing your favorite diy shamrock wreath ideas properly ensures your work lasts for multiple seasons. This step is quick but makes your effort endure. Keep your finished piece away from direct sunlight to prevent fading, and give it a gentle dusting with a soft brush every week or so to keep it looking fresh.
Conclusion
I hope looking through these options got your own creative wheels turning. The best part about making a display for St. Patrick’s Day is that it becomes a personal welcome sign, a little piece of handmade cheer that reflects your style. My one piece of advice is to gather more materials than you think you will need when planning diy shamrock wreath ideas, because a full, lush display always makes the happiest statement. Whether you choose the softness of felt or the sparkle of glitter, your front door is going to look fantastic. Pick your favorite project, set aside an afternoon, and enjoy the process of making something special for the season.
FAQs
Q: What is the best base to use for a beginner display?
A: A simple straw or styrofoam ring is excellent for beginners. These bases are sturdy and easy to attach materials to with pins or glue.
Q: How do I make my display look full and not sparse?
A: Prepare more materials than your initial estimate. Layer elements closely together and build volume from the outer ring inward to avoid gaps.
Q: Can I assemble a display without a hot glue gun?
A: Yes, you can use craft glue, floral wire, or pins. Some projects, like a yarn-wrapped design, require no glue at all.
Q: What type of green ribbon works best?
A: Wired ribbon is a great choice. It holds its shape well for bows and streamers, adding nice structure to your design.
Q: How can I store my display for next year?
A: Place it in a sturdy cardboard box or a dedicated storage container. Keep it in a cool, dry place to prevent colors from fading.